Table of Contents
Advertisement
Available languages
Available languages
Quick Links
LEDA401 Series
DESIGN LED FLOODLIGHT – 10 W
DESIGN LED-SCHIJNWERPER – 10 W
PROJECTEUR LED DESIGN – 10 W
PROYECTOR LED DE DISEÑO – 10 W
DESIGN LED-STRAHLER – 10 W
HOLOFOTE LED COM DESENHO MODERNO – 10 W
USER MANUAL
GEBRUIKERSHANDLEIDING
MODE D'EMPLOI
MANUAL DEL USUARIO
BEDIENUNGSANLEITUNG
MANUAL DO UTILIZADOR
4
10
16
22
28
34
Advertisement
Table of Contents

Subscribe to Our Youtube Channel
Related Manuals for Perel LEDA401 Series


Summary of Contents for Perel LEDA401 Series
- Page 1 LEDA401 Series DESIGN LED FLOODLIGHT – 10 W DESIGN LED-SCHIJNWERPER – 10 W PROJECTEUR LED DESIGN – 10 W PROYECTOR LED DE DISEÑO – 10 W DESIGN LED-STRAHLER – 10 W HOLOFOTE LED COM DESENHO MODERNO – 10 W USER MANUAL...
- Page 2 LEDA401 Series V. 03 – 14/05/2014 ©Velleman nv...
- Page 3 LEDA401 Series 2D Light Distribution Curve 2D-lichtverdelingscurve Courbe photométrique 2D Curva de distribución de la luz 2D 2D- Lichtverteilungskurve Curva de distribuição de luz 2D V. 03 – 14/05/2014 ©Velleman nv...
-
Page 4: Safety Instructions
Respect the local environmental rules. If in doubt, contact your local waste disposal authorities. Thank you for choosing Perel! Please read the manual thoroughly before bringing this device into service. If the device was damaged in transit, don't install or use it and contact your dealer. -
Page 5: General Guidelines
LEDA401 Series Caution: device heats up during use. Respect a minimum distance of 0.5 m between the device’s light output and any illuminated surface. 3. General Guidelines Refer to the Velleman® Service and Quality Warranty on the last pages of this manual. -
Page 6: Installation
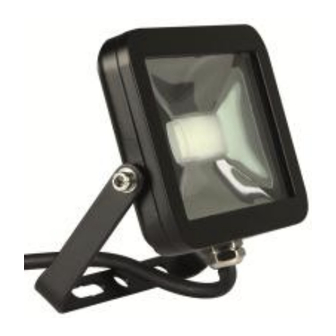
LEDA401 Series 5. Overview Refer to the illustrations on page 2 of this manual. mounting bracket protective glass hinge power cable 6. Installation Guidelines A qualified technician should install and service this device. The construction to which the device is attached should be able to support 4 times the weight of the device for one hour without deformation. -
Page 7: Cleaning And Maintenance
LEDA401 Series 4. Connect the power cable [4] to a suitable junction box (not incl.). Make sure the connection is properly earthed. Make sure there is no strain on the cable; leave sufficient slack. N = neutral, blue E = earth, yellow/green... -
Page 8: Technical Specifications
LEDA401 Series 8. Technical Specifications All models electrical data power LED module 8 x SMD 1.21 W LED total nominal power 12 W nominal voltage driver 210–240 Vac 50/60 Hz nominal voltage LED module 31 V power factor 0.56 energy consumption... - Page 9 (incorrect) use of this device. For more info concerning this product and the latest version of this manual, please visit our website www.perel.eu. The information in this manual is subject to change without prior notice.
- Page 10 LEDA401 Series GEBRUIKERSHANDLEIDING 1. Inleiding Aan alle ingezetenen van de Europese Unie Belangrijke milieu-informatie betreffende dit product Dit symbool op het toestel of de verpakking geeft aan dat, als het na zijn levenscyclus wordt weggeworpen, dit toestel schade kan toebrengen aan het milieu. Gooi dit toestel (en eventuele batterijen) niet bij het gewone huishoudelijke afval;...
-
Page 11: Algemene Richtlijnen
LEDA401 Series Opgelet: mogelijk gevaarlijke optische straling uitgezonden door dit product. Kijk nooit rechtstreeks in de lichtbron. Dit kan leiden tot oogletsels. Opgelet: dit toestel wordt zeer warm tijdens het gebruik. Zorg voor een minimumafstand van 0,5 m tussen de lichtuitgang van het toestel en het belichte oppervlak. - Page 12 LEDA401 Series met regelbare beugel levering met kabel zonder stekker (50 cm) geschikt voor gebruik buitenshuis (IP65) energie-efficiëntie-index (EEI): A+ 5. Omschrijving Raadpleeg de afbeeldingen op pagina 2 van deze handleiding. montagebeugel beschermglas scharnier voedingskabel 6. Installatie Richtlijnen ...
-
Page 13: Reiniging En Onderhoud
LEDA401 Series De lamp installeren 1. Dit toestel is niet uitgerust met een aan-uitschakelaar om het van het lichtnet los te koppelen. Isoleer het toestel elektrisch voor de installatie of onderhoud. 2. Gebruik de beugel [1] om de plaats van de montagegaten te bepalen. -
Page 14: Technische Specificaties
LEDA401 Series Dit toestel is niet uitgerust met een aan-uitschakelaar om het van het lichtnet los te koppelen. Isoleer het toestel elektrisch voor de installatie of onderhoud. Maak het toestel geregeld schoon met een vochtige, niet pluizende doek. - Page 15 LEDA401 Series kleur van de kleur van het model kleurtemperatuur behuizing licht LEDA401NW-B mat zwart LEDA401NW-SG zilvergrijs neutraalwit 4000 K LEDA401NW-W LEDA401WW-B mat zwart LEDA401WW-SG zilvergrijs warmwit 3000 K LEDA401WW-W Gebruik dit toestel enkel met originele accessoires. Velleman nv is niet aansprakelijk voor schade of kwetsuren bij (verkeerd) gebruik van dit toestel.
-
Page 16: Consignes De Sécurité
LEDA401 Series MODE D'EMPLOI 1. Introduction Aux résidents de l'Union européenne Informations environnementales importantes concernant ce produit Ce symbole sur l'appareil ou l'emballage indique que l’élimination d’un appareil en fin de vie peut polluer l'environnement. Ne pas jeter un appareil électrique ou électronique (et des piles éventuelles) parmi les déchets municipaux non sujets au tri... -
Page 17: Directives Générales
LEDA401 Series Attention : possibilité de rayonnements optiques dangereux émis par ce produit. Ne jamais regarder directement dans le faisceau lumineux de la lampe. Cela peut causer des lésions oculaires. Attention : l'appareil chauffe pendant l’usage. Respecter une distance minimum de 0,5 m entre la sortie lumière de l’appareil et la surface illuminée. - Page 18 LEDA401 Series avec câble sans terminaison (50 cm) convient à l'usage extérieur (IP65) indice d'efficience énergétique (EEI) : A+ 5. Description Se référer aux illustrations en page 2 de ce mode d'emploi. support de montage verre de protection charnière...
-
Page 19: Nettoyage Et Entretien
LEDA401 Series Installation du luminaire 1. Cet appareil n'est pas équipé d'un interrupteur ON/OFF pour le déconnecter du réseau électrique. Veiller à isoler électriquement le luminaire avant toute opération d'installation ou d'entretien. 2. Utiliser le support de montage [1] pour déterminer l'emplacement des trous de montage. -
Page 20: Spécifications Techniques
LEDA401 Series Cet appareil n'est pas équipé d'un interrupteur ON/OFF pour le déconnecter du réseau électrique. Veiller à isoler électriquement le luminaire avant toute opération d'installation ou d'entretien. Essuyer régulièrement l’appareil avec un chiffon humide non pelucheux. Éviter l’usage d’alcool et de solvants.
Need help?
Do you have a question about the LEDA401 Series and is the answer not in the manual?
Questions and answers