Table of Contents
Advertisement
CiMUKA EGG INCUBATORS
CT60 / CT120 / CT180
Please read the following instruction manual carefully before use.
IMPORTANT!
Keep this user manual safe for future reference.
USER MANUAL
CT Series Models ....................................2
Parts of Models ................................3-4
Quick Guide........................................5
Placement of Models...........................6
Ventilation.........................................6
Egg Handling.....................................7
Temperature/ Humidity Controller ...... 7-10
USB connection/ Room sensor.............11
TM
Auto-humidity control ...... 12
Humidity tray.....................................13
TM
Active Periodic Cooling (APC)..........18-21
Setting and Hatching ......................22-23
Incubation Records...........................24
Factors Affecting Hatchability..............24
Cleaning up and Service....................25
Safety Labeling................................25
Product Information...........................26
Recommended Incubation values.........27
30................14-17
CT SERIES
Advertisement
Table of Contents

Subscribe to Our Youtube Channel
Related Manuals for cimuka CT Series


Summary of Contents for cimuka CT Series
-
Page 1: Table Of Contents
CT60 / CT120 / CT180 Please read the following instruction manual carefully before use. IMPORTANT! Keep this user manual safe for future reference. USER MANUAL CT Series Models ….........2 Parts of Models ……………………….….3-4 Quick Guide……………………………..5 Placement of Models………………….…..6 Ventilation……………………………….….6 Egg Handling……………………………….7 Temperature/ Humidity Controller …... -
Page 2: Ct Series Models
CT SERIES CT Series Models Hatcher Models (H types) Setter Models (S types) CT60 S CT120 CT180 S CT180 H CT60 H CT120 H SH coded models include all turning and hatchery accessories. •... -
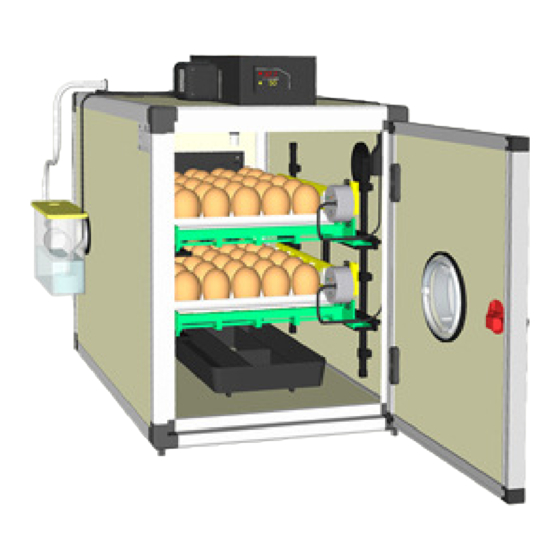
Page 3: Parts Of Models
CT SERIES Parts of Models 1 Water reservoir - 4lt ( 1 Gallon) 2 Humisonic Adapter 3 Control Panel 4 Temperature/Humidity sensor 5 Back Door for cleaning and service 6 Conturn 30 ( SH and S types) CS30 Hatchery Basket ( SH and H types) - Page 4 CT SERIES Accessories CT60 CT120 CT180 Conturn 2 pc 2 pc 4 pc 4 pc 6 pc 6 pc Conturn Adapter 1 pc 1 pc 1 pc 1 pc 1 pc 1 pc Distribution cable 1 pc 1 pc 1 pc...
-
Page 5: Quick Guide
CT SERIES Quick Guide - Remove all packing material carefully. - Please identify and check all parts of model. (see page 2-4 ) - Install Humisonic unit onto cabinet. (see page 12 ) Picture 1 - Fill humidity tray with water (1 channel). -
Page 6: Placement Of Models
CT SERIES 50cm (1,5ft) Placement of Model Your incubator must be located in an indoor area. The area must be clean and ventilated. Ideal distance from walls are 50 cm (1,5 ft). Do not place machine close to the walls of incubation room. The incubator should not be exposed to direct sunlight and not subject to splashes of water or high humid conditions. -
Page 7: Egg Handling
CT SERIES Egg Handling Eggs should be collected carefully and stored in good conditions up to setting. Quality of eggs is very important for hatchery results. Sanitizing eggs before storage is an effective method for killing or decreasing the amount of microorganisms in egg surface. You must know that sanitation processes does not only kill the bacteria, but it can also kill the chick embryo in the egg. - Page 8 CT SERIES To check temperature set point To check humidity set point When main screen is active, When main screen is active, 37.7 37.7 Press button and release Press button and release (f)tSEt – Temperature Set Screen hSEt– Humidity Set Screen...
- Page 9 CT SERIES Turn Light On Second sensor / Remaining time until next cooling When main screen is active, When main screen is active, Press button to light on and off. 37.7 37.7 Press button and release to check second Note: If you forget light on, controller will off bulb automatically after 3 minute.
- Page 10 CT SERIES User Menu Parameters US2: USB connected device Hold T + H together for 3 seconds to enter menu. no : no connected device 37.7 -Use T /H buttons to choose parameter th : second sensor connected ( room/calibration) ıot: iot module connected...
-
Page 11: Usb Connection/ Room Sensor
Sensor protective cover protective cover. Room sensor measures the temperature and humidity conditions of the room. Cimuka advanced temperature/ humidity controller provides best control of cabinet for room conditions and it has USB connection second sensor voice alarm function for high/low temperature/ humidity with user adjustable parameters. -
Page 12: Humisonic
CT SERIES Humisonic Automatic Humidity Control Humidity adjustment in incubators is for providing adequate water loss from eggs. Eggs need to lose between 13-16 % water depending on the species during incubation period. Weighing your eggs during incubation is the most reliable way to find proper humidity level for particular poultry species. -
Page 13: Humidity Tray
CT SERIES Humidity Tray Lowest humidity Highest humidity CAUTION! Never fill humidity trays with cold water. Use warm water close to incubator set point. Ideally 25-30 C (77-86 CAUTION! Humidity tray is part of the incubator. Always keep it in bottom, even empty. Advisable to fill one section of humidity tray during setting period and keep full for hatching period last 2-3 day. -
Page 14: Egg Turning / Conturn
CT SERIES Egg Turning / Conturn Adjustment Conturn 30 Base Conturn Egg Rack Rack Fixing Bar Rack Fixing Pins Main Turner Bar Conturn Motor Conturn Adapter Conturn 30 Adjustment Conturn 30 comes with 6 pre-installed racks, if you have bigger eggs than chicken eggs, racks must be adjusted. - Page 15 CT SERIES Conturn 30 base and main turner bar have holes for adjustments of racks. The standard unit includes 6 racks. The standard racks can be used for hens and smaller eggs without any change. Conturn 30 has 13 holes shown below.
- Page 16 CT SERIES CAUTION ! Never position eggs with the small end top. Eggs must be set small end down or horizontal. (sold separately) QT13- Quail Egg Tray QT13 Standard egg rack holds 9 pc quail egg, QT13 quail rack is placed directly onto the standard rack and can hold 13 quail eggs This can also be used for eggs smaller than an average quail egg.
- Page 17 CT SERIES GT03 – Goose Egg Rack (sold separately) GT03 The Goose Egg Rack is designed for large goose and peacock eggs. Goose eggs must be set in a horizontal position with the small end a bit lower (10 degrees). Periodic cooling of goose eggs is advised.
-
Page 18: Active Periodic Cooling (Apc)
2. Fan assistant cooling mode (for models with cooling fan) - reaches desired cooling temperature faster Cimuka ‘s advanced incubator controller lets user to change all parameters with Active Periodic Cooling (APC) menu to try and achieve best hatch rates for different poultry specie’s eggs. - Page 19 CT SERIES Active Periodic Cooling (APC) Menu -Hold U + D together 3 seconds to enter menu hct: max cooling time ( minute) 37.7 Heater /humidifier cut off time for clt mode. -Use T /H buttons to choose parameter. Maximum cooling time for clS mode.
- Page 20 CT SERIES The best hatch rates can be reached with which parameter combination is not known for different species yet. Cimuka Research Team is collecting data from our research center and customers for different APC applications. The table below outlines the recommended parameters for cooling for a set (clS) mode.
- Page 21 CT SERIES Active Periodic Cooling (APC) function behavior at “cooling for a set ( clS)” mode given in the graph for below parameters . APC Parameters Display settings Cooling mode Cooling start time Cooling cycle 24 h Cooling set point C ( set –adjusted data) -8.0 C...
-
Page 22: Setting And Hatching
CT series also offers Setter (S) and Hatcher (H) models in 3 different capacities from 60 to 180 chicken egg. Using a separate hatcher gives users advantage to work with exact temperature and humidity values for embryo needs. And also a separate hatcher decreases microbial cross contamination risk between eggs in setter and hatcher. - Page 23 CT SERIES Partial Setting SH type models can also be used by partial setting. To decrease egg storage times, eggs can be set partially and periodically SH type models can also be used by partial setting. To decrease egg storage times, eggs can be set partially and periodically SH type models can also be used by partial setting.
-
Page 24: Incubation Records
CT SERIES Incubation Records Keeping personal records is important for identifying performance issues or problems in incubation. Name of species, setting date, transfer date, first and last hatching date, number of eggs set, number of fertile eggs, number of chicks, and % hatchability should be recorded for future reference. -
Page 25: Cleaning Up And Service
Always check inside temperature and humidity of your model periodically with a high quality calibrated glass or electronic thermometer. If needed carry out a proper calibration procedure. Egg incubation requires dedication and oversight. Cimuka, or it’s distributors will not be heldresponsibleforloss of eggs or chicks under anycircumstances. -
Page 26: Product Information
CT SERIES Product Information Typical Egg CT60 CT120 CT180 Capacities Quail 108-156* 108-156* 216-312* 216-312* 324-468* 324-468* Partridge Pheasant Hen/ Duck Turkey/ Big Duck Goose-Peacock 24** 24** 48** 48** 72** 72** with optional QT13 - quail racks with optional GT03 - goose racks... -
Page 27: Recommended Incubation Values
CT SERIES Recommended Incubation Values Typical incubation periods and recommended temperature / humidity values for the species are given below. Incubation periods, temperature and humidity values can change for particular species. Please check literature or ask your dealer for information. - Page 28 CT SERIES Cimuka Kulucka Makineleri ve Ekipmanlari Ltd Sti. 1214.Sok. 21/3 Ostim Yenimahalle –ANKARA / TURKEY +90 (312) 349 55 66 – +90 (312) 348 1111 cimuka@cimuka.com www.cimuka.com...
Need help?
Do you have a question about the CT Series and is the answer not in the manual?
Questions and answers
Is there a way to change the temperature from Celsius to Fahrenheit