Advertisement
Quick Links
1
3
5
2
4
6
9
7
A
12 PCS
12 PCS
B
C
12 PCS
D
24
PCS
1 PC
E
8 PCS
F
2 PCS
G
2 PCS
H
14
13
15
14
12
6
8
9
7
8
11
10
I
8 PCS
J
6 PCS
K
2 PCS
CL
D
L
D CR
R
L
2 PCS
M
2 PCS
N
2 PCS
O
2 PCS
1
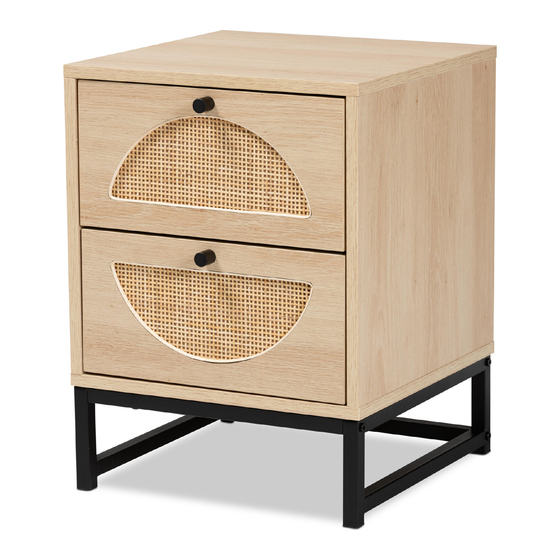
Attach the runners K to pieces 2 and 3 as shown. Use screws (D).
D
D
2
K
CL
D
2
Then attach pieces 2 and 3 to Top panel 1 using wooden dowels (F),
cam dowels (A) and cam locks (B).
3
B
A
F
D
D
K
CL
K
CR
3
K
CR
2
B
B
B
A
F
A
1
A
D
Advertisement

Subscribe to Our Youtube Channel
Related Manuals for Baxton Studio MUS005NATURALBLACK


Summary of Contents for Baxton Studio MUS005NATURALBLACK
- Page 1 Attach the runners K to pieces 2 and 3 as shown. Use screws (D). Then attach pieces 2 and 3 to Top panel 1 using wooden dowels (F), cam dowels (A) and cam locks (B). 12 PCS 8 PCS 12 PCS 6 PCS 12 PCS 2 PCS...
- Page 2 Slot in piece 5 to the built-in ridges. Then add piece 4 to the unit using wooden dowels (F), Screw (C). Attach piece 14 & 15 to piece 12 using screw (J) with tool (E). Attach piece 14 & 15 to piece 13 using screw (J) with tool (E).
- Page 3 Attach 2 section using screw (I) with tool (E). Attach pieces 6, 7 & 8 using screws (C). Make sure that the built-in ridge is facing inwards and at the bottom. ×2 On piece 10 & 11, attach the door handles (H) using screws (G). Slot piece 9 into the ridges.
- Page 4 Turn the drawer upside down. Line up the holes on the outside pieces Insert the drawers. with the holes on the runners (KDR & KDL), secure to the drawer using screws (D). Attach strip (M) using screw (L). Secure the unit to a wall in your chosen location using wall plugs (N) and screws (O).
Need help?
Do you have a question about the MUS005NATURALBLACK and is the answer not in the manual?
Questions and answers