Table of Contents
Advertisement
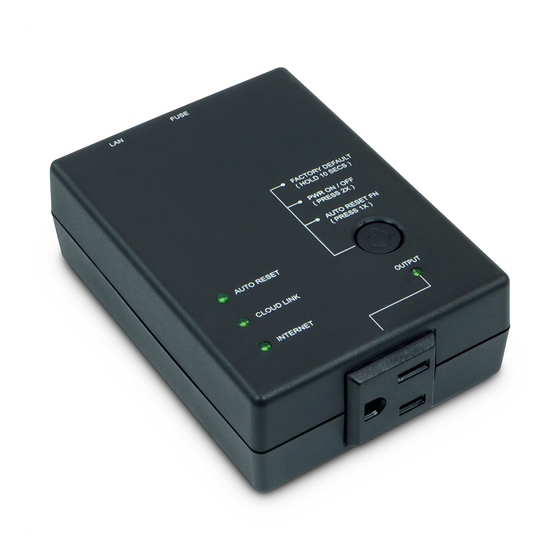
Single Outlet Remote Power Switch -
Overview:
The ezOutlet5 (EZ-72b) is the latest of the ezOutlet family for remote network
management. Functions include:
● Connect device to your LAN via Ethernet cable OR via Wi-Fi
● Auto-Reset upon loss of Internet or LAN device
● Remote control to turn power to the outlet on/ off or reset. This can be done
through the ezDevice application or through your Cloud4UIS account on any
computer with an Internet connection
● Schedule outlets to be turned on/ off or reset at specified Day(s)/ Time(s)
● Manage multiple devices from the same Cloud4UIS account (including EZ-22b,
EZ-72b UIS-522B, and UIS-622B
● Device 'owner' can share device(s) with other Cloud4UIS users OR transfer
device ownership to other Cloud4UIS users
Setup Guide (EZ-72b)
2
2
3
3
4
4
5
10
10
15
15
21
22
Advertisement
Table of Contents

Subscribe to Our Youtube Channel
Related Manuals for 5Gstore EZ-72b


Summary of Contents for 5Gstore EZ-72b
-
Page 1: Table Of Contents
Single Outlet Remote Power Switch - Setup Guide (EZ-72b) Overview: The ezOutlet5 (EZ-72b) is the latest of the ezOutlet family for remote network management. Functions include: ● Connect device to your LAN via Ethernet cable OR via Wi-Fi ● Auto-Reset upon loss of Internet or LAN device ●... -
Page 2: Locating Your Device Id & Serial Number
Locating your Device ID & Serial Number Both the Device ID and Serial Number can be found on the bottom of your EZ-72b. LED Indicators BLINKING Internet Internet connection is No Internet Internet is currently (IN) normal unstable Cloud Connected to... -
Page 3: Setting Up Your Device
EZ-72b. *If using a modem or router, allow time for the device to reboot and reconnect to the Internet. 4. Press the Power button 1x to Enable the Auto Reset - the EZ-72b is now ready to monitor your Internet and reset the outlet upon loss of connection. If you wish... -
Page 4: Configuring Your Ez-72B
Local Web Administration page ● Each EZ-72b can only be added to an account once . If you need to change that, you will need to remove the device from your account first and then another user... -
Page 5: Device Configuration Menu
Device Configuration Menu 1. Network a. Name (applies to Hostname below) : Name for your EZ-72b b. WAN IP : The WAN address the Switch is receiving from the router c. LAN IP : The Ethernet LAN address, if connected... - Page 6 2. Settings a. Outlet mode : Select between Auto Reset OR Manual Control i. Auto Reset : The EZ-72b will Ping a specific address or the default website addresses and when pings fail, power to the outlet will be reset ii.
- Page 7 This gives your equipment enough time to reboot. Default is 0 c. Power On Delay : This is the time the EZ-72b will take after a reset is triggered, before the outlet is powered back on. Default is 3 seconds d.
- Page 8 c. Time : Entered in 24-hour format. Set the time you want the event to take place 4. Ping Address a. Ping Site : If desired, enter a specific web address OR a local device’s IP address b. Mode : Select between Ping or HTTP. Ping is default setting...
- Page 9 5. Time a. System Time : Shows the current time and day of the week. b. Time Server : The server used to verify the time. Default is pool.ntp.org c. Update Interval : How frequently the system verifies the time. Default is 1 day d.
-
Page 10: Section 2: Configuration Via Cloud4Uis
Cloud Configuration Menu 1. Network a. Name : Change the name of your EZ-72b b. WAN IP : The WAN address the Switch is receiving from the router c. DHCP : Enabled by default. Shown disabled here. When disabled, you can use the IP it obtains via DHCP or enter something else . - Page 11 Manual Control : User must access the Mobile App or Cloud website to manually reset or power outlet ON/OFF b. Ping Delay : This is the time the EZ-72b will wait after a Reset, before it starts the ping tests. This gives your equipment enough time to reboot.
- Page 12 Power On Delay : This is the time the EZ-72b will take after a reset is triggered, before the outlet is powered back on. Default is 3 seconds. d. No. of Resets : This is the number of times the outlet will automatically reset when a time out is detected.
- Page 13 4. Ping Address a. Ping Site : If desired, enter a specific web address OR a local device’s IP address b. Mode : Select between Ping or HTTP. Default is Ping 5. Time a. Time : Shows current time b. Week : shows the current day c.
- Page 14 d. Update Time : How frequently the time gets updated e. Time Zone : Select your zone f. DST : Enable or Disable g. Begin : If DST is enabled, enter the date and time it begins h. End : If DST is enabled, enter the date and time it ends 6.
-
Page 15: Section 3: Configuration Via Local Web Administration Page
If you do not want/ need to use the mobile application or Cloud4UIS account, you will need to locate the IP address your router is assigning to the EZ-72b. This IP address will get you to its web administration page where you can configure settings. If you’re not familiar with how to locate IP addresses connected to your network, we recommend using either the Windows Utility program or LanScan for Mac users. - Page 16 c. Outlet Control : Status of the Outlet (ON or OFF), Turn Outlet (for outlet control), and Outlet Mode are displayed. d. Ping Response : Shows the Ping Address setting and its Response Time e. Cloud : Shows if the Cloud Link is enabled and connected to the server. f.
- Page 17 Reset. Configurable at Medium (default), Very Stable, Disable, or Intermittent c. Ping Delay After Power On : This is the time the EZ-72b will wait after a Reset, before it starts the ping tests. Default is 0 . Configurable between 0-1440 minutes (1 day) - e.g.
- Page 18 Power On Delay: This is the time the EZ-72b will take after a reset is triggered, before the outlet is powered back on ( e.g. Reset is triggered, outlet turns off, 3 seconds later outlet is turned back on ). Default is 3 seconds.
- Page 19 a. Select the day(s) you want the action to take place. b. Set the Hour and Minute you want the action to occur. This is done in 24 hour format. c. Select the outlet action (ON, OFF, RESET) Click Confirm to save any changes. 5.
- Page 20 7. Save/ Restore : This is where the user can manually restart the Switch and reset settings to factory default. Click Confirm to proceed with either action.
-
Page 21: Upgrading Firmware
Menu on the left 2. On the next screen, select Device Upgrade 3. Your EZ-72b should be listed here (along with any others you have saved). NOTE: If you don’t see your EZ-72b listed, click the circular arrow button at the top to refresh the page. -
Page 22: How To Remove Users And Reset Using Power Button
1. Press and hold the Power button for 10 seconds , then let go . The Internet and Cloud Link LEDs will turn off and the Auto Reset will blink. 2. Log into your Cloud4UIS account and Remove the EZ-72b from the Device List. a. Cloud4UIS website : Click the button at the top right, followed the button, then select the outlet you want to remove.
Need help?
Do you have a question about the EZ-72b and is the answer not in the manual?
Questions and answers