Table of Contents
Advertisement
Quick Links
4-419-630-11(1)
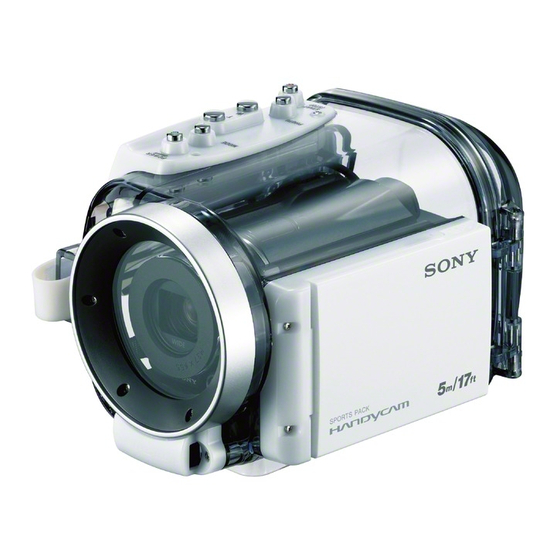
Waterproof Case
Sports Pack
Boîtier étanche
Caisson Sport
Operating Instructions
Mode d'emploi
Manual de instrucciones
SPK-HCH
© 2012 Sony Corporation Printed in Japan
Owner's Record
The model and serial numbers are located inside of the unit. Record the serial number
in the space provided below. Refer to them whenever you call upon your Sony dealer
regarding this product.
Model No. SPK-HCH Serial No.
Aide-mémoire
Les numéros de modèle et de série se situent dans l'appareil. Prendre en note le
numéro de série dans l' e space prévu di-dessous. Se reporter à ces numéros lors des
communications avec le détaillant Sony au sujet de ce produit.
Modèle no. SPK-HCH No de série
O-ring
Joint torique
Junta tórica
1
2
3
Bad example
Good example
Mauvais exemple
Bon exemple
Mal ejemplo
Buen ejemplo
Desiccant
Dessiccatif
Desecante
Telephoto button
Bouton Téléobjectif
Wide button
Botón de telefoto
Bouton Grand angle
Botón de gran angular
MODE button
Bouton MODE
PHOTO button
Botón MODE
Bouton PHOTO
Botón PHOTO
POWER button (Green)
Bouton POWER (vert)
Botón POWER (verde)
START/STOP button
(Red)
Bouton START/
Retractable
STOP (rouge)
mirror
Botón START/STOP
Miroir
(rojo)
rétractable
Espejo retráctil
Buckle
Front glass
Fermoir
Vitre avant
Hebilla
Vidrio frontal
Grip strap
Stereo microphone
Sangle
Microphone stéréo
Correa de la
Micrófono estéreo
empuñadura
Tripod mounting hole
Hook for shoulder strap
Filetage de pied photo
Crochet de bandoulière
Orificio de montaje en
Gancho para la correa
trípode
para el hombro
Cord holder
Support de cordon
Front body
Soporte del cable
Partie avant
Parte frontal del
Spacer*
cuerpo
Entretoise*
Espaciador*
Rear body
Partie arrière
Parte posterior
del hombro
Camera mounting shoe
Sabot de montage de
O-ring
caméscope
Joint torique
Zapata de montaje de
Junta tórica
cámara
Audio/Remote
plug
Fiche Audio/
Télécommande
Clavija de
control remoto
y audio
*1 Remove it to use this unit.
*1 La retirer avant d'utiliser ce boîtier.
*1 Retírelo para utilizar esta unidad.
OPEN
2
OPEN
4
Wide button
Bouton Grand angle
Botón de gran
angular
3
For the Customers in the U.S.A.
CAUTION
You are cautioned that any changes or modifications not expressly approved in this manual could void
your authority to operate this equipment.
NOTE:
This equipment has been tested and found to comply with the limits for a Class B digital device,
pursuant to Part 15 of the FCC Rules. These limits are designed to provide reasonable protection
against harmful interference in a residential installation. This equipment generates, uses, and can
radiate radio frequency energy and, if not installed and used in accordance with the instructions, may
cause harmful interference to radio communications.
However, there is no guarantee that interference will not occur in a particular installation. If this
equipment does cause harmful interference to radio or television reception, which can be determined
by turning the equipment off and on, the user is encouraged to try to correct the interference by one or
more of the following measures:
ˋ
Reorient or relocate the receiving antenna.
ˋ
Increase the separation between the equipment and receiver.
ˋ
Connect the equipment into an outlet on a circuit different from that to which the receiver is
connected.
ˋ
Consult the dealer or an experienced radio/TV technician for help.
For the Customers in Europe
Disposal of Old Electrical & Electronic Equipment (Applicable in the European
Union and other European countries with separate collection systems)
This symbol on the product or on its packaging indicates that this product shall
not be treated as household waste. Instead it shall be handed over to the applicable
collection point for the recycling of electrical and electronic equipment. By ensuring
this product is disposed of correctly, you will help prevent potential negative
consequences for the environment and human health, which could otherwise be
caused by inappropriate waste handling of this product. The recycling of materials
will help to conserve natural resources. For more detailed information about recycling
of this product, please contact your local Civic Office, your household waste disposal
service or the shop where you purchased the product.
< Notice for the customers in the countries applying EU Directives >
The manufacturer of this product is Sony Corporation, 1-7-1 Konan Minato-ku Tokyo, 108-0075
Japan. The Authorized Representative for EMC and product safety is Sony Deutschland GmbH,
Hedelfinger Strasse 61, 70327 Stuttgart, Germany. For any service or guarantee matters please
refer to the addresses given in separate service or guarantee documents.
This Sports Pack SPK-HCH (referred to below as "
ˎ
with the Sony digital HD video camera recorders and digital video camera recorders
(referred to below as "camera").
ˎ
This unit is waterproof so the camera can be used in the rain, at the beach, or
underwater.
HDR-PJ760V/PJ760/PJ740V/PJ720/PJ710V/PJ710/PJ600V/PJ600/PJ590V/PJ580V/
PJ580/PJ260V/PJ260/PJ50V/PJ50/PJ40V/PJ30V/PJ30/PJ20/PJ10,
HDR-CX760V/CX760/CX740V/CX730/CX720V/CX700V/CX700/CX690/CX590V/
CX580V/CX580/CX570/CX560V/CX560/CX550V/CX550/CX520V/CX520/
CX505V/CX500V/CX500/CX360V/CX360/CX12/CX11/CX7/CX6,
HDR-XR550V/XR550/XR520V/XR520/XR500V/XR500/XR350V/XR350/XR260V/
XR260/XR200V/XR200/XR160/XR155/XR150/XR106/XR105/XR101/XR100,
HDR-SR12/SR11/SR10/SR8/SR7/SR5,
DCR-SR220/SR210/SR88/SR85/SR78/SR75/SR68/SR65/SR58/SR55/SR46/SR45/
SR36/SR35
* The above camera models may not be available in all countries/regions.
ˎ
Useable at depths of up to 5 m (17 feet) underwater.
For how to use your camera with this unit, refer to the operating instructions of
ˎ
the camera.
ˎ
Before you start recording, make sure the camera is working correctly and there is
no water leakage.
Precautions on use
Remove the shoulder strap when using this unit near water or underwater. It may
ˎ
cause injury.
Do not subject the front glass to strong shock, as it may crack.
ˎ
ˎ
Avoid opening this unit at the beach or on the water. Preparation such as installing
the camera and changing the memory card should be done in a place with low
humidity and no salty air.
Do not throw this unit into the water.
ˎ
ˎ
Avoid using this unit in places with strong waves or getting splashed such as in a
strong current, in a river with different levels, or next to a waterfall.
Avoid using this unit under the following situations:
ˎ
ˋ
in a very hot or humid place.
ˋ
in water hotter than 40 ˚C (104 ˚F).
ˋ
at temperatures lower than 0 ˚C (32 ˚F).
In these situations moisture condensation or water leakage may occur and damage
the equipment.
Avoid installing the camera in a humid place. Installing in a humid place will lead to
ˎ
condensation.
ˎ
Use this unit for no longer than one hour at a time in temperatures above 35 ˚C (95
˚F).
Do not leave this unit under direct sunlight for a long period of time. If you cannot
ˎ
avoid leaving this unit under direct sunlight, be sure to cover this unit with a towel or
other protection.
If sun oil gets on this unit, be sure to wash it off thoroughly with lukewarm water.
If sun oil is left on this unit, the surface of this unit may become discolored or
damaged (cracks may appear on the surface).
Water leakage
If water happens to leak in, stop exposing this unit to water immediately.
If the camera gets wet, take it to the nearest Sony dealer immediately. Repair costs
ˎ
must be borne by the customer.
ˎ
In the unlikely event that a malfunction of this unit causes damage due to water
leakage, Sony does not guarantee against damages to the equipment contained in it
(camera, battery pack, etc.) and the recorded contents, nor expenses entailed in the
photography.
Handling the O-ring
O-ring
The O-ring ensures the waterproof qualities of this unit or other equipment. (See
illustration )
O-ring maintenance is very important. Failure to carry out O-ring
maintenance according to the instructions may lead to water leakage and
cause this unit to sink.
Handling the O-ring
Avoid fitting the O-ring in dusty or sandy locations.
1 Remove the O-ring that fitted to this unit. ( - 1)
To remove the O-ring, press it and slide it in the direction of the arrow as
ˎ
illustrated. The O-ring has enough slack to be able to be removed easily.
ˎ
Be careful not to scratch the O-ring with your fingernails.
Do not use a pointed or metal object to remove the O-ring. This kind of object
ˎ
may scratch or damage this unit groove or O-ring.
2 Inspect the O-ring.
1
Carefully check that there is
ˎ
1
any dirt, sand, hair, dust, salt,
1
threads, etc. on the O-ring. If
found, be sure to wipe off with a
soft cloth or tissue paper.
Dirt
Lightly run your fingertip around the O-ring to check for any invisible dirt.
ˎ
Be careful not to leave any cloth or tissue paper fibers on the O-ring after wiping it.
ˎ
ˎ
Check the O-ring for cracks,
skewing, distortion, fine
splitting, scratches, embedded
sand, etc. Replace the O-ring if
you find any of these.
Cracks
3 Inspect the surface that contact with the O-ring on the rear side of this unit.
Carefully remove any grains of sand or hardened salt that get into the groove.
4 Inspect the contact surface with the O-ring on the front side of this unit in
the same way.
5 Coat the O-ring with supplied grease.
Use your fingertips to thinly coat the entire surface of the O-ring with
ˎ
drop of grease. (-2)
ˎ
Make sure there is always a thin coating of grease on the surface of the O-ring.
Grease protects the O-ring and prevents wear.
Grease
Only use the grease supplied. Other kinds of grease will damage the O-ring and
cause water leaks.
6 Fit the O-ring into the groove on the rear side of this unit.
Fit the O-ring evenly into the groove paying attention to the following points:
Check for dirt on the O-ring.
–
–
Check that the O-ring is not twisted or protruding. (
–
Do not pull hard on the O-ring.
Final check
Check the O-ring again for any dirt, scratches or twisting, etc.
A loose or sandwiched O-ring, or sand or dirt on the O-ring may cause leaks
underwater.
Be sure to check the O-ring before use.
How to check for water leaks
Before installing the camera, always close this unit and immerse it in water to make sure
no water leaks in.
O-ring serviceable life
The serviceable life of the O-ring varies with frequency of use of this unit and
conditions. Generally, it is about one year.
After replacing, check that no water leaks in.
Desiccant
Insert one new desiccant into this unit 1 to 2 hours before recording. Put the desiccant
in the camera mounting shoe rail space inside the front body. (See illustration ) Be
careful not to catch the desiccant with the camera mounting shoe. Keep the remaining
desiccant in its original bag, and keep the bag firmly closed. Do not return the desiccant
to the bag after use, or you will reduce the effect of the unused desiccant. If you fully dry
the desiccant, it can be used about 200 times. Use a new desiccant to increase the anti-
fogging effect. Do not leave the desiccant in this unit after use.
O-ring and grease
You can obtain the O-ring and grease at the nearest Sony dealer.
O-ring (model No. 3-098-143-01)
Grease (model No. 2-582-620-01)
Maintenance
ˎ
After recording in a location with a sea breeze, wash this unit thoroughly in fresh
water with the buckles fastened to remove salt and sand, then wipe with a soft dry
cloth. It is recommended that you submerge this unit in fresh water for about 30
minutes. If salt is left on it, metal portions may become damaged or rusty and cause
water leakage. Be careful not to hit this unit with other equipment when submerging
this unit in fresh water. When the water pressure is low and the bend of the O-ring is
Telephoto button
small, an excessive impact may cause water leakage.
Bouton Téléobjectif
If sun oil gets on this unit, be sure to wash it off thoroughly using lukewarm water.
ˎ
Botón de telefoto
Wipe the inside of this unit with a soft dry cloth. Do not wash it with water.
ˎ
Be sure to perform the above maintenance each time you use this unit.
Do not use any type of solvent such as alcohol, benzine or thinner for cleaning, as
this might damage the surface finish of this unit.
When storing this unit (See illustration )
Insert the plug part of the Audio/Remote plug into the plug jack of the camera
ˎ
mounting shoe as illustrated.
Prevent dust from collecting on the O-ring.
ˎ
Attach the spacer supplied with this unit to prevent wear of the O-ring.
ˎ
Close this unit without fastening the buckles to prevent wear of the O-ring.
ˎ
ˎ
Avoid storing this unit in a cold, very hot or humid place, or together with
naphthalene or camphor, as these conditions might damage the unit.
Troubleshooting
Symptom
Cause
The sound is not
The Audio/Remote plug is
recorded.
not connected.
There are drops of
There are scratches or
ˎ
water inside this
cracks on the O-ring.
unit.
The O-ring is not set
ˎ
correctly.
The recording
The Audio/Remote plug is
ˎ
and playing back
not connected.
function does not
work.
The power does
ˎ
Some camera models take
not turn on.
a few seconds to be ready
to record after being turned
on. This is not malfunction.
Soon after being turned off,
ˎ
the power does not turn on.
The LED lamp on some
ˎ
camera models blinks for a
few seconds after the power
is turned off.
The power does
On some camera models, the
not turn off.
LED lamp blinks for a few
seconds before turning off.
This is not a malfunction.
There seems to be
This unit is designed so that
water in this unit.
water can flow into and out
of the space illustrated. (See
illustration )
The button of
There is an O-ring inside this
this unit does not
unit's button.
depress easily,
feels caught, or
does not return
quickly.
this unit") is exclusively for use
The zooming
The Audio/Remote plug
function does not
(cable) of this unit is
work.
interfering to the zoom lever
of the camera.
Specifications
Pressure-resistance
To a depth of up to 5 m (17 feet) underwater
Dimension
Approx. 159 mm × 148 mm × 220 mm (w / h / d) (6 3/8 inches × 5 7/8 inches × 8 3/4
inches)
Mass
Approx. 960 g (2 lb 2 oz) (only sports pack)
Included items
Waterproof Case (1), Shoulder strap (1), Camera mounting shoe (F-2 (1)/H (1)/I-2 (1)/
L (1)/M (1)), Tripod screw plate (1), Reflex prevention ring (M30 × Ø 47 (1)/M30 ×
Ø 50 (1)/M30 × Ø 58 (1)/ M30 × Ø 62 (1)/M37 × Ø 49 (1)/M37 × Ø 55 (1)/M52 × Ø
58 (1)), Grease (1), Spacer (1), Desiccant (1), Set of printed documentation
Design and specifications are subject to change without notice.
Using this unit
Preparation
1 Install the camera in this unit.
Refer to separate volume "Sports Pack Preparation Guide" to install the camera.
2 Open the retractable mirror. (-2)
You can record while watching the reflection in the retractable mirror.
Open the retractable mirror by holding the upper and lower of the mirror cover
with "OPEN" part as a mark.
Open the wings and insert the projections into their holes.
To close the retractable mirror
Release the projections on both wings, and close the lower wing first.
3 Turn on this unit.
Press the POWER button (green) of this unit to turn on the camera and this unit.
The camera is set to the movie recording mode.
Notes
If the camera is left in Standby mode for five minutes or more, the camera turns off
automatically to prevent the battery pack from running out.
You can change the "A.SHUT OFF" setting of this function to [Never] on the camera.
For details, refer to the operating instructions of your camera.
To return to Standby mode, turn the POWER button (green) to "ON" again.
4 Set the mode of the camera. (-4)
Press the MODE button of this unit to switch the mode of the camera in the
following order.
Movie recording
mode
Press the MODE button of this unit while checking the LCD screen of the camera in
the retractable mirror until the desired mode is displayed.
For details about each camera mode, refer to the operating instructions of your
camera.
Some camera models enable you to record movies in the still image recording mode or
to record still images in the movie recording mode.
For details, refer to the operating instructions of the camera.
Notes
When you press the MODE button, the mode of the camera without a photo button
ˎ
switches in the following order.
Movie recording
mode
Do not press the MODE button while recording a movie. If you press the MODE
ˎ
button, the camera may stop recording the movie and switch to still image recording.
Recording
Before using the camera underwater, first take this unit to a depth of about 1 m
(3.3 feet) and check that the camera is operating properly and that this unit is not
leaking, then commence your using.
Recording movies
1 Press the MODE button of this unit to set the camera to the mode for
recording movies.
2 Press the START/STOP button (red).
Recording starts.
To stop recording
Press the START/STOP button (red).
If you press the START/STOP button (red) once more, recording will start again.
To turn off the power
Stop recording before turning the POWER button (green) to "OFF. "
Sand
Hair
Zooming (See illustration )
The zoom speed is changed in two steps.
Press the zoom button gently to zoom more slowly and press it longer to zoom faster.
Press the wide button to zoom out.
ˎ
Press the telephoto button to zoom in.
ˎ
Recording still images
1 Press the MODE button of this unit to set the camera to the mode for
Distortion
Scratches
recording still images.
2 Lightly press the PHOTO button.
The green mark at the top of the LCD screen stops flashing and remains on. You can
now record a still image.
* No image is recorded yet.
3 Firmly press the PHOTO button.
a small
The image shown on the screen is recorded.
Some models have a Dual Rec function. For details, refer to the operating
instructions of your camera.
Notes for recording
ˎ
Strong external light may be reflected off the edge of the camera lens and
recorded. Check for such reflection before shooting.
-3)
You cannot use Nightshot or other function for shooting in the dark with this
ˎ
unit.
ˎ
You cannot use the camera's built-in light, flash or tele-macro functions with this
unit.
You cannot use the Face Detection function, Auto Back Light function, Spot
ˎ
(Metering, Focus) function, internal microphone and its related functions of the
camera with this unit.
ˎ
You cannot use the GPS that identifies the location of the camera with this unit.
Playing back
You can playback the recorded image with your camera after removing from this unit
and disconnecting the Audio/Remote plug from the camera.
When using the camera that included the supplied remote commander, you can play
back an image without removing the camera from this unit by pointing the supplied
remote commander toward the remote sensor. You cannot hear sound. Use the remote
commander for all other functions. For details, refer to the operating instructions of the
camera.
Notes
You cannot use the function related remote commander with a camera that is
ˎ
supplied with no remote commander.
If "Remote Commander" in the menu of your camera is set to "OFF, " change it to "ON. "
ˎ
ˎ
You cannot use the remote commander in underwater or rain.
You cannot use the projector function of the camera with this unit.
ˎ
Removing the camera
1 Press the POWER button (green) to turn off the camera.
2 Release the buckles and open the rear body.
For details, refer to step 1 of " Selecting the Camera Mounting Shoe" in separate
volume "Sports Pack Preparation Guide".
Notes
Before opening this unit, wipe any moisture off this unit and yourself. Do not allow
water onto the camera.
3 Pull out the camera mounting shoe. (-3)
Hold in the knob on one side of the camera mounting shoe to release the lock.
Slide the camera out slowly while holding the knob.
4 Remove the camera until the plugs connected to it are just out of this unit,
and then disconnect the plugs from the camera.
Notes
Make sure you disconnect the Audio/Remote plug properly by holding the plug part.
Do not disconnect the plug by holding the cord part, or pull the camera mounting
shoe out while the plug is connected. Doing so may damage the plug or the camera's
jack.
5 Detach the camera mounting shoe.
À l'intention des clients aux É.-U.
AVERTISSEMENT
Par la présente, vous êtes avisé du fait que tout changement ou toute modification ne faisant pas
l' o bjet d'une autorisation expresse dans le présent manuel pourrait annuler votre droit d'utiliser
l'appareil.
Note
L'appareil a été testé et est conforme aux exigences d'un appareil numérique de Classe B,
conformément à la Partie 15 de la réglementation de la FCC.
Ces critères sont conçus pour fournir une protection raisonnable contre les interférences
nuisibles dans un environnement résidentiel. L'appareil génère, utilise et peut émettre des
fréquences radio; s'il n' e st pas installé et utilisé conformément aux instructions, il pourrait
Corrective Actions
provoquer des interférences nuisibles aux communications radio.
Connect the Audio/Remote plug to
Cependant, il n' e st pas possible de garantir que des interférences ne seront pas provoquées dans
the A/V jack, A/V OUT jack or A/V
certaines conditions particulières. Si l'appareil devait provoquer des interférences nuisibles à la
remote jack on the camera.
réception radio ou à la télévision, ce qui peut être démontré en allumant et éteignant l'appareil,
il est recommandé à l'utilisateur d' e ssayer de corriger cette situation par l'une ou l'autre des
Replace the O-ring with a new one.
ˎ
mesures suivantes :
ˋ
Réorienter ou déplacer l'antenne réceptrice.
Check the method of O-ring
ˎ
ˋ
Augmenter la distance entre l'appareil et le récepteur.
attachment.
ˋ
Brancher l'appareil dans une prise ou sur un circuit différent de celui sur lequel le récepteur est
branché.
Connect the Audio/Remote plug to
ˎ
ˋ
Consulter le détaillant ou un technicien expérimenté en radio/téléviseurs.
the A/V jack, A/V OUT jack or A/
Pour les clients en Europe
V remote jack on the camera.
ˎ
Check that the camera is ready
before starting to record.
Allow this unit to sit for at least a
ˎ
few seconds after the LCD screen
of the camera turns off and then
turn this unit on again.
Leave the camera for at least two
ˎ
seconds after the LED lamp turns
off and then turn the camera on
< Avis aux consommateurs des pays appliquant les Directives UE >
again.
Le fabricant de ce produit est Sony Corporation, 1-7-1 Konan Minato-ku Tokyo, 108-0075
Do not operate the camera until its
Japon. Le représentant autorisé pour les questions de compatibilité électromagnétique (EMC)
LED lamp turns off.
et la sécurité des produits est Sony Deutschland GmbH, Hedelfinger Strasse 61, 70327 Stuttgart,
Allemagne. Pour toute question relative au SAV ou à la garantie, merci de bien vouloir vous
référer aux coordonnées contenues dans les documents relatifs au SAV ou la garantie.
Ce caisson sport SPK-HCH (appelé ci-dessous «
This space is sealed from the inside.
ˎ
exclusivement avec les caméscopes numériques HD et les caméscopes numériques
Drops of water in this space do not
indicate a malfunction.
Sony (appelés ci-dessous « le caméscope »).
ˎ
Ce boîtier étanche permet d'utiliser le caméscope sous la pluie, à la plage ou sous l' e au.
HDR-PJ760V/PJ760/PJ740V/PJ720/PJ710V/PJ710/PJ600V/PJ600/PJ590V/PJ580V/
This may occur when you use this
PJ580/PJ260V/PJ260/PJ50V/PJ50/PJ40V/PJ30V/PJ30/PJ20/PJ10,
unit after a long period of disuse.
HDR-CX760V/CX760/CX740V/CX730/CX720V/CX700V/CX700/CX690/CX590V/
This is not a malfunction.
CX580V/CX580/CX570/CX560V/CX560/CX550V/CX550/CX520V/CX520/
CX505V/CX500V/CX500/CX360V/CX360/CX12/CX11/CX7/CX6,
HDR-XR550V/XR550/XR520V/XR520/XR500V/XR500/XR350V/XR350/XR260V/
XR260/XR200V/XR200/XR160/XR155/XR150/XR106/XR105/XR101/XR100,
HDR-SR12/SR11/SR10/SR8/SR7/SR5,
Check that the Audio/Remote plug is
DCR-SR220/SR210/SR88/SR85/SR78/SR75/SR68/SR65/SR58/SR55/SR46/SR45/
not interfering to the zoom lever.
SR36/SR35
If interfering, correct the wiring of
* Les modèles de caméscopes mentionnés ci-dessus ne sont pas forcément
the Audio/Remote plug to resolve
interfering.
commercialisés dans tous les pays ou toutes les régions.
Utilisable sous l' e au jusqu'à une profondeur de 5 mètres.
ˎ
Pour la façon d' e mployer votre caméscope avec ce boîtier, reportez-vous au mode
ˎ
d' e mploi du caméscope.
Avant la prise de vue, assurez-vous que le caméscope fonctionne correctement et
ˎ
que l' e au ne s'infiltre pas à l'intérieur du caisson sport.
Précautions d'emploi
ˎ
Retirez la bandoulière lorsque vous utilisez ce boîtier près de l' e au ou sous l' e au. Elle
peut causer des blessures.
Ne soumettez pas la vitre avant à des chocs trop forts, car elle pourrait se briser.
ˎ
ˎ
Évitez d' o uvrir ce boîtier sur la plage ou sur l' e au. Les préparatifs, tels que la mise en
place du caméscope et le remplacement de la carte mémoire doivent être effectués à
l'abri de l'humidité et de l'air salin.
Ne pas jeter ce boîtier dans l' e au.
ˎ
Évitez d'utiliser ce boîtier à un endroit exposé à de fortes vagues ou aux projections
ˎ
d' e au, par exemple dans une rivière au courant puissant ou au dénivelé important, ou
près d'une cascade.
Évitez d'utiliser ce boîtier dans les situations suivantes :
ˎ
ˋ
à un endroit très chaud ou humide
ˋ
dans une eau à plus de 40°C
ˋ
à des températures inférieures à 0°C
Dans de telles situations, le matériel peut être endommagé par la condensation
d'humidité ou les infiltrations d' e au.
Évitez d'installer le caméscope à un endroit humide. De la condensation risque de se
ˎ
former à l'intérieur.
Ne pas utiliser ce boîtier pendant plus d'une heure à une température supérieure à
ˎ
35°C.
Ne pas laisser ce boîtier en plein soleil pendant longtemps. Si ce boîtier doit rester
ˎ
longtemps exposé au soleil, veillez à le recouvrir d'une serviette ou d'un tissu
quelconque.
Si de l'huile solaire devait tomber sur ce boîtier, prenez soin de l' e nlever avec de l' e au
tiède. Si de l'huile solaire reste sur ce boîtier, la surface de celui-ci peut se décolorer
ou être endommagée (apparition de craquelures à la surface).
Infiltration d'eau
Si de l' e au devait pénétrer dans ce boîtier, retirez-le immédiatement de l' e au.
Si le caméscope devait être mouillé, portez-le immédiatement au revendeur Sony le
ˎ
plus proche. Les frais de réparation seront à la charge du client.
ˎ
Si une défectuosité du boîtier devait provoquer des dégâts à la suite d'une infiltration
d' e au, Sony ne garantira pas les dégâts causés à l'appareil qu'il contient (caméscope,
batterie, etc.) ni au contenu de la prise de vue ou les frais liés à la prise de vue.
Entretien du joint torique
Still image
Video playback
recording mode
mode
Joint torique
Le joint torique assure l' é tanchéité de ce boîtier et de l'appareil qu'il contient. (Voir
l'illustration )
L'entretien du joint torique est très important. De l'eau risque de pénétrer
à l'intérieur de ce boîtier et de le faire couler si vous ne nettoyez pas
correctement le joint torique.
Entretien du joint torique
Évitez de mettre le joint torique en place à un endroit poussiéreux ou sableux.
1 Retirez le joint torique de ce boîtier. ( - 1)
Pour retirer le joint torique, appuyez légèrement dessus, puis faites-le glisser
ˎ
Movie recording
Video playback
dans le sens de la flèche, comme indiqué sur l'illustration. Le joint torique est
mode
mode
suffisamment souple pour être facilement retiré.
ˎ
Veillez à ne pas abîmer le joint torique avec les ongles.
N'utilisez pas d' o bjet pointu ou métallique pour retirer le joint torique. Ce type
ˎ
d' o bjet risque de rayer ou d' e ndommager la rainure de ce boîtier ou le joint torique.
2 Inspectez le joint torique.
Vérifiez avec soin la présence de
ˎ
saletés, grains de sable, cheveux,
poussière, sel, fils, etc. sur le
joint torique. Si nécessaire,
essuyez-les avec un chiffon doux
ou un mouchoir en papier.
Passez légèrement votre doigt sur le joint torique pour repérer les saletés invisibles.
ˎ
ˎ
Veillez à ne pas laisser de fibres de tissu ou de papier sur le joint torique après l'avoir
nettoyé.
Assurez-vous que le joint torique
ˎ
ne présente aucune craquelure,
déformation, irrégularité,
coupure, éraflure, incrustation
de sable, etc. Remplacez-le s'il
en présente.
3 Inspectez la surface en contact avec le joint torique à l'arrière de ce boîtier.
Retirez avec soin les grains de sable ou de sel s'incrustant parfois dans la rainure.
4 Inspectez de la même façon la surface en contact avec le joint torique à l'avant
de ce boîtier.
5 Mettez de la graisse fournie sur le joint torique.
ˎ
Avec le bout du doigt, étalez
toute la surface du joint torique. (-2)
Assurez-vous qu'une fine couche de graisse recouvre toujours la surface du joint
ˎ
torique.
La graisse protège le joint torique et l' e mpêche de s'user.
Graisse
Utilisez seulement la graisse fournie. Tout autre type de graisse peut endommager
le joint torique et causer des infiltrations d' e au.
6 Insérez le joint torique dans la rainure à l'arrière de ce boîtier.
Insérez le joint torique uniformément dans la rainure en prêtant attention aux points
suivants :
ˋ
Assurez-vous qu'il n'y a pas de saleté sur le joint torique.
ˋ
Assurez-vous que le joint torique n' e st pas tordu ou ne ressort pas. (
ˋ
Ne tirez pas fort sur le joint torique.
Traitement des appareils électriques et électroniques en fin de vie
(Applicable dans les pays de l'Union Européenne et aux autres pays
européens disposant de systèmes de collecte sélective)
Ce symbole, apposé sur le produit ou sur son emballage, indique que ce
produit ne doit pas être traité avec les déchets ménagers. Il doit être remis à
un point de collecte approprié pour le recyclage des équipements électriques
et électroniques. En vous assurant que ce produit sont mis au rebut de façon
appropriée, vous participez activement à la prévention des conséquences
négatives que leur mauvais traitement pourrait provoquer sur l' e nvironnement
et sur la santé humaine. Le recyclage des matériaux contribue par ailleurs à la
préservation des ressources naturelles. Pour toute information complémentaire
au sujet du recyclage de ce produit, vous pouvez contacter votre municipalité,
votre déchetterie locale ou le point de vente où vous avez acheté le produit.
ce boîtier ») est destiné à être utilisé
Saleté
Sable
Cheveu
Craquelures Irrégularité
Rayures
une petite goutte de graisse en fine couche sur
-3)
(Suite à la page arrière)
Advertisement
Table of Contents

Related Manuals for Sony SPK-HCH


Summary of Contents for Sony SPK-HCH
- Page 1 Owner’s Record The model and serial numbers are located inside of the unit. Record the serial number in the space provided below. Refer to them whenever you call upon your Sony dealer regarding this product. Model No. SPK-HCH Serial No.
- Page 2 Rétroéclairage auto, la fonction Ponctuelle (Mesure de la lumière, Mise au point) Vous pouvez vous procurer un joint torique et de la graisse auprès du revendeur Sony le ni le microphone interne et les fonctions associées du caméscope avec ce boîtier.
Need help?
Do you have a question about the SPK-HCH and is the answer not in the manual?
Questions and answers