Table of Contents
Advertisement
Quick Links
Advertisement
Table of Contents

Related Manuals for Skydio X2E


Summary of Contents for Skydio X2E
- Page 1 Quick Reference Guide Skydio X2E-Color Skydio X2E-Color/Thermal Updated: June 16, 2022 WARNING: Please read all documentation provided with your Skydio X2E including but not limited to the Safety & Operating Guide: www.skydio.com/getstartedX2...
- Page 2 This document contains instructions from the original product manufacturer Skydio, Inc.
-
Page 3: Table Of Contents
Table of contents Hardware overview Skydio X2E Skydio Enterprise Controller Safety Guidelines Pre-flight Charge Skydio X2E Skydio Enterprise Controller Deploy Skydio X2E Skydio Enterprise Controller Pairing devices Flight Joystick controls Flight controls Launch Return Land Obstacle avoidance GPS night flight... -
Page 4: Hardware Overview
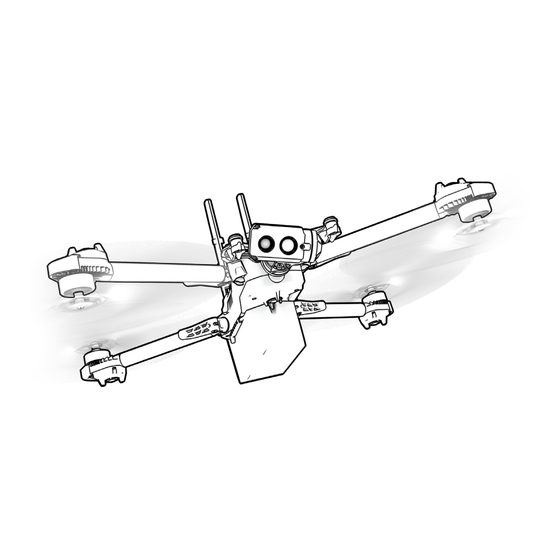
(6) counter-clockwise (6) 2. Navigation camera (6) 7. Arm (4) 3. Gimbal 8. Arm clamp (4) 4. Motor hub and lights (4) 9. Antennas 5. Propeller hub Skydio X2E Color variant Skydio X2E Color/Thermal variant Skydio X2E Quick Reference Guide... - Page 5 18. Gimbal pitch motor 19. Gimbal roll motor 20. Cooling inlet 21. Skydio X2E label WARNING: Skydio X2E is not weatherproof. Do not operate in any precipitation, including rain, fog, snow, or similar environments. © 2022 Skydio, Inc. All rights reserved.
-
Page 6: Skydio Enterprise Controller
HARDWARE OVERVIEW Skydio Enterprise Controller 1. Left joystick 8. Power button 2. Right joystick 9. Launch/Land button 3. Menu/back button 10. Pause button 4. D-pad 11. Controller clamshell 5. C1 button (customizable) 12. User interface screen 6. C2 button (customizable) 7. - Page 7 21. Neck-strap and tripod (¼-20) mount 17. R2 button toggle map WARNING: Skydio Enterprise Controller is not weatherproof. Do not operate in any rain, fog, snow, or similar environments. Do not rest the controller in fine sand, dirt or on similar terrain where particles can get trapped in the fan.
-
Page 8: Safety
(still water, mirrors, etc.) and small propellers at all times obstacles (thin branches, utility lines, ropes, chain link fencing, etc.) Skydio X2E does not avoid moving Skydio X2E is not weatherproof – objects or cars don’t fly in rain, snow, fog, high winds, Before flying over water, ensure your drone has GPS lock. - Page 9 SAFETY Skydio X2E obstacle avoidance is off during GPS Night Flight mode and can Clean all of the cameras so Skydio be impaired when in low light & poor X2E can see clearly visibility. Fly with extreme caution under these conditions...
-
Page 10: Pre-Flight
PRE-FLIGHT Charge Skydio X2E Skydio Dual Charger is capable of simultaneously providing current to two batteries. However, it will prioritize fully charging the battery with the highest charge level. Allow approximately two hours to fully charge batteries. Step 1 - Slide one or both batteries down the rails onto the Dual Charger •... -
Page 11: Skydio Enterprise Controller
PRE-FLIGHT Skydio Enterprise Controller Connect your Skydio Enterprise Controller to the USB-C charging cable and 65 W adapter. The lights on the front of the controller will begin to flash blue when the unit is charging, as well as a single light next to the USB-C charging port. A charge level will display on the Controller Screen. -
Page 12: Deploy
PRE-FLIGHT Deploy Step 1 — Unfold X2E WARNING: The propeller blades are sharp. Handle with care. • Release the 4 arm clamps • Lift the motor arms out and away from the chassis • Listen and feel for a click •... - Page 13 1. Logs card - supports future software offerings 2. Media card - stores all media captured during flight To offload your media - connect X2E to a computer using the USB-C cable or remove the card and insert in to a microSD card reader.
-
Page 14: Skydio X2E
Step 4 — Release antenna • Gently push the antennae inward to release and guide them into a vertical position Step 5 — Power on Skydio X2E • Press and hold the power button on the battery for 3 seconds... -
Page 15: Skydio Enterprise Controller
Connect to the Internet and enter your email address to activate the controller. Enter the activation code you received from Skydio. Set a password to unlock your Skydio Controller every time you power on or wake it from a sleep state. - Page 16 PRE-FLIGHT Step 4 — Pair the devices • Power on X2E and Enterprise Controller • Connect the Controller to X2E using the USB-C cable • Wait approximately 15 seconds • Verify that your Skydio X2E was paired • Select INFO and your drone name will be listed under PAIRED DRONE...
- Page 17 Inspect battery - Skydio X2E uses magnets to seat the battery that may attract metallic debris. Visually inspect the battery and connector pins to ensure they are free of debris and damage.
-
Page 18: Flight
3. Select the launch button on the Fly screen or 4. Press and hold the Launch/Land button on the Controller 5. X2E will arm and ascend to 10 ft (3 m) and hover in place Skydio X2E Quick Reference Guide... -
Page 19: Return
Skydio X2E uses six 4K navigation cameras and a main subject camera for visual navigation resulting in unparalleled 360° obstacle avoidance. Skydio X2E will maintain a distance of 34 in (86 cm) away from objects (measured from the propeller to the obstacle). -
Page 20: Gps Night Flight
Low battery X2E will assess the altitude and distance from the Launch/Home Point and alert you when it is time to return home. X2E will begin a series of notifications and actions to ensure time for a safe landing: 1. Two-minute warning - fly to a safe location and land 2. -
Page 21: Replacing Propellers
A routine preflight inspection should include the propellers to ensure that they are in good working condition. Skydio recommends replacing your propellers after 100 hours of flight time or whenever you notice any damage for optimal performance. Replace all propellers in the hub, even if only one is damaged, to reduce any potential variations and to make it easier to track propeller flight time. -
Page 22: How To Replace Propellers
WARNING: Failure to match the markings on the propeller to those on the propeller hub is a safety hazard and may result in potential serious damage to the vehicle and serious bodily harm or injury to you and bystanders. Skydio X2E Quick Reference Guide... -
Page 23: Additional Resources
WARNING: Failure to follow any instructions in this Quick Reference Guide or in the X2E Operator Manual can void the limited warranty © 2021 Skydio, Inc. All rights reserved. Skydio and the Skydio logo are trademarks of Skydio, Inc. Registered in the United States and other countries. - Page 24 400-206711-000-C - A0090...
Need help?
Do you have a question about the X2E and is the answer not in the manual?
Questions and answers