Table of Contents
Advertisement
Advertisement
Table of Contents

Related Manuals for AVC Quingo CLASSIC

Summary of Contents for AVC Quingo CLASSIC
- Page 1 HANDBOOK & SERVICE MANUAL QUINGO CLASSIC-PLUS-SPORT MAY 2016 - ISSUE 15...
- Page 2 This Document must remain with the vehicle throughout its life This Vehicle was supplied by: Product Model Number…………………………… Serial Number……………………………………… Date of Purchase………………………………… This product is manufactured by: AVC LTD, Sovereign Court, 230 Upper Fifth Street, Central Milton Keynes, Bucks MK9 2HR England.
-
Page 3: Table Of Contents
Contents page 1 NOTICE The contents of this document regarding photographs and text may change because of specification upgrades. AVC Ltd retains the right to change specification of its products without prior notice. Contents Safety information 2 to 3 EMI Information & Life Expectancy of the Product Quick reference Controls –... -
Page 4: Safety Information
If you have any doubt about the content of this manual phone your service provider immediately. Read the instructions contained within this document, they apply for the Quingo Classic, Quingo Plus and Quingo Sport. The photographs in this document depict the Quingo Classic and Quingo Plus. Differences for the Sport are explained on page 7. - Page 5 Safety Information page 3 Use by another person or Insurant The vehicle can be used by additional persons other than the owner/driver. Before usage the following checks should be carried out: Seat height is comfortable Angle of footrests is correct Armrests are adjusted correctly Seat is adjusted forward or rearward to suit the driver All functions should be explained...
-
Page 6: Emi Information & Life Expectancy Of The Product
EMI Information & Life Expectancy of the Product page 4 Information regarding Electromagnetic Interference (EMI) This section contains information on the possible effects of electromagnetic interference to your vehicle. EMI refers to the effects electromagnetic energy might have on the control systems of your vehicle. -
Page 7: Quick Reference
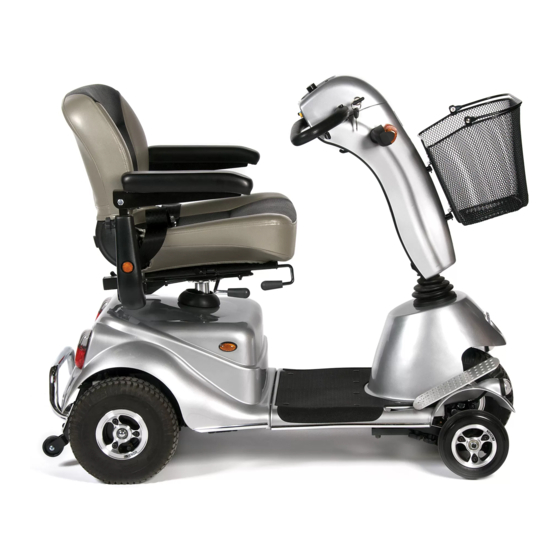
Quick Reference Page 5 Headrest Tiller Armrest Basket Indicators Lights Seat Adjustments Rear Cover Footrest QSS (Quintell Stabilising System) -
Page 8: Controls - Dashboard
Controls – Dashboard page 6 Before driving your vehicle it is important to familiarise yourself with the controls. Do not attempt to drive the vehicle before reading the rest of this Handbook. Power status lamp – see flash codes page 7 Battery level indicator Speed control Half speed... - Page 9 Controls- Dashboard page 7 See photographs on page 6 Power Status lamp: For normal use when the ignition is switched on this lamp will light green. It stays constant unless a fault arises. If this should happen make a note of the number of flashes as this indicates the problem with the vehicle. Report this information to the service department when requesting an engineer.
- Page 10 Controls – Dashboard Page 8 WARNING NOTICE!! The lever mechanism should be treated with care as it could become damaged if misused. Do not pull both levers in at once, as this will damage the mechanism. Carry out recommended checks. 1.
- Page 11 Ignition Switch: Always remember to remove key when not in use. Do not leave the ignition on when not in use especially when charging the vehicle. Charging socket The photo shows the charging socket for the Quingo Classic & Hazard lights Quingo Plus. For the Quingo Sport see page 10...
-
Page 12: Quingo Sport Features
This should be carried out by competent person who is familiar with this technique. Ask your service provider for details. Pages 22 & 23 apply to the Quingo Classic and Quingo Plus. Pages 20 & 21 show the seat and battery removal for the Sport. -
Page 13: Quingo Sport Features/Front Bumper
Do not use the bumper to open doors Important note to all Quingo owners If you own a Quingo Classic or Plus these items can be fitted to your machine as an extra. Contact your service provider for details. -
Page 14: Freewheel Device Quingo & Quingo
Freewheel device/ Quingo Classic & Quingo Plus page 12 Important Safety Notice for Models Quingo Classic & Plus The freewheel device allows the vehicle to be moved without power. When the lever is moved upwards the automatic brakes are released. This means there is no braking except for the emergency handbrake (Page 6). -
Page 15: Freewheel Device Quingo Sport
Freewheel device Quingo Sport page 13 Important Safety Notice for Model Quingo Sport The freewheel device allows the vehicle to be moved without power. When the lever is moved backwards the automatic brakes are released. This means there is no braking except for the emergency handbrake (Page 6). Follow these instructions but if you are in any doubt contact the service advisor immediately. -
Page 16: Anti Tip Devices
Anti tip devices Page 14 The Anti Tip device is fitted to the rear of the vehicle. Its function is to restrict the vehicle tipping backwards in an extreme situation. This only occurs if the machine is misused. See pages 31 & 32- “Driving the Vehicle”... -
Page 17: Quingo Adjustments
Quingo Adjustments Page 15 Your Quingo has multiple adjustments to make your driving position comfortable. The general rule is to keep the footrests as far forward as possible. Keep the seat as low as possible and adjust the seat and tiller to suit. This places the weight forward, which aids comfort to the rider and enhances stability especially when going uphill. -
Page 18: Seating & Tiller Adjustments
Seating and Tiller adjustments page 16 Tiller Adjustment The tiller can be adjusted forwards or backwards for easier entry/ exit of the scooter or to suit your preferred seating position. The lever is situated just under the handlebars. Push the lever down and this will allow the tiller to be moved. Release and it automatically locks. - Page 19 Seat Adjustments page 17 Headrest Height To adjust the headrest push the button as shown and move the headrest to the desired position. Armrest Height Armrest Width and Armrest removal To adjust the height of the To adjust width, undo clamp knob armrest undo clamp knob, and pull each armrest outwards or raise or lower the armrest to...
- Page 20 Seat Adjustments page 18 Seat Slider Revolving seat Seat Slider: Allows the seat to be adjusted forwards or backwards. Pull the lever upwards and adjust to suit. Release the lever and move the seat slightly back and forth until you hear the seat lock.
- Page 21 Seat Adjustments page 19 To adjust the backrest pull the lever upwards and gently lay backward to suit. Release the handle and the backrest will lock. Important: Keep the backrest as upright as is comfortable. This stabilises the scooter. Only make these adjustments when the scooter is on flat and level ground...
-
Page 22: Transporting The Classic & Plus
Transporting the Quingo Classic & Plus page 20 Important: Parts of this scooter are heavy. You may require assistance to carry out this procedure. Assemble in reverse order. Do not transport the vehicle with the occupant aboard NOTE: If you wish to transport your vehicle without dismantling, use a strong pair of ramps and always read the instructions before use. - Page 23 Transporting your vehicle page 21 Remove the 3 connector cables plugged into the black box marked “Merits”. Press the plastic locking trigger inwards and remove the plug. The 2 outer cables are battery and the centre the main cable loom. Do not force these cables out.
- Page 24 Transporting your vehicle page 22 Important Safety Notice Brake cable release (Rear Brake model only) Cable nipple To separate the chassis the emergency brake must be disconnected. Press the black lever down as shown and pull out the cable. Please note that this operation is only relevant if you have the rear drum brake model.
- Page 25 Splitting the frame page 23 Important Safety Notice Remove the chassis locking pin by pulling outwards. This component must be lined up when assembling the frames. WARNING Make sure this pin is fully inserted after assembly To separate the frames hold the seat stem with one hand and push the rear frame back.
-
Page 26: Transporting The Sport
Transporting the Quingo Sport page 24 The Quingo Sport can be transported but not fully dismantled. Caution should be taken when loading any vehicle using an approved set of vehicle ramps. Ask your service provider for details and how to load the vehicle safely. Remove mirrors 39”/100cm Remove seat... -
Page 27: Battery Charging
Battery Charging page 25 Connection Instructions When you receive your vehicle the batteries are partially charged. Fully charge for 12 hours before use. Place your machine in an area that is dry and well ventilated. Make sure a power point is nearby. - Page 28 Battery Charging page 26 GENERAL NOTES REGARDING THE BATTERY CHARGER Battery chargers are subject to regular upgrades. For full instructions read the leaflet supplied with the charger, which can be found in the Battery Charger box. IMPORTANT Batteries have a limited guarantee; if they have not been charged correctly and they fail, they will not be replaced under the guarantee.
-
Page 29: Using A Fully Weather Cover/Warning Beacon
Full Weather Cover/Beacon page 27 Points to remember about the When adjusting the tiller canopy make sure there is a gap between the screen and the Make sure the canopy is fitted basket correctly. The frame is stable The side curtains are tied up correctly The windscreen is clean The mirrors are adjusted... -
Page 30: Simple Maintenance
Simple Maintenance page 28 Simple Maintenance page 20.1 Maintenance should be carried out by a qualified engineer. Unfortunately they cannot be there at all times. Items you should check on a daily/weekly basis: Your daily checklist 1. Visually check the machine for damage. 2. -
Page 31: Troubleshooting Guide
Troubleshooting Guide page 29 This table is a guide to fault finding. The fault may be a simple fix. If you have any doubts phone your service provider. Symptom Solution Unit does not move. Freewheel is engaged. Check: Does the battery level Batteries flat –... -
Page 32: Additional Safety Information
Additional Safety Information page 30 Carrying Weight on the Vehicle Front Basket – The basket mounted on the front has a weight limit of 10lbs (5kgs). The plastic lockable box (Standard on the Sport) - Rated at 13lbs (6kg) Do not exceed these weights as it could effect the steering. -
Page 33: Driving The Vehicle
Driving the Vehicle page 31 Read This Before Driving the Vehicle! Whether or not this is your first mobility vehicle, read these guidelines as all vehicles differ. Failure to do this may cause damage to you, a third party or the vehicle. - Page 34 Driving the vehicle page 32 Kerbs and Obstacles: Do not ride up kerbs or obstructions higher than 3” (75mm). On inclines lean forward. This places more weight over the front making the vehicle more stable. Hills & Slopes: Lean forward when climbing. Make sure you have enough speed to make the slope.
- Page 35 Frequently Asked Questions (FAQ) page 33 How do I clean the vehicle? Only use a damp cloth and gentle detergent. Do not use any abrasive or scouring liquids or high-pressure cleaning devices. Do not allow water near or direct contact with water. Disinfection Spray or wipe disinfection using a tested and recognised product is permitted.
-
Page 36: Guarantee And Warranty
Guarantee and Warranty page 34 Warranty Statement The period of warranty varies from country to country ranging from 1 year to 3 years. Please see your purchase order for full details. In accordance with the warranty conditions for new vehicles the warranty is as follows active from the date of delivery. -
Page 37: Breakdown & Servicing
Breakdown & Servicing page 35 Breakdown (UK) – Phone 01582 430900 If your vehicle breaks down do not instruct a 3 party (a dealer, garage or friend) to fix the problem. Phone your provider immediately. Failure to do so will invalidate your warranty. -
Page 38: Engineers Checklist
Engineer’s Checklist page 36 CHECKLIST Initial diagnostic road test Wheel bearings wear and lubricate Wheel alignment of the 3 front wheels Steering and tilting mechanism Wear or damage to tyres or wheels Tyre pressures Bodywork fixtures Throttle movement, play and adjustment Bodywork Steering bearing for wear Seat mounting... -
Page 39: Service Log
Service Log page 37 Notice for the Service Engineer. Please sign and date after each service – enter all additional repair or service work service Engineers Name Engineers Signature service Engineers Name Engineers Signature service Engineers Name Engineers Signature service Engineers Name Engineers Signature service... -
Page 40: Technical Information Regarding Emi
Technical Information Regarding EMI page 38 Technical Information Regarding EMI Important Technical Information regarding Electromagnetic Interference (EMI) The intensity of interference from electromagnetic energy is measured in volts per metre (v/m), which refers to the strength of the electrical source (voltage) as it relates to the distance away from the object being considered (in metres). -
Page 41: Technical Specification Quingo & Quingo
Technical Specification page 39 Quingo Plus Quingo Classic Differences only) Class Type Class 3 Pavement 4mph – Road 8mph Class 2 Pavement 4mph Length/Width 122cm/48” x 64cm/25” Height-seat at lowest setting 116cm/46” 90cm/36” Wheelbase 84cm/33” Seat width 48cm/19” 46cm/18” Seat depth 30.5cm/12”... -
Page 42: Technical Specification Quingo Sport
Technical Specification page 40 Quingo Sport Class Type Class 3 Pavement 4mph – Road 8mph Dimension Length/Width 140cm/55” x 66cm/26” Seat height at lowest setting 127cm/50” Wheelbase 100cm/40” Seat width 55cm/22” Seat depth 36cm/14” Measured to ISO 7176.7 Backrest height min/max 67cm/27”... - Page 43 Please read this manual. This document contains the important information required to familiarise yourself with the vehicle. Complete all the information within this document. If any information is not clear, contact us immediately. Keep this manual in a safe place, it must remain with the vehicle throughout it’...
Need help?
Do you have a question about the Quingo CLASSIC and is the answer not in the manual?
Questions and answers
Quingo Vitesse Serial No