Table of Contents
Advertisement
Advertisement
Table of Contents

Related Manuals for Ashton RHYTHMVX


Summary of Contents for Ashton RHYTHMVX
- Page 1 ELECTRONIC DRUMKIT USER MANUAL...
-
Page 3: Table Of Contents
CONTENTS INTRODUCTION SPECIFICATIONS SETTING UP THE KIT 6 - 10 REFERENCE GUIDE/HI-HAT PEDAL CONTROLS MODULE: FRONT/REAR PANEL DESCRIPTIONS MODULE: INPUT/OUTPUT GUIDE MODULE: BASIC FUNCTIONS MODULE: DRUM KIT SETTINGS MODULE: VOICE SETTINGS MODULE: PATTERN SETTINGS 17–18 MODULE: CLICK (METRONOME) SETTINGS MODULE: RECORDING SETTINGS 19–20 MODULE: RESTORE FACTORY SETTINGS MODULE: MIDI/USB CONNECTION INFORMATION... -
Page 5: Introduction
INTRODUCTION Ashton is designed in Australia by a team of industry experts that have years of experience in the development, design and production of musical instruments and equipment. Ashton’s range of products are a result of years of development and careful testing. -
Page 6: Setting Up The Kit
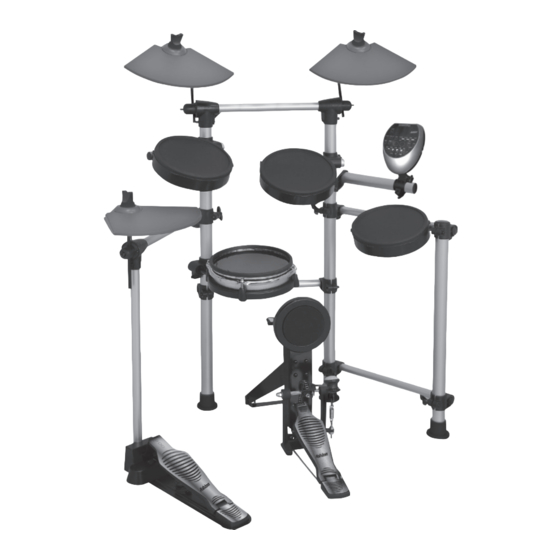
SETTING UP THE PARTS LIST DRUM PADS BOX: HI-HAT PEDAL BOX: (2 x TOM PADS) (1 X SNARE PAD) (1 x HI-HAT PEDAL) CYMBAL PADS BOX: KICK TRIGGER BOX: (3 x CYMBAL PADS) (1 x KICK & 1 x BEATER) ACCESSORIES BOX: DRUM MODULE: CYMBAL HOLDERS (L &... - Page 7 SETTING UP THE ASSEMBLY 1. OPEN THE STAND: i) Tear off the adhesive tape on the stand. ii) Loosen the wing-nuts on the pillars. iii) Open the stand in the A/B/C order shown. iv) Adjust the pillar heights so that the stand is steady when assembled.
- Page 8 SETTING UP THE ASSEMBL Y 3. ATTACHING THE SNARE PAD: i) Adjust the clamp position then tighten the wing nuts on the clamp. ii) Use a hexagon key to loosen the screw of the clamp holder. iii) Insert the metal rod into the clamp holder and adjust the position.
- Page 9 SETTING UP THE ASSEMBLY 5. ATTACHING THE CYMBAL PADS: i) Attach the cymbal holders to the holder clamps on the arms. ii) Use a drum key to tighten the screws on the holder clamps. iii) Remove the wing nut and the felt washer off each cymbal holder.
- Page 10 SETTING UP THE ASSEMBL Y 7. ATTACHING THE KICK TRIGGER: i) Attach the rod to the holders. ii) Attach the kick pedal to the kick pad. iii) Tighten the wing screw on the kick pedal. iv) Loosen the screw. v) Attach the beater to the kick pedal. vi) Center the beater to the pedal and tighten the screw.
-
Page 11: Reference Guide/Hi-Hat Pedal Controls
REFERENCE GUIDE NOTE: DO NOT CONNECT THE ELECTRONIC DRUM KIT TO A POWER UNIT UNTIL FULLY SETUP TO AVOID RISK OF ELECTRICAL DAMAGE TO YOURSELF AND/OR THE UNIT. HI-HAT PEDAL CONTROLS OPEN HI-HAT: Strike the hi-hat without stepping on the pedal. CLOSED HI-HAT: Strike the hi-hat whilst stepping on the pedal. -
Page 12: Module: Front/Rear Panel Descriptions
MODULE PANEL DESC. 1. VOLUME: Controls master volume. Turn to adjust. 2. (+) & (-) BUTTONS: Adjusts menu parameter (kit, voice, pattern, click value, tempo etc...) 3. TEMPO: Enters tempo adjustment mode . 4. PAD INDICATORS: Shows triggered pad (LED). 5. -
Page 13: Module: Input/Output Guide
You will probably need to purchase: From a MP3/COMPUTER to module: 1/8” jack to 1/8” jack (Ashton SC88) From a CD PLAYER to module: RCA jack to 1/8” jack (Ashton RCA28S) HEADPHONES OUTPUT An optional set of stereo headphones can be connected for quiet practice or if you are playing in an area with noise restrictions. -
Page 14: Module: Basic Functions
MODULE: BASIC FUNCTIONS SWITCHING THE POWER ON After confirming all the connections are in place (see previous pages for rear module output and input guide), rotate the volume knob left (counter-clockwise) all the way to ensure the volume is at the minimum level. -
Page 15: Module: Drum Kit Settings
MODULE: DRUM KIT SETTINGS SELECTING A DRUM KIT There are 10 types of drum kits you can set your kit to. You can also save your own kit of different voices that you prefer for each pad. TO SELECT A KIT: Press KIT button to enter kit selecting mode (the KIT indicator will light), the screen will display the current kit setting by number value, search through the 10 kits by using the (+) and... -
Page 16: Module: Voice Settings
MODULE: VOICE SETTINGS SELECTING A PAD VOICE Press the VOICE button to enter voice selecting mode , the current pad voice will light on the LED screen. Trigger the pad you want to adjust the voice on by hitting it, then use the (+) and (-) buttons to adjust the pad voice. -
Page 17: Module: Pattern Settings
MODULE: P ATTERN SETTINGS SELECTING A PATTERN Press the PATTERN button to enter pattern selecting mode, the current pattern number value will light on the LED screen. Use the (+) and (-) buttons to set the desired pattern. There are 40 preset patterns and 1 user pattern, for pattern breakdown please turn to the pattern appendix. -
Page 18: Module: Click (Metronome) Settings
MODULE: PATTERN SETTINGS ADJUSTING THE PATTERN TEMPO Press the TEMPO button to enter pattern tempo mode , the current pattern tempo value will light on the LED screen. Use the (+) and (-) buttons to set to desired pattern. You can set the pattern tempo from 30bpm to 280bpm. -
Page 19: Module: Recording Settings
MODULE: RECORDING WAITING TO RECORD MODE Press and hold the SAVE button for more than 2 seconds to enter the pattern waiting to record mode , the LED will display kit number and the ‘rec’ indicator will flash. In this mode you must adjust all your settings to record: Press PATTERN to set your accompaniment pattern, press TEMPO to set the tempo, press KIT to select your kit setting, press CLICK to turn on/off the metronome and press DRUM OFF to deselect any muted settings. -
Page 20: Module: Restore Factory Settings
MODULE: RECORDING PLAYING BACK THE USER P ATTERN Choose the 041 in the pattern menu and press START/STOP to play the pattern. • If the screen displays “N-P” there is no data in the bank. • You can change the tempo of your recorded user pattern. •... -
Page 21: Module: Midi/Usb Connection Information
MIDI/USB CONNECTION CONNECTING A MIDI/USB DEVICE 1. Connect a PC/MAC or other USB host device that support USB audio. 2. For devices with a USB cable you can elect to transfer the recorded pattern and MIDI notes from the drum module into a software program that can read MIDI data. - Page 22 VOICE LIST 08.1. Timbale High RIDE KICK 08.2. Timbale Low 05.7. Classic Ride 02.7. Classic Tom 1 00.1. Standard Kit 1 08.3. Agogo High 05.8. Rock Ride 02.8. Classic Tom 2 00.2. Standard Kit 2 08.4. Agogo Low 05.9. Brush Ride 02.9.
- Page 23 PATTERN LIST 01.1. Funk 2 03.3. Bossa 02.2. Fusion 2 00.1. Fusion1 01.2. Latin Jazz 2 03.4. Samba 2 02.3. Jazz 1 00.2. Latin Jazz 1 01.3. Pop Funk 1 03.5. 3/4 Pop 02.4. Guitar Bossa 00.3. Funk 1 01.4. Latin Rock 1 03.6.
-
Page 24: Midi Implementation Chart
MIDI IMPLEMENTATION CHART PAGE 24... -
Page 25: Safety Information
SAFETY INFORMATION INSTRUCTIONS RELATING TO RISK OF FIRE, ELECTRIC SHOCK, OR INJURY TO PERSONS. WARNING! When using any electronic product basic precautions should always be followed, including the following: Read all the safety and installation instructions and explanations of graphic symbols before using the products. - Page 26 AUTOMATIC SHUTDOWN INSTRUCTIONS In order to save energy, we have designed the “Automatic shutdown” function for the drum module. With this function, the drum module will shutdown automatically when you have left it idle for more than 30 (default) minutes. If you don’t need this feature, just press and hold the [START/STOP] button then turn the drum module on.
- Page 27 PAGE 27...
Need help?
Do you have a question about the RHYTHMVX and is the answer not in the manual?
Questions and answers