Advertisement
Quick Links
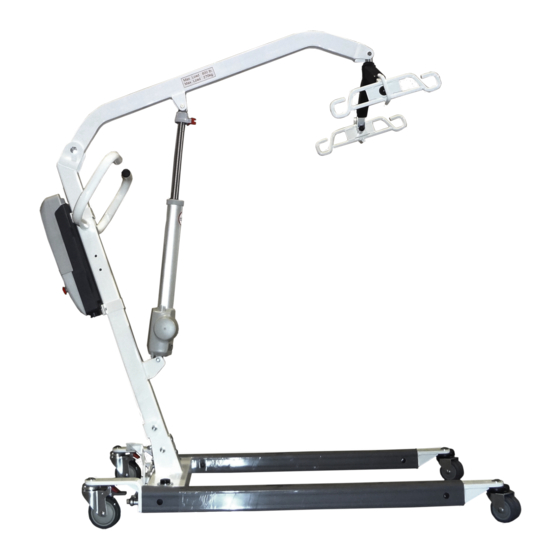
ConvaLift
F U L L B O D Y P A T I E N T L I F T
MODELS
ConvaLift CL600E
ConvaLift CL600E-D
Made in China
Ensure the product has been assembled according to the
instructions in this manual.
All operators should have received or read and understood the
instructions for safe and proper operation of the patient lift.
*ConvaQuip CL600E shown
Advertisement

Related Manuals for ConvaQuip ConvaLift CL600E


Summary of Contents for ConvaQuip ConvaLift CL600E
- Page 1 ConvaLift F U L L B O D Y P A T I E N T L I F T MODELS ConvaLift CL600E ConvaLift CL600E-D *ConvaQuip CL600E shown Made in China Ensure the product has been assembled according to the instructions in this manual.
- Page 2 Refuse delivery if the packaging appears to be badly damaged. If the merchandise is received damaged or is missing components, contact the shipping company immediately and file a claim. For further assistance, contact your local dealer or ConvaQuip at the following: ConvaQuip Ind., Inc. P.O. Box 3417...
- Page 3 SAFETY INSTRUCTIONS The ConvaQuip Series of full body patient lifts reflect innovative state of the art design to increase user mobility. The ConvaLift will provide years of service if it is properly maintained as any electric and/or mechanical equipment requires. Please pay careful attention to the following important information regarding the care, maintenance, and operation of the patient lift.
- Page 4 DEFINITIONS & SYMBOLS In this manual the user refers to the patient or resident and may be used interchangeably at different times. Caregiver refers to the operator or person who is assisting with the transfer. Symbols used in this manual and their meanings: Warning! Failure to heed this warning may result in damage to the product or serious injury to the operator and/or user.
- Page 5 PRODUCT FEATURES DESCRIPTION & APPLICATIONS Designed to provide the perfect combination of patient safety, weight capacity and maneuverability. This lift is manufactured to meet the needs of the general patient population in hospitals and nursing homes. Caregivers appreciate the ease of operation and patients are reassured by the stability and overall comfort provided.
- Page 6 2 Point Spreader Bar Optional 6 Point Spreader Bar Emergency Release Weigh Scale Optional *ConvaQuip is committed to continuous improvements of our products therefore the specs, dimensions, and features listed above are for guidance only and subject to change without prior notice.
- Page 7 ASSEMBLY Prior to assembly, unpack all parts from the shipping carton and check for any missing parts. Contact you dealer immediately if a part is missing. Parts List for CL600E / CL600E-D Boom Mast Base Spreader bar w/ Sling hooks Pendant / Hand Control Actuator Control box and Battery Pack...
- Page 8 ASSEMBLY STEP BY STEP ASSEMBLY Engage the brakes. Remove the bolts from the bottom of the mast and base. Pull the Mast to an upright position. Re-insert the bolts into the holes at bottom of the mast and tighten the nuts. Attach boom to top of mast.
- Page 9 ASSEMBLY BATTERY ASSEMBLY FOR CL600E / CL600E-D Install the control box. Slide the control box over and onto the metal tab mounted at the bottom of the Mast. Line up the control box with the hole at the top of the mast and insert the screw to hold the control box in place.
- Page 10 ASSEMBLY ACTUATOR ASSEMBLY FOR CL600E / CL600E-D A. Attach the bottom of Actuator to the B. Attach the top of the Actuator to bracket on the Mast and insert pin. Insert the bracket on the Boom and insert keeper ring through hole in pin to secure pin.
- Page 11 ASSEMBLY Attach actuator and pendant to the control box. * refer to page 14 for charging instructions BATTERY PLUG-INS FOR E-series 翿 Actuator Plug 翿 翿 Pendant Plug AC Power Plug Tighten all nuts and make sure lift is sturdy before use.
- Page 12 CONTROL BOX INSTRUCTIONS The following instructions apply to ConvaQuip CL600E / CL600E-D. LCD display / LCD Lifting actuator UP Battery pack release Lifting actuator DOWN Emergency button Battery indicator FEATURES: • Smart charging function for longer battery life • Battery capacity indicator on battery pack •...
- Page 13 LCD INDICATORS Capacity Function Battery is charged to around 90% Battery is charged to overload around 70% battery volume 50% Battery Capacity Remaining overused Charge batteries 翿 immediately. battery low low battery (blinking) 25% Battery Capacity Remaining Charge batteries immediately. Battery is charged to around 10% Buzzer Beeps / Only...
- Page 14 FEATURES OF POWER PLUG: C-CLAMP : • when the battery is being charged, insert this C-clamp to secure the power plug. WATERPROOF COVER: • when control is being used, this cover can be used to prevent water ingress. C-clamp Waterproof Cover REMOVE AND INSERT BATTERY PACK: REMOVE : press button A and pull out in the up direction (Fig.1)
- Page 15 OPERATING INSTRUCTIONS Double check all assemblies for tightness and read operating instructions carefully prior to use. Do not attempt to use patient lift unless the patient exhibits control over the upper body, strength to grasp the handles, ability to bear some weight and flexibility in knees, hips, and ankles.
- Page 16 Turn the lift “ON” by turning the red “RESET” button clockwise. Turn the lift “OFF” by pressing down the “RESET” button. TRANSFER FROM BED • User/patient should be in the center of the bed. • Position user onto his/her side by rolling user towards you. •...
- Page 17 SLING ATTACHMENT INSTRUCTIONS FOR THE 6-POINT SPREADER BAR Attach Loop A and D of the sling to Hook A on Spreader Bar; attach Loop B and C to Hook B. 翿 • Lift the user above the bed by using the hand control. •...
- Page 18 MAINTENANCE & INSPECTION • The operator of the lift shall inspect the ConvaLift before each use. Check all bolts for tightness. Make sure the base can be easily widened, and that all lift parts are in place. Make sure that casters can be turned freely, and that caster brakes can be engaged.
- Page 19 FIRST EVERY 3 MONTHLY RECEIVED MONTHS BASE & FOOT PEDAL Apply grease to caster ball bearings if needed. Check welding joints for rust and crack. CLEANING AS NEEDED ACTUATOR & CONTROL BOX Make sure the control box is firmly affixed to the mast.
- Page 20 TROUBLESHOOTING GUIDE The following list of encountered problems and solutions will assist you in determining what may be causing your patient lift not to function as designed. If you have a problem occurring which is not listed below please contact your dealer or technical support for help. Do not attempt to repair or replace components or parts on your ConvaLift as this may void your warranty or cause further problems that may result in patient injury.
- Page 21 EMERGENCY LOWERING MECHANISM In case there is a failure with the actuator or electronics and the user is left suspended in mid-air, please follow the procedures below to safely lower the user to a safer position. Contact your dealer immediately if standard troubleshooting techniques do not correct the failure.
- Page 22 NOTES...
- Page 23 ConvaQuip within 30 days or the RA will expire. The returning package must be clearly marked with the RA number or the shipment will not be received or any credit issued. When a part is returned to ConvaQuip for warranty inspection a $50 service charge will apply if the part is not defective.
- Page 24 L.L.C. ConvaQuip LLC P.O. Box 3417 Abilene, TX 79604 tel. 325-677-4177 free 1-800-637-8436 www.convaquip.com | ConvaQuip ®...
Need help?
Do you have a question about the ConvaLift CL600E and is the answer not in the manual?
Questions and answers