
Subscribe to Our Youtube Channel
Related Manuals for Titanium TRL-10G Kit


Summary of Contents for Titanium TRL-10G Kit
- Page 1 TRL-10G Kit G R E E N R O T A R Y L A S E R Product Code: 88170 REVISION 2020.1.0 Instruction Manual...
-
Page 3: Item Checklist
• Do not let children come in contact with the laser. ITEM CHECKLIST Please ensure the following items are included with your laser level. If anything is missing please contact your retailer. 1 Titanium TRL-10G 5 Laser glasses 9 Adaptor head (UK) -
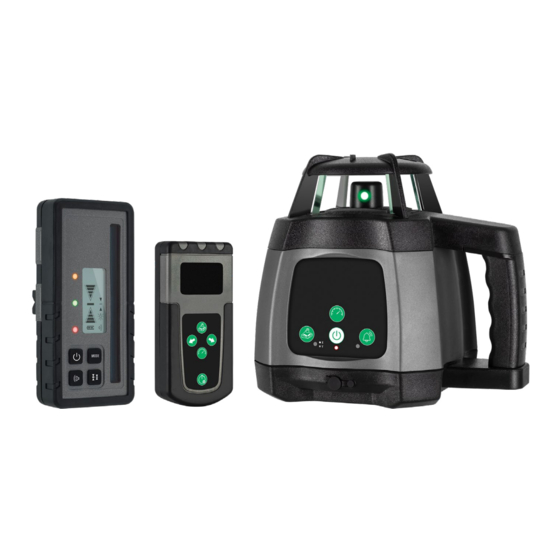
Page 4: Laser Overview
LASER OVERVIEW 1 Rotating laser port 2 Protective lighthouse 3 Control panel 4 Rechargeable battery charging port 5 5/8” x 11 thread for horizontal operation on a tripod 6 Battery thumb screw 7 Power button 8 Speed control button 9 Manual grade mode button MANU AL 10 Tilt alarm button GRADE... -
Page 5: Operation
USING THE LASER (continued) Charging the rechargeable battery pack • Attach the desired adaptor head onto the charger. • Insert the charger into one of the two charging ports (Fig.1). The charging ports are located on the battery pack and underneath the control panel. Progress will be shown by the power indicator display on the charger as following: Red (flashing) = Charger and battery... -
Page 6: Remote Control
USING THE LASER (continued) Setting up a manual grade / slope • To adjust the grade, press the manual grade mode To create a manual grade / slope, press the manual • button to cycle between X and Y axis grade mode button on the laser level control panel or To cancel manual grade mode, and return to normal •... - Page 7 DETECTOR & CLAMP (continued) DETECTOR LCD SCREEN OVERVIEW 1 Arrow indicator 2 Detection mode 3 Centre alignment 4 Brightness indicator 5 Battery indicator 6 Speaker indicator Fig. 2 POWER SUPPLY The detector is powered by one 9V alkaline battery. • Battery replacement • Remove the battery cover door and the batteries.
-
Page 8: Calibration Check
MOUNTING TO A CONSTRUCTION TRIPOD NO T INCLUD ED A construction tripod (flat, domed or elevating) can • Place the laser level onto the tripod with the lighthouse be purchased from your nearest measurement tool facing upwards and mount the male 5/8” thread into the dealer. -
Page 9: Warranty
• Check that the laser level and detector are within the operating range. WARRANTY 3 YEAR STANDARD WARRANTY PERIOD All Titanium measurement tools are carefully checked and tested to our precise quality assurance standards. 1. The warranty period for your tool is 3 years We offer a warranty in accordance with from the date of purchase. -
Page 10: Customer Support
CUSTOMER SUPPORT EU DIRECTIVES & DISPOSAL To assist you with any queries or technical This device complies with all necessary standards for the questions please contact customer support. free movement of goods within the EU. This product is an electric device and must be collected separately for disposal Australia: 1300 658 338 according to the European Directive on waste electrical and electronic equipment. - Page 11 NOTES...
- Page 12 © 2020. Titanium Laser Tools...
Need help?
Do you have a question about the TRL-10G Kit and is the answer not in the manual?
Questions and answers