Advertisement
Quick Links
K1
M2
21 szt. / pcs
27 szt. / pcs
W1
S1
Ø3 x 16
48 szt. / pcs
2 szt. / pcs
P1-A
P1-B
500 mm
3 szt. / pcs
3 szt. / pcs
P5-A
300 mm
1 szt. / pcs
DO MONTAŻU POTRZEBNE SĄ DWIE OSOBY!
INSTALLATION REQUIRES TWO PEOPLE!
Akcesoria / Fittings
M1
ZM1
27 szt. / pcs
W4
W6
Ø4 x 16
16 szt. / pcs
P2-A
P2-B
500 mm
500 mm
500 mm
3 szt. / pcs
ANIMALS B10
INSTRUKCJA MONTAŻU
ASSEMBLY INSTRUCTIONS
ZW1
27 szt. / pcs
16 szt. / pcs
U1
Ø6,3 x 50
16 szt. / pcs
4 szt. / pcs
P5-B
300 mm
3 szt. / pcs
1 szt. / pcs
G1
20 szt. / pcs
U2
N1
16 szt. / pcs
4 szt. / pcs
P6-A
P5-B
300 mm
300 mm
1 szt. / pcs
1 szt. / pcs
Narzędzia / Tools
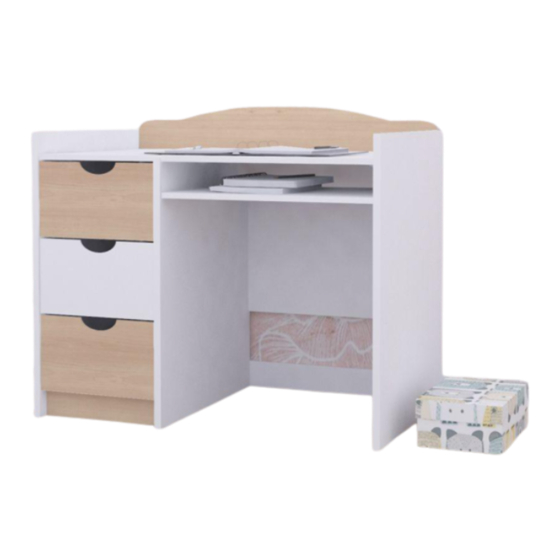
Biurko B10/ Desk B10
1
Advertisement

Related Manuals for bonaselect ANIMALS B10


Summary of Contents for bonaselect ANIMALS B10
- Page 1 ANIMALS B10 INSTRUKCJA MONTAŻU ASSEMBLY INSTRUCTIONS Akcesoria / Fittings 21 szt. / pcs 27 szt. / pcs 27 szt. / pcs 27 szt. / pcs 16 szt. / pcs 20 szt. / pcs Ø3 x 16 Ø4 x 16 Ø6,3 x 50 48 szt.
-
Page 2: Instrukcja Obsługi
BARDZO WAŻNE! NALEŻY UWAŻNIE PRZECZYTAĆ ZACHOWAĆ DO PÓŹNIEJSZEGO STOSOWANIA INSTRUKCJA OBSŁUGI By zapobiec zadławieniu lub uduszeniu opakowanie z akcesoriami należy trzymać w miejscu niedostępnym dla niemowląt i dzieci. Wszystkie połączenia w meblu muszą być dobrze dokręcone, żaden z elementów łączących nie może być luźny. Nie należy używać... - Page 3 Paczka 1 z 1 / Package 1 of 1 Numer elementu / Wymiary (mm)/ Ilość / item no. Dimensions (mm) Quantity 674 x 598 x 18 752 x 598 x 18 1002 x 600 x 18 674 x 598 x 18 402 x 600 x 18 582 x 450 x 18 557 x 300 x 18...
- Page 4 P2-A LEWA STRONA LEFT SIDE P5-A PRAWA STRONA RIGHT SIDE Biurko B10/ Desk B10...
- Page 5 P1-A P1-A P6-A Biurko B10/ Desk B10...
- Page 6 Biurko B10/ Desk B10...
- Page 7 Biurko B10/ Desk B10...
- Page 8 Biurko B10/ Desk B10...
- Page 9 P1-B P2-B Biurko B10/ Desk B10...
- Page 10 P1-B P2-B Na widoczych śrubach (W6) należy umieścić dostarczone zaślepki samoprzylepne (ZW1). On the visible screws (W6) should be placed supplied adhesive caps (ZW1). Na mimośrodach (M1) należy umieścić dostarczone plastikowe zaślepki (ZM1). On the eccentrics (M1) should be placed supplied plastic caps (ZM1).
- Page 11 Poluzować wkręty 1. Loosen the screws Przesunąć prowadnicę w górę lub w dół o pożądaną odległość Adjust the runner up or down for the desired distance 3. Dokręcić poluzowane wcześniej wkręty. 4. Wsunąć szuflady i sprawdzić ich położenie. 5. Jeśli szuflady leżą prawidłowo wkręcić dla stabilizacji kolejne 3 wkręty.
Need help?
Do you have a question about the ANIMALS B10 and is the answer not in the manual?
Questions and answers