Flux Reference Series Installation Manual
Component speaker
Hide thumbs
Also See for Reference Series:
- Installation manual (16 pages) ,
- Installation manual (10 pages)

Subscribe to Our Youtube Channel
Related Manuals for Flux Reference Series


Summary of Contents for Flux Reference Series
- Page 1 COMPONENT SPEAKER INSTALLATION MANUAL Maestro Competition Series Reference Series MC Comp 361 RC 361...
-
Page 2: Passive Crossover
Hearing Damage Continuous, excessive exposure to sound pressure levels in excess of 85dB can cause a loss of hearing. FLUX Components are capable of producing sound pressure levels greater than 85dB. Volume and Driver Awareness Use of sound components can impair your ability to hear necessary traffi c sound and may constitute a hazard while driving your vehicle. -
Page 3: Features And Contents
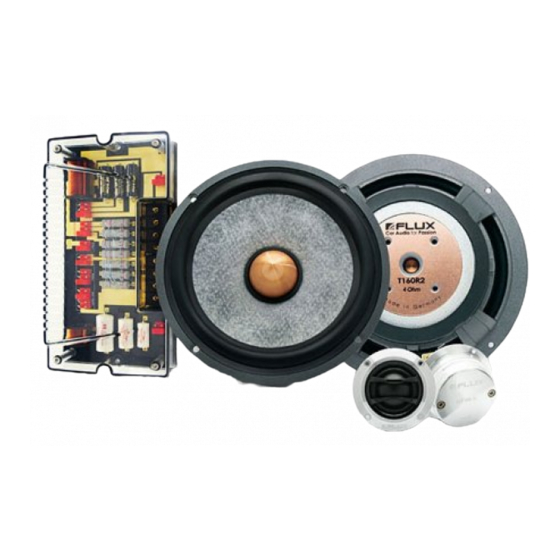
Passive Crossover FEATURES AND CONTENTS Product Features - Reference Series (RC 361) FLUX T 160 R3 • 6.5” midwoofer, 4 layer (paper+glass fi ber+silk+ceramic) cone • 37mm v/c with 90mm magnet diameter • Aluminium die cast basket, vented basket • copper reverse dust cap FLUX M 80 R •... -
Page 4: Installation
INSTALLATION Getting Started It is recommended that your new FLUX speakers are installed by an au- thorized FLUX Authorized Dealers. This will ensure the use of proper in- stallation techniques and material, and also will save you a lot of time and efforts. - Page 5 Passive Crossover Positioning & Choosing a Location Using a component speaker gives you the freedom to place the woofer and tweeter separately in your car. It could be good or bad in terms of sound quality, it depends where you put it. 3 Way Speaker System With 3 way speaker system consisting of fi...
-
Page 6: Installation Components
Reference Series [RC 361] Installation Components Installation Using 1 Amplifi er XR 361 Input Input Selector A Selector B Input Jumper Positions Input Jumper Positions Amplifi er Selector B Selector A 1 Amp 1 Amp HT 28R M 80 R... - Page 7 Reference Series [RC 361] Installation Using 2 Amplifi er XR 361 Input Input Selector A Selector B Tweeter Woofer Input Jumper Positions Input Jumper Positions Midrange Amplifi er Amplifi er Selector B Selector A 2 Amp 2 Amp HT 28R...
- Page 8 Reference Series [RC 361] Installation Using 3 Amplifi er XR 361 Input Input Selector B Selector A Input Jumper Positions Tweeter Input Jumper Positions Midrange Woofer Amplifi er Amplifi er Amplifi er Selector B Selector A 3 Amp 3 Amp...
- Page 9 Reference Series [RC 361] Standard Jumper Settings XR 361 HP FREQ HP Q LEVEL LP FREQ FREQ 1 2 3 1 2 3 1 2 3 1 2 3 1 2 3 1 2 3 WOOFER 1 2 3 1 2 3 4...
- Page 10 Reference Series [RC 361] Tweeter Setting 0 dB -3 dB -6 dB Level (dB) -9 dB Level 1 2 3 4 FREQ Hi Pass Freg Hi Pass Q Factor...
- Page 11 Reference Series [RC 361] Midrange Setting HP Q Hi Pass Q Factor HP FREQ Hi Pass Freg LEVEL Level LP FREQ Lo Pass Freg...
- Page 12 Reference Series [RC 361] LP Q Lo Pass Q Factor LP Q LEVEL Lo Pass Q Level 1 2 3 Woofer Setting FREQ Lo Pass Freg Lo Pass Q Factor...
- Page 13 Maestro Competition Series [MC Comp 361] Installation Components Installation Using 1 Amplifi er XMC 361 Input Input Selector A Selector B Input Jumper Positions Input Jumper Positions Amplifi er Selector B Selector A 1 Amp 1 Amp HT 25 MC M 80 MC T 160 MC3 WARNING...
- Page 14 Maestro Competition Series [MC Comp 361] Installation Using 2 Amplifi ers XMC 361 Input Input Selector A Selector B Tweeter Input Jumper Positions Input Jumper Positions Woofer Midrange Amplifi er Amplifi er Selector B Selector A 2 Amp 2 Amp HT 25 MC M 80 MC T 160 MC3...
- Page 15 Maestro Competition Series [MC Comp 361] Installation Using 3 Amplifi er XMC 361 Input Input Selector B Selector A Input Jumper Positions Input Jumper Positions Tweeter Midrange Woofer Amplifi er Amplifi er Amplifi er Selector B Selector A 3 Amp 3 Amp HT 25 MC M 80 MC...
- Page 16 Maestro Competition Series [MC Comp 361] Standard Jumper Settings XMC 361 HP FREQ HP Q LEVEL LP FREQ FREQ 1 2 3 1 2 3 1 2 3 1 2 3 1 2 3 1 2 3 WOOFER 1 2 3 1 2 3 4 1 2 3 1 2 3...
- Page 17 Maestro Competition Series [MC Comp 361] Tweeter Setting 0 dB -3 dB -6 dB Level (dB) -9 dB Level 1 2 3 4 FREQ Hi Pass Freg Hi Pass Q Factor...
- Page 18 Maestro Competition Series [MC Comp 361] Midrange Setting HP Q Hi Pass Q Factor HP FREQ Hi Pass Freg LEVEL Level LP FREQ Lo Pass Freg...
- Page 19 Maestro Competition Series [MC Comp 361] LP Q Lo Pass Q Factor LP Q LEVEL Lo Pass Q Level 1 2 3 Woofer Setting FREQ Lo Pass Freg Lo Pass Q Factor...
- Page 20 Passive Crossover Running In Period / Break In To ensure such complex mechanical elements work in harmony with each other, they must be allowed to function correctly are in this environment. Such change in temperature and humidity are regarded as very hostile. For speakers to benefi...
- Page 21 NOTES ......................................................................................................................................................................................................................................................................................................................................................................................................................................................................................................................................................................................................................................................................................................................................................................................................................
- Page 22 Ringstrasse 20 | 85386 Eching | Germany Email : info@fl ux-audio.com | Website : www.fl ux-audio.com...
Need help?
Do you have a question about the Reference Series and is the answer not in the manual?
Questions and answers