
Related Manuals for ALLENZI PI3020T

Summary of Contents for ALLENZI PI3020T
- Page 1 INSTRUKCIJA Indukcinė kaitlentė PI3020T PI4030T Prieš pradėdami naudotis perkskaitykite šią instrukciją...
- Page 2 Saugos reikalavimai JŪSŲ IR APLINKINIŲ SAUGUMAS YRA LABAI SVARBUS 1) Šiuo prietaisu negali naudotis asmenys (įskaitant vaikus), turintys fizinių, sensorinių ar protinių sutrikimų arba patirties ir žinių trūkumą, išskyrus tokius atvejus, kai jie yra prižiūrimi ir instruktuojami kitų asmenų. 2) DĖMESIO: jei paviršius įtrūko, nedelsiant išjunkite prietaisą iš elektros tinklo, kad išvengtumėte elektros smūgio.
- Page 3 11) Šiuo įrenginiu gali naudotis vaikai nuo 8 metų amžiaus, asmenys, turintys fizinių, sensorinių ar protinių sutrikimų arba nepatyrę vartotojai tik tuomet, kai yra tinkamai prižiūrimi arba mokomi, kaip saugiai naudotis įrenginiu ir gerai žino visas su juo susijusias rizikas. Neleiskite vaikams žaisti su gartraukiu.
- Page 4 Įrengimas Žemiau yra nurodyti reikalingi išmatavimai montuojant kaitlentę. Model A(mm) B(mm) PI3020T PI4030T Atstumas tarp apatinės prietaiso dalies ir skiriančios plokštės turi atitikti paveikslėlyje nurodytus išmatavimus (min 50mm). Įsitikinkite, kad kaitlentė turi oro ventiliaciją. Po prietaisu turi būti ...
- Page 5 Neįrenkite kaitlentės virš indaplovės, šaldytuvo, šaldiklio, skalbyklės ar drabužių džiovyklės, nes drėgmė gali pažeisti kaitlentės elektroniką. Tvirtinimo laikikliai: Pritvirtinkite kaitlentę ant darbinio paviršiaus varžtais ir 4 laikikliais. Sureguliuokite laikiklio padėtį. PRIJUNGIMAS PRIE ELEKTROS ŠALTINIO Kaitlentę prie maitinimo tinklo gali prijungti tik kvalifikuotas specialistas.
- Page 6 PRIEŠ NAUDOJANTIS SVARBU: Naudokite tik tuos indus, kurie pritaikyti indukcinėms kaitlentėms. Patikrinkite, ar ant indo pakuotės bei jo pačioje yra ženklas, rodantis, kad jie tinka indukcinėms viryklėms. TINKAMI GAMINIMO INDAI Jūs galite patikrinti su magnetu Priartinkite jį prie indo – jei magnetą indas pritraukia, jis tinka indukcinei viryklei.
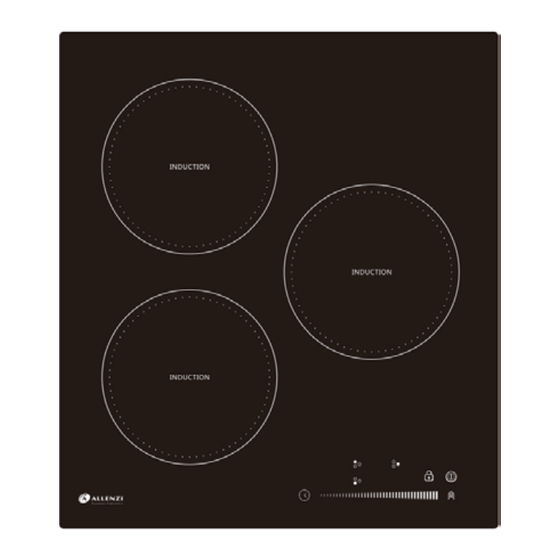
- Page 7 NAUDOJIMO INSTRUKCIJA Kad nesugadintumėte keramikos paviršiaus nenaudokite: Puodų su nelygiu dugnu Metalinių puodų su emaliuota apačia. VALDYMO ZONA IŠ VIRŠAUS PI3020T PI4030T 1. Įjungimas/Išjungimas 2. Laikmatis 3. Galia/Laikmačio jutiklis 4. Funkcija ”Boost” 6. Užraktas nuo vaikų 5. Galingumo nustatymai...
- Page 8 Kaitlentės įjungimas-išjungimas • Norėdami įjungti kaitlentę, paspauskite mygtuką ir pasirinkite kaitvietę. • Jegu per 60 sekundžių įjungus nepasirinkta kaitvietė, kaitlentė išsijungia automatiškai. Įjungimas ir kaitvietės galingumo pasirinkimas • Kai kaitlentė yra įjungta ir keptuvė/puodas yra teisingai uždėti ant pasirinktos kaitvietės mygtuko indikatorius rodo 5 lygmenį.
- Page 9 • Norėdami įšjungti valdymo užraktą palieskite kaitlentę 3 sekundes. Lo išsijungia ir ir laikykite sensorių kaitlentė vėl įsijungia. Laikmatis Laikmatis gali būti panaudotas ilgiausiai 99 minutes visom kaitvietėms. Pasirinkus kaitvietę su laikmačio valdymu, pamatysite "10" ekranėlyje, kurį palietėte, tada "0". Pasirinkite laiką...
- Page 10 Automatiškas išsijungimas Kaitlentė automatiškai išsijungs jeigu nenustatėte laikmačio, arba jei pamiršote kaitlentę išjungti. Galingumo lygiai 1 2 3 4 5 6 7 8 9 Laikmatis ( valandos ) 8 8 8 4 4 4 2 2 2 VALDYMO EKRANO INDIKATORIAI Likusio karščio indikatorius Kaitlentė...
- Page 11 TECHNINĖ INFORMACIJA Montavimo Gaminimo Maks. Dydis Įtampa Modelis matmenys zonos galia D×W(mm) (mm) PI3020T 2 zonos 3500W 290 x 510 270 x 480 220-240V 50/60Hz PI4030T 3 zonos 5800W 450 x 510 430 x 480 VALYMAS Nenaudokite valymo garais prietaisų.
- Page 12 Aukšta įtampa Patikrinkite, ar įtampa yra normali. Įjunkite, kai maitinimo šaltinis veikia normaliai. Žema įtampa Patikrinkite, ar įtampa yra normali. Įjunkite, kai maitinimo šaltinis veikia normaliai. Prašome apžiūrėti puodą. Įjunkite iš naujo, kai E3~E4 Nenormali temperatūra kaitvietė atvės. Paskambinkite į servisą ir nurodykite kodą F3~F5 NTC trumpas arba F9~FA...
- Page 13 Pajungimo būdas: 1. Jei laidas pažeistas ir turi būti pakeistas, tai turi padaryti specialistas. 2. Jei prietaisas tiesiogiai prijungtas prie elektros tinklo, jis privalo turėti kontaktinį jungiklį, kuris atjungia prietaisą nuo maitinimo tinklo ties visais poliais. Tarp kontaktinio jungiklio kontaktų turi būti ne mažesnis kaip 3 mm pločio tarpelis.
- Page 14 Simbolis ant produkto arba jo pakuotės rodo, kad šis prietaisas neturėtų būti išmetamas kartu su buitinėmis atliekomis. Jis turi būti pristatytas į elektros ir elektronikos prietaisų surinkimo centrą perdirbimui. Šalindami atliekas, laikykitės galiojančių nurodymų. Dėl išsamesnės informacijos apie šio prietaiso utilizavimą ir perdirbimą, Utilizavimas: kreipkitės į...
- Page 15 INSTRUCTION MANUAL INDUCTION HOB PI3020T PI4030T PLEASE READ THE INSTRUCTION MANUAL BEFORE USE...
-
Page 16: Table Of Contents
CONTENTS SAFETY INSTRUCTIONS ..............17 INSTALLATION ................... 18 ELECTRICAL CONNECTION ............. 20 BEFORE USE ..................21 INSTRUCTION FOR USE ..............22 TECHNICAL INFORMATION .............. 26 CLEANING ..................26 TROUBLESHOOTING GUIDE ............27 NOISES MADE BY THE HOB ............. 27 CONNECTING THE HOB TO THE MAIN POWER SUPPLY ....28 AFTER-SALES SERVICE .............. -
Page 17: Safety Instructions
SAFETY INSTRUCTIONS YOUR SAFETY AND THAT OF OTHERS IS VERY IMPORTANT his manual and the appliance itself provide important safety messages, to be read and always observed. This is the warning / caution-safety symbol, regarding safety, warning of potential risks to users and other All messages relevant to safety specify the potential risk to which they refer and indicate how to reduce the risk of injury, damage and electric shocks due to incorrect use of the appliance. -
Page 18: Installation
they do not play with it. Do not touch the appliance heating elements during and after use. Do not allow the appliance to come into contact with cloths or other flammable materials until all the components have cooled sufficiently. ... - Page 19 For built-in dimensions and installation instruction, see in below figures Model A(mm) B(mm) PI3020T PI4030T The distance between the underside of the appliance and the separator panel must respect the dimensions given in the figure (mini. 50mm). In order to ensure the correct operation of the product, do not obstruct the MINIMUM REQUIRED clearance (min.
-
Page 20: Electrical Connection
The unit should be placed on a stable, smooth surface (use the packaging). Do not apply force onto the controls protruding from the hob. Fix the hob on the work surface by screw and four brackets on the bottom of hob (see picture) after installation. Adjust the bracket position to suit for different work surface’s thickness. -
Page 21: Before Use
BEFORE USE IMPORTANT: The cooking zones will not switch on if pots are not the right size. Only use pots bearing the symbol “INDUCTION SYSTEM” (Figure below). Place the pot on the required cooking zone before switching the hob on EXISTING POTS AND PANS Use a magnet to check if the pot is suitable for the induction hob: pots and pans are unsuitable if not magnetically detectable. -
Page 22: Instruction For Use
Pots with bottoms that are not perfectly flat. Metal pots with enameled bottom. CONTROL PANEL LAYOUT PI3020T PI4030T 1. ON/OFF control 2.Timer control 3. Power / Timer slider touch control 4. Power boost control 5. Heating zone selection controls... - Page 23 Switching the hob On/Off • To switch the hob on, press the button and the cooking zone displays light up. • If within 60 seconds of switching on, no heating zone is selected, the hob switches off automatically. Switching on and adjusting cooking level •...
- Page 24 and hold button for three seconds.The Lo goes off and the hob is active again. Timer The timer can be used to set cooking time for a maximum of 99 minutes for all cooking zones. Select the cooking zone to be used with the timer, Touch timer control , the “10”...
- Page 25 Auto switch off The hob will automatically switch off when you did not set cooking time, forgot to switch off the hob, and did not operate the hob at all. Power level 1 2 3 4 5 6 7 8 9 Default working timer ( hour ) 8 8 8 4 4 4 2 2 2 CONTROL PANEL WARNINGS...
-
Page 26: Technical Information
TECHNICAL INFORMATION Product Built-in Cooking Supply Model Size Dimensions Zones Voltage Power D×W(mm) (mm) PI3020T 2 Zones 3500W 290 x 510 270 x 480 220-240V 50/60Hz PI4030T 3 Zones 5800W 450 x 510 430 x 480 CLEANING Do not use steam cleaners. -
Page 27: Troubleshooting Guide
TROUBLESHOOTING GUIDE Read and follow the instructions given in the section “Instructions for use”. Check that the electricity supply has not been shut off. Dry the hob thoroughly after cleaning it. If, when the hob is switched on, alphanumeric codes appear on the display, consult the following table for instructions. -
Page 28: Connecting The Hob To The Main Power Supply
during operation and for several minutes after the hob has been switched off, the noise of the cooling fan will be audible. • This is perfectly normal and indeed essential for proper functioning of the appliance. CONNECTING THE HOB TO THE MAIN POWER SUPPLY This hob must be connected to the mains power supply only by a suitably qualified person. - Page 29 6. If the cable is damaged or needs replacing, this should be done by an after-sales technician using the proper tools, to avoid any accidents. 7. If the appliance is being connected directly to the mains supply, an omnipolar circuit breaker must be installed with a minimum gap of 3mm between the contacts.
-
Page 30: After-Sales Service
A symbol on the product or its packaging indicates that this product should not go into household waste. It must be taken to the collection point of an electric and electronic equipment recycling facility. By making sure this product is disposed of properly, you will help prevent the negative effects on the environment and human health that would otherwise result from inappropriate disposal... - Page 31 1. See if you can solve the problem yourself with the help of the “Troubleshooting guide”. 2. Switch the appliance off and then on again it to see if the problem has been eliminated. If the problem persists after the above checks, contact the nearest After-Sales Service.
Need help?
Do you have a question about the PI3020T and is the answer not in the manual?
Questions and answers