
Related Manuals for ALLENZI PR4031ET

Summary of Contents for ALLENZI PR4031ET
- Page 1 Instrukcija Keraminė kaitlentė Modelis:PR4031ET Prieš pradėdami naudotis, perskaitykite šią instrukciją ir pasilikite ją ateičiai, jei kiltų klausimų.
-
Page 2: Saugos Reikalavimai
Saugos reikalavimai Šiuo prietaisu negali naudotis asmenys (įskaitant vaikus), turintys fizinių, sensorinių ar protinių sutrikimų arba patirties ir žinių trūkumą, išskyrus tokius atvejus, kai jie yra prižiūrimi ir instruktuojami kitų asmenų. DĖMESIO: jei paviršius įtrūko, nedelsiant išjunkite prietaisą iš elektros tinklo, kad išvengtumėte elektros smūgio. DĖMESIO: nevalykite prietaiso... - Page 3 asmenys, turintys fizinių, sensorinių ar protinių sutrikimų arba nepatyrę vartotojai tik tuomet, kai yra tinkamai prižiūrimi arba mokomi, kaip saugiai naudotis įrenginiu ir gerai žino visas su juo susijusias rizikas. Neleiskite vaikams žaisti su gartraukiu. Vaikai be priežiūros negali naudotis bei valyti prietaiso. 11) DĖMESIO: Prietaisas ir jo dalys įkaista naudojimo metu.
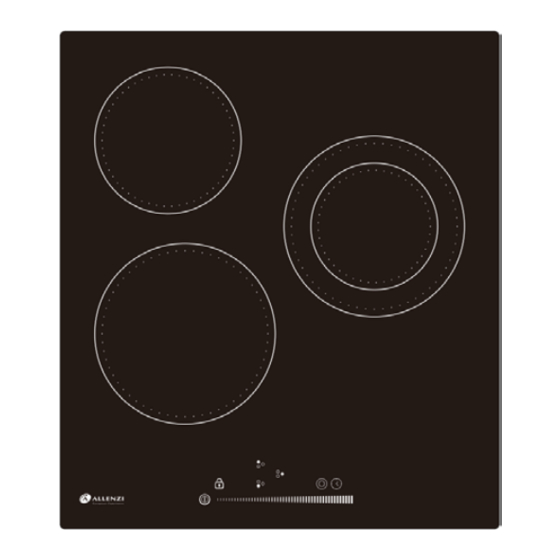
- Page 4 Produkto aprašymas Vaizdas iš viršaus 1. Kairė galinė: φ165mm, 1200W 2. Kairė priekinė: φ200mm, 1800W 3. Dešinė: φ120mm, 700/1700W 4. Valdymo jutikliai...
- Page 5 Valdymo ekranas 1. Įjungimo /išjungimo jutiklis 2. Galios/Laikmačio reguliavimo jutikliai 3. Užraktas nuo vaikų 4. Gaminimo zonos pasirinkimo jutikliai 5. Dvigubos zonos jutiklis 6. Laikmačio jutiklis Prieš pradėdami naudotis Perskaitykite instrukciją, ypač “Saugos reikalavimus”. Nuo kaitlentės nuimkite apsauginę plėvelę. ...
- Page 6 Jutiklių naudojimas Jutikliai reaguoja į palietimą pirštu, nereikia jų spausti. Palieskite piršto pagalvėle, ne galiuku. Kiekvieną kartą jutikliui sureagavus išgirsite garsinį signalą. Įsitikinkite, kad jutikliai sausi, švarūs ir ant jų nėra jokių daiktų (pvz. įrankių ar šluostės). Netgi nedidelis kiekis vandens gali apsunkinti jutiklių...
- Page 7 Įsitikinkite, kad jūsų indas yra lygiu, plokščiu dugnu ir atitinka kaitvietės zonos dydį. Visada pastatykite indą kaitinimo zonos centre. Indus visada nukelkite nuo gaminimo zonos – niekada nestumkite, nes galite subraižyti paviršių. Jūsų kaitlentės naudojimas Pradėdami gaminti 1. Palieskite įjungimo/išjungimo jutiklį. Kaitvietė...
- Page 8 1. Ant gaminimo zonos uždėkite indą. Įsitikinkite, kad indo dugnas ir gaminimo zonos paviršius yra sausi ir švarūs. 2. Palieskite gaminimo zonos pasirinkimo jutiklį. 3. Pasirinkite kaitinimo lygį, liesdami galios/laikmačio reguliavimo jutiklius. Jei per 5 s nepasirinksite kaitinimo lygio, kaitvietė ...
- Page 9 Kai baigėte gaminti 1. Palieskite gaminimo zonos, kurią norite išjungti, pasirinkimo jutiklį. 2. Išjunkite gaminimo zoną braukdami pirštu į kairę arba paliesdami galios/laikmačio reguliavimo kairėje pusėje esantį jutiklį. Išjunkite kaitlentę, paliesdami įjungimo/išjungimo jutiklį.
- Page 10 3. Saugokitės įkaitusių paviršių. Simbolis “H” rodo, kad gaminimo zona yra įkaitusi. Jis dings, kai kaitvietė pakankamai atvės, kad ją būtų galima paliesti. Taupydami energiją, galite naudoti įkaitusią kaitvietę, jei norite, kad gaminimo indas neatvėstų. Vakdymo užraktas Jūs galite užrakinti valdymo jutiklius, jei norite, kad ...
- Page 11 naudotis ja. Perkaitimo apsauga Įmontuotas temperatūros sensorius gali reguliuoti temperatūrą kaitlentės viduje. Kai kaitlentė per daug įkaista, ji automatiškai išsijungia. Dvigubos gaminimo zonos valdymas Palietus gaminimo zonos ir dvigubos zonos jutiklius, aktyvuojama dviguba gaminimo zona. Jei norite deaktyvuoti dvigubą zoną, pakartokite aukščiau ...
-
Page 12: Laikmačio Naudojimas
Kaitinimo lygis Veikimo trukmė ( valandos ) Laikmačio naudojimas Jūs galite naudoti laikmatį dviem skirtingais būdais: Jūs galite įjungti jį, kad viena gaminimo zona išsijungtų nustatytu laiku. Jūs galite nustatyti laikmatį iki 99 minučių. 1. Palieskite kaitinimo zonos parinkimo jutiklį. liečiate įjungimo/išjungimo jutiklius,... - Page 13 4. Kai laikas nustatytas, jis iš karto bus pradėtas skaičiuoti. Ekranas rodys likusį laiką. 5. Kai laikas baigsis, gaminimo zona automatiškai išsijungs, ir jos indikatorius rodys “H”. Pastaba: jei norite pakeisti laiką po to, kai jis nustatytas, turite pradėti nuo 1 žingsnio.
-
Page 14: Valymas Ir Priežiūra
Valymas ir priežiūra Atjunkite kaitlentę nuo maitinimo šaltinio prieš jos priežiūrą bei valymą. Įsitikinkite, kad jos kištukas ištrauktas iš lizdo sienoje. Keraminė danga turi būti švari, todėl išsiliejusį skystį ar kitus nešvarumus nedelsiant nuvalykite. Nedidelį nešvarumų kiekį galima išvalyti popieriniu rankšluosčiu arba šluoste. - Page 15 Problemos ir jų sprendimas Problema: Kaitlentė neįsijungia. Galima priežastis: nėra elektros. Įsitikinkite, kad kaitlentė prijungta prie maitinimo šaltinio. Patikrinkite, ar veikia jungiklis ir lizdas. Jei viską patikrinote ir problema išlieka, kvieskite kvalifikuotą specialistą. Problema: nereaguoja jutikliai. Galima priežastis: jutikliai užrakinti. Atrakinkite jutiklius.
-
Page 16: Techninės Specifikacijos
Galima priežastis: triukšmą sukelti gali gaminimo indų konstrukcija (skirtingi metalo sluoksniai gali skirtingai vibruoti). Tai ne problema. Techninės specifikacijos Montavimo Gaminim Maitinim Maks. Modelis Dydis D×W(mm) matmenys o įtampa o zonos galia (mm) 220-240V PR4031ET 3 Zones 4700W 450 x 510 430 x 480 50/60Hz... - Page 17 Montavimas 1. Išpjaukite tokio dydžio angą, kokia parodyta paveikslėlyje. Darbinis paviršius turi būti bent 30 mm storio. Pasirinkite karščiui atsparią medžiagą, kuri nesideformuos nuo jo. 2. Keraminė kaitlentė gali būti montuojama ant spintelės stalviršio. Ji turi būti horizontalioje padėtyje, kaip parodyta žemiau: 480mm 430mm...
- Page 18 50mm mini 50mm mini Visais atvejais įsitikinkite, kad keraminė kaitlentė turi gerą ventiliaciją. Pastaba: Saugus atstumas tarp kaitlentės ir spintelės po ja turi būti ne mažesnis negu 760mm.
- Page 19 A(mm) B(mm) C(mm) 50 mini 30 mini įėjimas išėjimas 10 mm Prieš montavimą įsitikinkite ● Stalviršio paviršius yra lygus. ● Jis pagamintas iš atsparios karščiui plokštės. ● Jei kaitlentė įrengta virš orkaitės, orkaitė turi turėti aušinimo ventiliatorių. ● Prietaisas gali būti nuolat prijungtas prie elektros tinklo, todėl privalo turėti kontaktinį...
- Page 20 Po kaitlentės montavimo, įsitikinkite, kad ● Po kaitlente yra oro cirkuliacija. ● Jei kaitlentė yra virš spintelės, jas skiria izoliacijos sluoksnis. Tvirtinimo laikikliai: Pritvirtinkite kaitlentę 4 laikikliais, kaip parodyta žemiau. Įspėjimai! 1. Indukcinę kaitlentę turi montuoti kvalifikuotas specialistas. Niekada nemontuokite kaitlentės patys. 2.
- Page 21 Kaitlentės prijungimas prie maitinimo šaltinio Kaitlentę prie maitinimo tinklo gali prijungti tik kvalifikuotas specialistas. Įsitikinkite, kad: Elektros duomenys, nurodyti techninių duomenų lentelėje, atitinka jūsų elektros tinklo duomenis. Prijungdami prietaisą, nenaudokite adapterių, reduktorių ar šakotuvų. Jie gali perkaisti ir sukelti gaisrą. Elektros laidas neturi liestis prie įkaitusių...
- Page 22 1. Jei laidas pažeistas ir turi būti pakeistas, tai turi padaryti specialistas. 2. Jei prietaisas tiesiogiai prijungtas prie elektros tinklo, jis privalo turėti kontaktinį jungiklį, kuris atjungia prietaisą nuo maitinimo tinklo ties visais poliais. Tarp kontaktinio jungiklio kontaktų turi būti ne mažesnis kaip 3 mm pločio tarpelis. 3.
- Page 23 Simbolis ant produkto arba jo pakuotės rodo, kad šis prietaisas neturėtų būti išmetamas kartu su buitinėmis atliekomis. Jis turi būti pristatytas į elektros ir elektronikos prietaisų surinkimo centrą perdirbimui. Šalindami atliekas, laikykitės galiojančių nurodymų. Dėl išsamesnės informacijos apie šio prietaiso utilizavimą ir perdirbimą, kreipkitės į vietos valdžios instituciją,...
-
Page 24: Ceramic Hob
Instruction Manual Ceramic Hob Model:PR4031ET Please read this manual before the operation, and keep this manual for future use. -
Page 25: Safety Warnings
Thank you for purchasing our product. We hope you will be satisfied with our product throughout its service life. Safety Warnings Your safety is important to us. Please read this information before using your hob. Installation Electrical Shock Hazard Disconnect the appliance from the mains electricity supply before carrying our any work or maintenance on ... -
Page 26: Operation And Maintenance
No combustible material or products should be placed on this appliance at any time. Please make this information available to the person responsible for installing the appliance as it could reduce your installation costs. In order to avoid a hazard, this appliance must be installed according to these instructions for installation. -
Page 27: Health Hazard
Health Hazard This appliance complies with electromagnetic safety standards. Hot Surface Hazard During use, accessible parts of this appliance will become hot enough to cause burns. Do not let your body, clothing or any item other than suitable cookware contact the Induction glass until the surface is cool. -
Page 28: Important Safety Instructions
Failure to use caution could result in injury or cuts. Important safety instructions Never leave the appliance unattended when in use. Boilover causes smoking and greasy spillovers that may ignite. Never use your appliance as a work or storage surface. ... - Page 29 appliance without danger to themselves or their surroundings. Do not repair or replace any parts of the appliance unless specifically recommended in the manual. All other servicing should be done by a qualified technician. Do not use a steam cleaner to clean your hob. ...
- Page 30 knowledge if they have been given supervision or instruction concerning use of the appliance in a safe way and understand the hazards involved. Children shall not play with the appliance. Cleaning and user maintenance shall not be made by children without supervision.
-
Page 31: Product Overview
how to install correctly and operate it. For installation, please read the installation section. Read all safety instructions carefully before use and keep this Instruction / Installation Manual for future reference. Product Overview... -
Page 32: Top View
Top View 3. Rear left: φ165mm, 1200W 4. Front left: φ200mm, 1800W 3. Right: φ120mm, 700/1700W 4. Control panel Control Panel 1.ON / OFF control 2. Power/Timer regulating controls 3. Child safety lock 4. Heating zone selection controls Dual zone control 6. -
Page 33: Product Information
Product Information The microcomputer ceramic cooker hob can meet different kinds of cuisine demands because of resistance wire heating, micro-computerized control and multi-power selection, really the optimal choice for modern families. The ceramic cooker hob centers on customers and adopts personalized design. -
Page 34: Choosing The Right Cookware
there is no object (e.g. a utensil or a cloth) covering them. Even a thin film of water may make the controls difficult to operate. Choosing the Right Cookware Do not use cookware with jagged edges or a curved base. Make sure that the base of your pan is smooth, sits flat against the glass, and is the same size as the cooking zone. -
Page 35: Using Your Ceramic Hob
Always lift pans off the ceramic hob - do not slide, or they may scratch the glass. Using your Ceramic Hob To start cooking 2. Touch the ON / OFF control . After power on, the buzzer beeps once, all displays show “0”, indicating that the ceramic hob has entered the state of standby mode. - Page 36 4. Place a suitable pan on the cooking zone that you wish to use. Make sure the bottom of the pan and the surface of the cooking zone are clean and dry. 5. Touching the heating zone selection control. 6. Select a heat setting by touching the Power/Timer regulating controls.
- Page 37 When you have finished cooking 4. Touching the heating zone selection control that you wish to switch off. 5. Turn the cooking zone off by pressing the Left of the Power/Timer regulating controls directly or sliding to Left. Turn the whole cooktop off by touching the ON / OFF control.
-
Page 38: Locking The Controls
6. Beware of hot surfaces “H” will show which cooking zone is hot to touch. It will disappear when the surface have cooled down to a safe temperature. It can also be used as an energy saving function if you want to heat further pans, use the hotplate that is still hot. - Page 39 shall unlock the hob first in the next operation. Over-Temperature Protection A temperature sensor equipped can monitor the temperature inside the ceramic hob. When an excessive temperature is monitored, the ceramic hob will stop operation automatically. Dual zone control Touching the heating zone selection control, touching the dual zone control, then the dual zone will be activated.
-
Page 40: Using The Timer
levels are shown in the below table: Power level Default working timer ( hour ) Using the timer Your can use the timer in two different ways: You can set it to turn one cooking zone off after the set time is up. - Page 41 6. When the time is set, it starts to count down immediately. The display shows the remaining time 7. When cooking timer expires, the corresponding cooking zone will be switch off automatically, and the corresponding cooking zone indicator shows “H” when the setting time is finished.
-
Page 42: Cooking Guidelines
Cooking Guidelines Take care when frying as the oil and fat heat up very quickly, particularly you are using Power Boost. At extremely high temperatures oil and fat will ignite spontaneously and this presents a serious fire risk. Cooking tips . -
Page 43: Care And Cleaning
find the settings that best suit you. Heating Fitness setting . Delicate warming for small amounts of food . Melting chocolate, butter and foods that burn quickly . Gentle simmering . Slow warming . Reheating . Rapid simmering . Cooking rice . - Page 44 settings that best suit you. Everyday soiling on glass (fingerprints, marks, stains left by food or non-sugary spillovers on the glass) Switch the power to the hob off Apply a cooktop cleaner while the glass is still warm (but not hot) Rinse and wipe dry with a clean cloth or paper towel.
- Page 45 soiling or spill to a cool area of the cooktop. Clean the soiling or spill up with a dish cloth or paper towel. Follow steps 2 to 4 for “Everyday soiling on the glass” above. Remove stains left by melts and sugary food or spillovers as soon as possible.
-
Page 46: Hints And Tips
Hints and Tips Problem: The cooktop cannot be turned on. Possible Causes: No power. Make sure the cooktop is connected to the power supply and that it is switch on. Check whether there is a power outage in your home or area. -
Page 47: Technical Specification
Model Dimensions Zones Voltage Power D×W(mm) (mm) 220-240V PR4031ET 3 Zones 4700W 450 x 510 430 x 480 50/60Hz Weight and Dimensions are approximate. Because we continually strive to improve our products we may change specifications and designs without prior notice. - Page 48 Installation Selection of installation equipment 3. Cut out the work surface according to the sizes shown in the drawing. For the purpose of installation and use, a minimum of 50mm space shall be preserved around the hole. Be sure the thickness of the work surface is at least 30mm. Please select heat-resistant work surface material to avoid larger deformation caused by the heat radiation from the hotplate.
- Page 49 50mm mini 50mm mini Under any circumstances, make sure the ceramic cooker hob is well ventilated and the air inlet and outlet are not blocked. Ensure the ceramic cooker hob is in good work state. As shown below. Note: The safety distance between the hotplate and the cupboard above the hotplate should be at least 760mm.
- Page 50 A(mm) B(mm) C(mm) 50 mini 30 mini Air intake Air exit 10 Before you install the hob, make sure that ● The work surface and level, and no structural members interfere with space requirements. ● The work surface is made of a heat-resistant material. ●...
- Page 51 as ceramic tiles) for the wall surfaces surrounding the hob. When you have installed the hob, make sure that: ● The power supply cable is not accessible through cupboard doors or drawers. ● There is adequate flow of fresh air from outside the cabinetry to the base of the hob.
- Page 52 Caution! 4. The ceramic cooker hob must be installed by qualified personnel or technicians. We have professionals at your service. Please never conduct the operation by yourself. 5. The ceramic cooker hob shall not be mounted to cooling equipment, dishwashers and rotary dryers. 6.
-
Page 53: Connecting The Hob To The Mains Power Supply
necessary, please consult your supply authority for system impedance information. Connecting the hob to the mains power supply This hob must be connected to the mains power supply only by a suitably qualified person. Before connecting the hob to the mains power supply, check that: 1. - Page 54 6. If the cable is damaged or needs replacing, this should be done by an after-sales technician using the proper tools, to avoid any accidents. 7. If the appliance is being connected directly to the mains supply, an omnipolar circuit breaker must be installed with a minimum gap of 3mm between the contacts.
- Page 55 A symbol on the product or its packaging indicates that this product should not go into household waste. It must be taken to the collection point of an electric and electronic equipment recycling facility. By making sure this product is disposed of properly, you will help prevent the negative effects on the environment and human health that would otherwise result from inappropriate disposal of this product.
Need help?
Do you have a question about the PR4031ET and is the answer not in the manual?
Questions and answers