Table of Contents
Advertisement
Available languages
Available languages
Quick Links
Advertisement
Chapters
Table of Contents

Related Manuals for Schellenberg ROLLODRIVE 75 PREMIUM


Summary of Contents for Schellenberg ROLLODRIVE 75 PREMIUM
- Page 1 ROLLODRIVE 75 PREMIUM...
- Page 3 deutsch ��������������������������������������������������������������������������������������������������� english ���������������������������������������������������������������������������������������������������� français ��������������������������������������������������������������������������������������������������� nederlands ���������������������������������������������������������������������������������������������� polski ������������������������������������������������������������������������������������������������������ italiano ���������������������������������������������������������������������������������������������������� español ��������������������������������������������������������������������������������������������������� português ����������������������������������������������������������������������������������������������� český ������������������������������������������������������������������������������������������������������ slovenčina ���������������������������������������������������������������������������������������������� magyar ���������������������������������������������������������������������������������������������������� hrvatski ��������������������������������������������������������������������������������������������������� slovenski jezik ����������������������������������������������������������������������������������������� român ����������������������������������������������������������������������������������������������������� български ����������������������������������������������������������������������������������������������...
-
Page 4: Table Of Contents
Weitere Funk-Handsender koppeln ��������������������������������������������������������������� Kopplung Smart Home-System ��������������������������������������������������������������������� Urheberrechtlich geschützt, 2017, Alfred Schellenberg GmbH� Alle Rechte vorbehalten� Jede vom Urheberrechtsgesetz nicht zugelassene Verwertung, insbesondere Vervielfältigung, Übersetzung, Verarbeitung bzw� Weitergabe von Inhalten in Datenbanken oder anderen elektronischen Medien und Systemen, ist verboten�... -
Page 5: Sicherheit Und Hinweise
SICHERHEIT UND HINWEISE Sehr geehrte Kundin, sehr geehrter Kunde, bitte lesen Sie vor der Montage und Inbetriebnahme diese Anleitung sorgfältig durch� Beachten Sie alle Sicherheitshinweise, bevor Sie mit den Arbeiten beginnen� Bewahren Sie die Anleitung gut auf und unter- weisen Sie alle in Frage kommenden Personen im sicheren Gebrauch mit dem Produkt�... -
Page 6: Eu-Konformitätserklärung
Gefahren verstehen� Reinigung und Benutzerwartung dürfen nicht von Kindern ohne Beaufsichtigung durchgeführt werden� EU-KONFORMITÄTSERKLÄRUNG Hiermit erklärt die Alfred Schellenberg GmbH, dass das Produkt (Art� Nr� 22576/ 22578) der Richtlinie 2014/53/EU entspricht� Der vollständige Text der EU-Kon- formitätserklärung ist bei der Alfred Schellenberg GmbH hinterlegt und kann bei unserem Kundenservice angefordert werden�... -
Page 7: Bestimmungsgemäße Verwendung
Eine andere oder darüber hinausgehende Verwendung gilt als nicht bestim- mungsgemäß� Für Personenschäden, Sachschäden und Folgeschäden bei nicht bestimmungs- gemäßer Verwendung haftet die Alfred Schellenberg GmbH nicht� Nach der Norm EN 13659 muss dafür Sorge getragen werden, dass die für die Behänge festgelegten Verschiebungsbedingungen nach EN 12045 eingehalten werden�... -
Page 8: Technische Daten
Netzanschlusskabel 2x0,75qmm H03VVH2-F Anzahl Bedientasten Anzahl LEDs LpA < _ 70 dB (A) Schalldruckpegel Frequenz 868,4 MHz Schellenberg Radio System Sendeleistung max 10dbm Reichweite im Gebäube ca. 20m Reichweite im Freifeld ca, 100m Die Angaben sind Richtwerte und gelten für eine ideale Einbausituation�... - Page 9 Hinweise: Nach einem Netzausfall bleiben die eingestellten Schaltzeiten erhalten� Sobald die Stromversorgung wieder gewährleistet ist, werden Öffnungs- und Schließ- zeiten um die Dauer des Stromausfalls versetzt und ausgeführt. Öffnungs- und Schließzeiten neu setzen� Verwenden Sie das Produkt nur mit Rollladengurten der in der Tabelle „Tech- nische Daten“...
-
Page 10: Produkterklärung
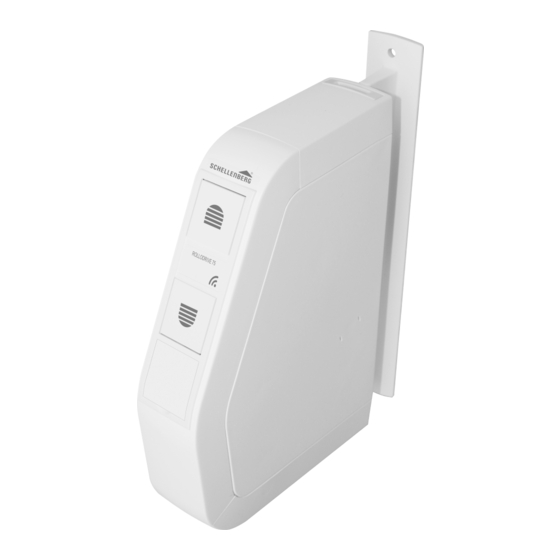
PRODUKTERKLÄRUNG Wandhalterung (C) Gurteinlass Montagelager Wickelrad Bedientasten Haken für Gurtband Kontrollleuchte Montage- sicherung Abdeckblende Einstelltasten Anschluss für Sonnensensor Anschluss für Netzleitung Gurteinlass Wickelfachabdeckung Entriegelungs- klammer... -
Page 11: Funktionsbeschreibung
FUNKTIONSBESCHREIBUNG Taste Auffahrt Rollladen fährt aufwärts oder stoppt� Taste Abfahrt Rollladen fährt abwärts oder stoppt� LED-Kontrollleuchte / Statusanzeige Taste Sonne Schaltet die Sonnen-Funktion ein/aus� Taste Uhr - Einstellen der beiden Schaltzeiten� - Ein- / Ausschalten der Zeitautomatik Taste Dämmerung Schaltet die Dämmerungs-Funktion ein oder aus�... - Page 12 Pairing of further hand-held wireless remote controllers ������������������������������� Pairing with Smart Home System ������������������������������������������������������������������ Copyright protected, 2017 Alfred Schellenberg GmbH� All rights reserved� Any use, in particular reproduction, translation, processing or transmission of content into databases or other electronic media and systems beyond the authorization...
-
Page 13: Safety And Notices
SAFETY AND NOTICES Dear customers, Please completely read this instruction manual before the installation and commissioning� Observe all safety instructions before you begin to work� Keep the instruction manual stored at hand and advise each user about possible dangers that are related to this product� When ownership to this product changes, hand this instruction manual over to the new owner�... -
Page 14: Eu Declaration Of Conformity
Alfred Schellenberg GmbH hereby declares that the product (Item No� 22576/ 22578) is compliant with the 2014/53/EU guideline� The complete text of the EU declaration of conformity is deposited at Alfred Schellenberg GmbH, and can be requested from our customer service� E-Mail: service.int@schellenberg.de... -
Page 15: Intended Use
Any other or further utilization beyond the explicitly specified shall be regarded as not intended use� Alfred Schellenberg GmbH shall not be liable for any consequential damage, property damage and personal injury due to improper use� According to EN 13659, it must be ensured that the displacement requirements as per EN 12045 are met for the hanging material�... -
Page 16: Technical Data
Number operating buttons Number of LEDs LpA < _ 70 dB (A) Sound pressure level Frequency 868,4 MHz Schellenberg The specifications provided are recommended values and apply to ideal installation situations� Due to existing site conditions, the values may be different. - Page 17 Notes After a power failure, the settings will be permanently retained� As soon as the supply of power returns, the opening and closing times will be processed again� Setting the new opening and closing times� Only use the product with roller shutter belts with the dimensions indicated in the „Technical data“...
-
Page 18: Product Explanation
PRODUCT EXPLANATION Wall holder (C) Belt inlet Mounting bearings Winding wheel Number operatingbuttons Hook for Indicator light the belt Mounting lock Cover panel Adjustment buttons Connector for the sun sensor Connection for mains cable Belt inlet Roll-up compartment cover Unlocking clip... -
Page 19: Functional Description
FUNCTIONAL DESCRIPTION G Open button Roller shutter moves up or stops� Close button The roller shutter moves downwards or stops� Sets values in the menu� LED indicator light / status indicator Sun button Switches the sun function on / off. Clock button - Setting of the two switching times�... - Page 20 Couplage avec le système Smart Home �������������������������������������������������������� Soumis au droit d‘auteur, 2017, Alfred Schellenberg GmbH� Tous droits réservés� Interdiction de toute utilisation non autorisée par le droit d‘auteur, et notamment de la reproduction, de la traduction, de la transformation ou de la transmis-...
-
Page 21: Sécurité Et Consignes
SÉCURITÉ ET CONSIGNES Chers clients, chères clientes, Veuillez lire cette notice complètement avant le montage et la mise en service� Respectez toutes les consignes de sécurité avant de commen- cer les travaux� Conservez cette notice et indiquez à chaque utilisateur les éventuels dangers en liaison avec ce produit�... -
Page 22: Déclaration De Conformité Ue
DÉCLARATION DE CONFORMITÉ UE La société Alfred Schellenberg GmbH déclare par la présente que le produit (Réf� 22576/22578) est conforme à la directive 2014/53/UE� Le texte complet de la déclaration de conformité UE est enregistré au sein de la société Alfred Schel- lenberg GmbH et peut être demandé... -
Page 23: Utilisation Conforme
Toute autre utilisation ou utilisation dépassant ce cadre est considérée comme non conforme� L‘entreprise Alfred Schellenberg GmbH ne garantit pas les dommages matériels, corporels et consécutifs résultant d‘une utilisation non conforme� Conformément à la norme EN 13659, il convient de veiller à ce que les conditi- ons de déplacement définies pour les tentures selon EN 12045 soient respec-... -
Page 24: Caractéristiques Techniques
Nombre de touches de commande Nombre de DEL LpA < _ 70 dB (A) Niveau de pression acoustique Fréquence 868,4 MHz Schellenberg Les données sont indicatives et se réfèrent à une situation de montage idéale. Les valeurs peuvent différer en raison des données locales. - Page 25 Nota: Les paramètres sont conservés, même après une panne secteur� Dès que l‘ali- mentation en courant est restaurée, les heures d‘ouverture et de fermeture sont de nouveau exécutées en étant décalées de la durée de la panne de courant� Régler de nouveau l‘heure d‘ouverture et de fermeture� Utilisez le produit exclusivement en liaison avec des sangles de volet roulant présentant les cotes indiquées dans le tableau «...
-
Page 26: Description Du Produit
DESCRIPTION DU PRODUIT Support mural (C) Entrée de sangle Palier de montage Roue d‘enroulement Touches de commande Crochet pour Témoin lumineux la sangle Arrêt de montage Cache de recouvrement Touches de réglage Raccordement pour le capteur Soleil Raccordement pour le câble secteur Recouvrement du com- partiment d‘enroulement Entrée de... -
Page 27: Description Fonctionnelle
DESCRIPTION FONCTIONNELLE Touche Montée Le volet roulant s‘ouvre ou s‘arrête� Touche Descente Le volet roulant se ferme ou s‘arrête� Témoin de contrôle DEL / Affichage de statut Touche Soleil Active/Désactive la fonction Soleil� Touche Horloge - Réglage des deux heures de commu- tation�... - Page 28 Dołączanie dodatkowych pilotów ������������������������������������������������������������������� Sprzężenie z systemem Smart Home ����������������������������������������������������������� Chronione prawami autorskimi, 2017, Alfred Schellenberg GmbH� Zabronione jest wszelkie wykorzystanie niezgodne z Ustawą o prawie autorskim, w szczególności powielanie, tłumaczenie, przetwarzanie lub przekazywanie treści w bazach danych lub na/w innych nośnikach i systemach elektronicznych.
-
Page 29: Bezpieczeństwo I Wskazówki
BEZPIECZEŃSTWO I WSKAZÓWKI Szanowna Klientko, Szanowny Kliencie Przed montażem i uruchomieniem dokładnie przeczytaj niniejszą instrukcję. Przestrzegaj wszystkich zasad bezpieczeństwa przed przystąpieniem do pracy. Zachowaj tę instrukcję oraz informuj każdego użytkownika o ewentualnych zagrożeniach związanych z używaniem produktu. Przy każdej zmianie właściciela przekaż niniejszą instrukcję nowemu właścicielowi. -
Page 30: Deklaracja Zgodności Ue
Firma Alfred Schellenberg GmbH niniejszym oświadcza, że produkt (Nr Art. 22576/22578) spełnia wymogi dyrektywy 2014/53/UE. Pełny tekst deklaracji zgodności UE jest dostępny w firmie Alfred Schellenberg GmbH i można go uzyskać w naszym biurze obsługi klienta. E-mail: service.int@schellenberg.de Dyrektywa maszynowa... -
Page 31: Użycie Zgodne Z Przeznaczeniem
Inne lub wykraczające poza powyższe użytkowanie jest uważane za niezgodne z przeznaczeniem� Alfred Schellenberg GmbH nie odpowiada za szkody następcze, szkody materi- alne i osobowe, spowodowane użyciem niezgodnym z przeznaczeniem. Zgodnie z normą EN 13659 użytkownik musi zapewnić warunki przesuwania zasłon zgodne z wymogami normy EN 12045. -
Page 32: Dane Techniczne
Liczba przycisków obsługowych Liczba diod LED LpA < _ 70 dB (A) Poziom ciśnienia akustycznego Częstotliwość 868,4 MHz Schellenberg Podane parametry są wartościami orientacyjnymi i dotyczą idealnej sy- tuacji montażowej. Ze względu na specyfikę miejsca montażu wartości mogą być inne. - Page 33 Wskazówki: Ustawienia są trwale zachowywane także w razie awarii sieci. Po przywróceniu zasilania czasy otwarcia i zamknięcia są przesunięte o czas trwania awarii zasi- lania. Ustaw czas otwarcia i zamknięcia od nowa. Używaj produkt tylko do taśm roletowych o wymiarach zawartych w tabeli „Dane techniczne“.
-
Page 34: Objaśnienie Produktu
OBJAŚNIENIE PRODUKTU Uchwyt ścienny (C) Wlot taśmy Łożysko montażowe Krążek zwijający Przyciski obsługowe Hak do taśmy Lampka kontrolna Zabezpieczenie montażowe Osłona Przyciski ustawcze Przyłącze do czujnika słonecznego Przyłącze do przewodu sieciowego Wlot taśmy Osłona pojemnika do zwijania Klamra zwal- niająca... -
Page 35: Opis Działania
OPIS DZIAŁANIA Przycisk podnoszenia Roleta podnosi się lub zatrzymuje. Przycisk opuszczania Roleta opuszcza się lub zatrzymuje. Lampka kontrolna LED / wskaźnik stanu Przycisk Słońce Włącza/wyłącza funkcję Słońce. Przycisk zegara - Ustawianie obu czasów przesterowania. - Włączanie/wyłączanie automatyki czasowej� Przycisk zmierzchowy Włącza lub wyłącza funkcję... - Page 36 Accoppiamento sistema Smart Home ����������������������������������������������������������� Protetto da copyright, 2017, Alfred Schellenberg GmbH� Tutti i diritti riservati� È vietato qualsiasi tipo di utilizzo diverso da quello previsto dai diritti d’autore, in particolare la copia, la traduzione, l’elaborazione o la trasmissione dei contenuti in...
-
Page 37: Sicurezza Ed Avvertenze
SICUREZZA ED AVVERTENZE Gentile cliente, prima di procedere al montaggio e all‘utilizzo dell‘apparecchio si prega di leggere attentamente le istruzioni� Rispettare tutte le avvertenza prima di procedere con i lavori� Conservare le istruzioni ed informare eventuali utenti sui rischi correlati all’uso del presente prodotto� In caso di cambio di proprietà, consegnare le presenti Istruzioni al nuovo proprietario�... -
Page 38: Dichiarazione Di Conformità Ue
DICHIARAZIONE DI CONFORMITÀ UE Con la presente la ditta Alfred Schellenberg GmbH dichiara che il prodotto (N� Art� 22576/22578) è conforme alla direttiva 2014/53/CE� Il testo integrale della di- chiarazione di conformità UE è depositato presso la Alfred Schellenberg GmbH e può... -
Page 39: Uso Conforme
Un impiego diverso o che non rientri in quello previsto del prodotto non è consi- derato conforme� La Alfred Schellenberg GmbH non si assume alcuna responsabilità per danni conseguenti, danni a persone e cose nel caso di un impiego diverso rispetto a quello previsto�... -
Page 40: Dati Tecnici
LpA < _ 70 dB (A) Livello di pressione acustica Frequenza 868,4 MHz Schellenberg Le indicazioni riportate sono dei valori di riferimento e sono valide per una situazione di montaggio ideale� Questi valori possono divergere in base alla struttura presente�... - Page 41 Note: Le impostazioni rimangono invariate dopo una caduta di tensione� Non appena viene ripristinata l’energia elettrica, vengono eseguiti nuovamente i tempi di apertura e di chiusura spostati per la durata dell’interruzione di energia elettrica� Impostare nuovamente gli orari di apertura e di chiusura� Utilizzare il prodotto solo con cinghie delle misure indicate nella tabella “Dati tecnici”�...
-
Page 42: Spiegazione Del Prodotto
SPIEGAZIONE DEL PRODOTTO Supporto a parete (C) Ingresso cinghia Cuscinetto di montaggio Ruota di avvolgimento Tasti di comando Gancio Spia di controllo nastro Protezione di montaggio Montatura di copertura Tasti di impostazione Collegamento per sensore solare Collegamento per cavo di rete Ingresso Copertura vano avvolgimento cinghia... -
Page 43: Descrizione Delle Funzioni
DESCRIZIONE DELLE FUNZIONI Tasto Salita L’avvolgibile sale o si arresta� Tasto Discesa L’avvolgibile scende o si arresta� Spia di controllo a LED / Indicatore di stato Tasto Sole Attiva/Disattiva la funzione solare� Tasto Ora - Impostazione dei due tempi di co mutazione�... -
Page 44: Abmessungen
ABMESSUNGEN 37 mm 155 mm... -
Page 45: Lieferumfang & Benötigte Werkzeuge
6 mm 1,50 m... - Page 48 30kg 30kg...
- Page 50 6 mm...
- Page 55 Click...
- Page 56 Click...
-
Page 57: B Obere Endlage Einstellen
2sec 90 %... - Page 58 100 %...
- Page 59 1 sec� 2 sec� 3 sec� 4 sec� 5 sec� ���...
-
Page 60: C Untere Endlage Einstellen
2sec 90 % 100 %... - Page 61 1 sec� 2 sec� 3 sec� 4 sec� 5 sec� ���...
-
Page 65: F Automatikbetrieb: Öffnungs- Und Schließzeiten Einstellen
Nach eingestellter Zeit leuchtet die LED�... - Page 66 Die Schritte 38 und 39 müssen einmalig zur gewünschten Uhrzeit vorgenommen werden� Es muss mindestens eine Schaltzeit einge- stellt werden, z�B um 7 Uhr morgens, z�B um 22 Uhr abends� Steps 37 and 38 must be perfor- med once at the required time� At least one switching time must be set�...
-
Page 67: G Automatikbetrieb: Manuell- Automatikumschaltung
B + C 2sec... -
Page 68: Hinderniserkennung
Trifft der Rollladen während der Ab- fahrt auf ein Hindernis, schaltet der ROLLODRIVE ab� Fahren Sie den Rollladen frei und entfernen Sie das Hindernis� If the shutter hits an obstacle when closing, the ROLLODRIVE will switch off. Open the roller shutter upwards and remove the obstacle�... -
Page 69: I Blockiererkennung
Blockiert der Rollladen während der Blockiert der Rollladen während der Auffahrt (z.B. durch Vereisung), Auffahrt (z.B. durch Vereisung), schaltet der ROLLODRIVE 55 ab� schaltet der ROLLODRIVE ab� Beseitigen Sie die Überlastungs- Beseitigen Sie die Überlastungs- ursache� ursache� If the roller shutter gets stuck while opening (e�g�... -
Page 70: J Werksreset
6sec... -
Page 81: M Laufzeitbegrenzung
max. min. 4 min 12 min 60 min... -
Page 82: N Optionales Zubehör: Sonnen- Und Dämmerungssensor
Sensor, ca� 0,75 m Kabellänge Art�Nr� 22720/22721 ca� 1,50 m Kabellänge Art�Nr� 02266* ca� 3,00 m Kabellänge Art�Nr� 02267* *Kommissionsartikel, auf Bestellung lieferbar. Sensor, approx� 0�75 m cable length item-no� 22720/22721 approx� 1�50 m cable length item-no� 02266* approx� 3�00 m cable length item-no� 02267* *Commission item, available upon request. - Page 83 min� 20 cm...
-
Page 84: O Einstellen Des Helligkeitswertes - Sonnenfunktion
2sec Die Sonnenautomatik wird bei der Übernahme des aktuellen Helligkeitswerts eingeschaltet� Drücken Sie gleichzeitig die Taste Sonne und die Taste Uhr� Der aktuelle Helligkeitswert gilt jetzt als Grenzwert� Zur Bestätigung blinkt die LED Sonne kurz auf� Hinweis: Die Übernahme sollte bei der gewünschten Helligkeit erfolgen� The automatic Sun function is switched on with the adoption of the current brightness value�... -
Page 85: P Ein- Und Ausschalten Der Sonnenfunktion
Automatyka przeciwsłoneczna jest włączana po zaakceptowaniu aktualnej wartości jasności. Naciśnij jednocześnie przycisk Słońce i przycisk Zegar. Aktualna wartość jasności stanowi teraz wartość graniczną. Jako potwierd- zenie miga przez chwilę dioda LED Słońce. Wskazówka : Akceptacja powinna następować przy pożądanym poziomie jasności. -
Page 86: Q Funktionsschaubild Der Sonnenfunktion
~ 5 min. ~ 5 min. ~ 20 min. - Page 87 Wird die eingestellte Helligkeit ca� 10 Minuten ununterbrochen erkannt, fährt der Rollladen bis zum Saugknopf des Sonnensensors nach unten� Nach ca� 20 Minuten wird der Roll- laden ein Stück hochgezogen und der Lichtsensor ist freigegeben� Wird weiterhin die ein- gestellte Helligkeit erkannt, bleibt der Rollladen dort stehen� Wird die eingestellte Helligkeit unterschritten, fährt der Rollladen bis zum oberen Endanschlag hoch�...
-
Page 88: R Einstellen Des Dämmerungswertes - Dämmerungsfunktion
1sec Die Dämmerungsfunktion wird bei der Übernahme des aktuellen Dämme- rungswertes eingeschaltet� Drücken Sie gleichzeitig die Taste Dämmerung und die Taste Uhr� Die aktuelle Dämmerung gilt jetzt als Grenzwert� Zur Bestätigung blinkt die LED Mond kurz auf� Hinweis: Die Übernahme sollte abends bei der gewünschten Dämmerung erfolgen�... -
Page 89: S Ein- Und Ausschalten Der Dämmerungsfunktion
Funkcja zmierzchowa jest włączana po zaakceptowaniu aktualnej wartości zmierzchu. Naciśnij jednocześnie przycisk Zmierzch i przycisk Zegar. Aktual- na wartość zmierzchu stanowi teraz wartość graniczną. Jako potwierdzenie miga przez chwilę dioda LED Księżyc. Wskazówka: Akceptacja powinna nastąpić wieczorem przy pożądanym poziomie zmierzchu� La funzione crepuscolare si attiva con l’applicazione del valore crepuscolare attuale�... -
Page 90: T Funktionsschaubild Der Dämmerungsfunktion
Wird der eingestellte Dämmerungswert für ca� 15 Sekunden erkannt, blinkt die LED Mond und der Rollladen fährt runter� Nach der Abfahrt wird die Däm- merungsfunktion erst nach 19 Stunden wieder aktiv� Der Rollladen fährt im manuellen Betrieb oder zur nächsten, eingestellten Auffahrtzeit wieder nach oben�... -
Page 91: U Optionales Zubehör: Funk-Handsender / -Zeitschaltuhr
Gdy ustawiony poziom jasności (zmierzch) jest rejestrowany przez ok. 15 sekund, miga dioda LED pod ikoną Księżyca i roleta opuszcza się. Po opu- szczeniu rolety funkcja zmierzchowa jest uaktywniana dopiero po upływie 19 godzin. Roleta może być podniesiona w trybie ręcznym lub ponownie o tym samym ustawionym czasie podniesienia�... -
Page 92: Funk-Handsender Koppeln
V FUNK-HANDSENDER KOPPELN 4sec... - Page 93 Durch das Drücken der beiden Tasten wird der ROLLODRIVE in den Program- miermodus versetzt� Ab diesem Zeitpunkt muss innerhalb 10 Sekunden der Funk-Handsender gekoppelt werden (Schritte 86 bis 89)� Sind 10 Sekunden vergangen ohne den Funk-Handsender zu koppeln, muss der ROLLODRIVE durch das Wiederholen des Schrittes 86 erneut in den Programmiermodus ver- setzt werden�Es sind max�...
-
Page 95: W Weitere Funk-Handsender Koppeln
1- 5 1- 5... - Page 97 max�...
-
Page 98: Kopplung Smart Home-System
Koppeln Sie das Produkt mit dem Schellenberg Smart Home System oder dem Smart Friends System und benutzen Sie alle Schellenberg Funk-Produkte bzw� „Ready für Smart Friends“-Produkte über eine App miteinander� SCHELLENBERG SMART HOME SYSTEM Art�Nr� 21000 www�schellenberg�de/SH1/ SMART FRIENDS SYSTEM... - Page 99 Pair the product with the Smart Friends System, and control all „Ready for Smart Friends“ products through the Friends app� Coupler le produit avec le système Smart Friends et gérer tous les produits « Ready for Smart Friends » à l‘aide de l‘application Friends� Produkt można skojarzyć...
- Page 100 Per la garanzia, pezzi di ricambio o informazioni sulle operazioni di montaggio corrette del prodot- to, si prega di contattare il servizio di assistenza clienti� service.int@schellenberg.de Alfred Schellenberg GmbH An den Weiden 31 D-57078 Siegen service.int.@schellenberg.de www.schellenberg.de...
Need help?
Do you have a question about the ROLLODRIVE 75 PREMIUM and is the answer not in the manual?
Questions and answers