Table of Contents
Advertisement
Available languages
Available languages
EN
* NOTE: this Tuner is supporting the reception of Free To Air
programmes only
CONTENTS OF THE PACKAGE
Tuner Unit, Remote Control Unit, 2 pcs AAA type Batteries,
User Manual
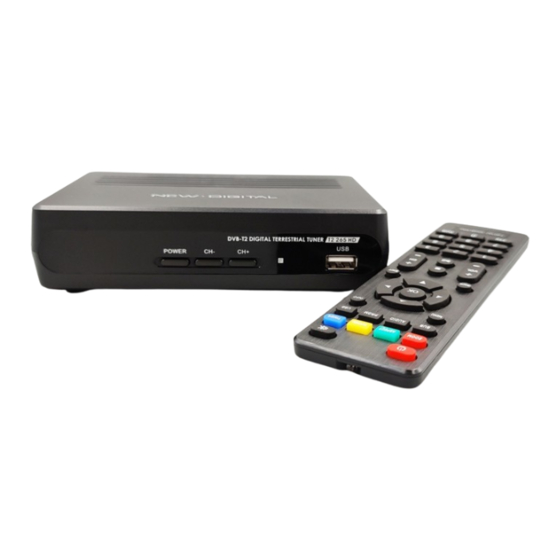
Front panel and controls
1
2
Rear panel
1
2
3
4
3
4
5
5
HIGH DEFINITION DIGITAL TERRESTRIAL
DVB-T2/T TUNER WITH H.265 SUPPORT
USER MANUAL
IMPORTANT SAFETY INSTRUCTIONS
1. Read and follow these instructions.
2. Do not use this apparatus near water, heat sources, do not expose to direct sunlight and the
temperatures higher than in normal household. For Indoor use only!
3. Clean only with dry cloth, protect from moisture and dirt, do not cover the ventilation grid.
4. Operate this product only from the type of power source indicated on the label. Protect the
Device and the power cord from the moisture, physical damage.
5. Unplug this apparatus during lightning storms or when unused for the longer period.
6. Do not disassemble the unit or try to insert any extraneous items into it.
7. Refer all servicing to qualified service personnel only. Servicing is required when the apparatus
has been damaged in any way, including damage to the mains cord or plug, if the unit was
exposed to liquids or moisture, has been dropped or not operating correctly.
CAUTION
Risk of electric shock!
DO NOT OPEN!
ATTENTION
Risque de choc electrique!
NE PAS OUVRIR!
This symbol indicates that dangerous voltages constituting a risk of electric shock are
present within this unit.
This symbol indicates that there are important operating and maintenance
instructions in the literature accompanying this unit.
This symbol indicates that this product incorporates double insulation between
hazardous mains voltage and user accessible parts. When servicing use only identical
replacement parts.
This symbol on the product or in the instructions means that your electrical and
electronic equipment should be disposed at the end of life separately from your
household waste. There are separate collection systems for recycling.
For more information, please contact the local authority or your retailer where you
purchased the product.
This symbol on the product means that your equipment is suitable only for Indoor use.
FRONT AND REAR PANELS AND CONNECTIONS DIAGRAM
1
POWER – Switches between working and Standby mode
2
CH-
switches TV program up the list
3
CH+ switches TV program down the list
4
IR (Infrared remote control) window
5
USB -- connector for external USB memory device (USB 2.0 support)
1
RF IN: This socket connects to your external Aerial
2
COAXIAL (SPDIF) – Digital Audio Output
3
HDMI: High definition audio and video output used to connect to TV HDMI socket
4
LAN – Data network connector for service/maintenance functions
5
TV SCART – analog Audio / video output for connection to TV set
Advertisement
Table of Contents

Related Manuals for New Digital T2 265 HD


Summary of Contents for New Digital T2 265 HD
- Page 1 HIGH DEFINITION DIGITAL TERRESTRIAL DVB-T2/T TUNER WITH H.265 SUPPORT USER MANUAL IMPORTANT SAFETY INSTRUCTIONS 1. Read and follow these instructions. 2. Do not use this apparatus near water, heat sources, do not expose to direct sunlight and the temperatures higher than in normal household. For Indoor use only! 3.
-
Page 2: First Time Installation
DESCRIPTION OF THE REMOTE CONTROL UNIT (RCU) POWER: Turns the receiver On/Standby. ZOOM: Increases the size of the image. 3. ASPECT: Switch 4:3/16:9. SUB: Shows list of available subtitle languages temporary override of the subtitle setting in the main menu. AUDIO: Shows list of available audio type or language temporary override of Main menu audio setting. - Page 3 Edit Channel Menu: Allows to edit the TV channels individually. Main sections: · TV Channel list – allows to edit TV channel list · Radio Channel List – allows to edit Radio channel list · Delete All – deletes all preprogrammed channels To Edit TV Channel list: Enter TV channel list section Select the TV channel you would like to edit...
- Page 4 Press Exit, the heart Icon will appear at the name of the TV program. Press FAV to disable FAV function Press Exit to Exit edit Menu (the popup asking for edit confirmation will appear) Press Exit to exit the Main Menu. To view the favorite program in the Favorite Group 1: When viewing the program press OK to retrieve the ALL TV channel list Press Right / Left arrow buttons to select between ALL TV / Fav group 1 lists:...
- Page 5 DVBT Channel Scan Menu: Scan mode – By channel (Recommended) Select the Scan Band (VHF or UHF) Select the channel Number of the Brodcasted TV Package Check the Signal Intensity and Quality is high enough to receive the broadcasted program Package. * NOTE: to ensure good reception conditions it is Highly recommended to install the Antenna to ensure Signal Intensity (level) not less than 60% and Signal quality not less than 80%.
- Page 6 System Setup Menu: Set up the Tuner according to User requirements Language – allows to set the OSD Menu, Audio and Teletext languages accordingly TV system – allows to set Video resolution, Aspect mode, Digital Audio output mode and turn on / off HDR (High dynamic rate) correction. *NOTE: when using the Tuner with 16:9 LCD/LED TV sets it is recommended to use Video resolutions of 1080i or 1080p to achieve the best picture quality via HDMI port.
- Page 7 · Parental Lock – Allows to set the Tuner for locking the Menu, Programmes according to Rating, set the New password for the system. · OSD Setting – Allows to set the On screen display appearance time (timeout) and OSD ·...
-
Page 8: Other Functions
OTHER FUNCTIONS: Program Guide : · Press [PRGM] key to display Program Guide screen. Press [OK] key in each item can see more detail information and press [RED] key to cancel. Audio language Menu: Press Audio key on RCU, the Audio Menu will appear on screen with multiple Audio Tracks listed (if available from Broadcaster). -
Page 9: Troubleshooting
TROUBLESHOOTING Potential reasons What to do PROBLEM Power isn’t connected Connect the power. Audio/Video OUT No picture The power switch is not on Switch on the power DVB-T or DVB-T2 cable not connected Plug in the DVB-T or DVB-T2 cable Screen shows No Signal Aerial cable is faulty... -
Page 10: Importanti Istruzioni Di Sicurezza
SINTONIZZATORE DIGITALE TERRESTRE AD ALTA DEFINIZIONE DVB-T2/T CON SUPPORTO H.265 MANUALE UTENTE IMPORTANTI ISTRUZIONI DI SICUREZZA 1. Leggere e seguire queste istruzioni. 2. Non utilizzare questo dispositivo vicino ad acqua, fonti di calore, né esporre alla luce diretta del sole e a temperature più elevate rispetto a quelle normalmente presenti in casa. Esclusivamente per uso interno! 3. -
Page 11: Descrizione Del Telecomando
DESCRIZIONE DEL TELECOMANDO 1. ACCENSIONE: Accende il ricevitore o lo mette in standby. 2. ZOOM: Aumenta le dimensioni dell'immagine. 3. ASPETTO: Passa tra le modalità 4:3 e 16:9. 4. SOTTOTITOLI: Mostra la lista delle lingue disponibili per i sottotitoli e sovrascrive temporaneamente le impostazioni dei sottotitoli nel menu principale. 5. - Page 12 Menu Modifica Canali: Consente di modificare individualmente i canali TV. Sezioni principali: Lista dei canali TV: permette di modificare la lista dei canali TV Lista dei canali radio: permette di modificare la lista dei canali radio Cancella tutto: cancella tutti i canali memorizzati Per modificare la lista dei canali TV: Entrare nella sezione con la lista dei canali TV Selezionare il canale TV che si vuole modificare...
-
Page 13: Installazione
Premere Exit, l'icona col cuore apparirà sul nome del programma TV Premere FAV per disabilitare la funzione FAV Premere Exit per uscire dal menu di modifica (apparirà una finestra di conferma della modifica) Premere Exit per andare al menu principale. Per vedere il programma preferito nel Gruppo Preferiti 1: Quando si sta guardando il programma premere OK per recuperare TUTTA la lista dei canali TV... - Page 14 Menu Scansione Canali DVBT: Modalità di scansione: Per canale (consigliata) Seleziona la Banda di Scansione (VHF o UHF) Seleziona il numero di canale o il pacchetto di Trasmissione TV Controllare che l'intensità e la qualità del segnale siano sufficienti per ricevere il pacchetto di programmi trasmessi.
- Page 15 Menu Impostazioni di Sistema: Imposta il sintonizzatore in base ai requisiti definiti dall'utente Lingua: permette di impostare la lingua del Menu OSD, dell'Audio e del Teletext. Sistema TV: permette di impostare la risoluzione video, la modalità di aspetto, la modalità di uscita digitale dell'audio e di attivare/disattivare la correzione HDR (High Dynamic Rate).
- Page 16 Blocco genitori: permette di impostare il sintonizzatore in modo da bloccare il menu e i programmi in base alla loro classificazione, e di impostare una nuova password per il sistema. Impostazione OSD: permette di impostare il tempo (timeout) di comparsa delle indicazioni sullo schermo e la loro trasparenza.
-
Page 17: Altre Funzioni
ALTRE FUNZIONI: Guida ai programmi: Premere il tasto [PRGM] per mostrare lo schermo della Guida ai Programmi. Premere il tasto [OK] su ogni voce per vedere informazioni più dettagliate e premere il tasto [ROSSO] per cancellare. Menu lingua audio: Premere il tasto Audio sul telecomando. Apparirà... -
Page 18: Guida Alla Risoluzione Dei Problemi
GUIDA ALLA RISOLUZIONE DEI PROBLEMI Possibili motivi PROBLEMA Cosa fare L'alimentazione non è collegata Collegare l'alimentazione e le uscite Audio/Video Nessuna immagine Il tasto dell'interruttore non è acceso Accendere l'alimentazione Collegare il cavo DVB-T o DVB-T2 Il cavo DVB-T o DVB-T2 non è collegato Lo schermo non mostra nessun segnale Il cavo dell'antenna è... -
Page 19: Ważne Wskazówki
TUNER CYFROWEJ TELEWIZJI NAZIEMNEJ WYSOKIEJ ROZDZIELCZOŚCI DVB-T2/T Z OBSŁUGĄ STANDARDU H.265 INSTRUKCJA OBSŁUGI WAŻNE WSKAZÓWKI 1. Przeczytaj i postępuj zgodnie z niniejszą instrukcją. 2. Nie używaj tego urządzenia w pobliżu wody, źródeł ciepła, nie wystawiaj na bezpośrednie działanie promieni słonecznych i temperatur wyższych niż w normalnym gospodarstwie domowym. -
Page 20: Pierwsza Instalacja
OPIS MODUŁU ZDALNEGO STEROWANIA (RCU) 1. POWER: Włącza urządzenie/przełącza na tryb czuwania 2. ZOOM: Powiększa obraz 3. ASPECT: Przełącza pomiędzy trybami 4:3/16:9. 4. SUB: Pokazuje listę dostępnych języków napisów, tymczasowe zastąpienie ustawienia napisów w menu głównym 5. AUDIO: Pokazuje listę dostępnych typów lub języków dźwięku, które mogą tymczasowo zastąpić... - Page 21 Edycja kanałów: Umożliwia indywidualną edycję kanałów telewizyjnych. Główne sekcje: TV Channel list – Lista kanałów TV - pozwala na edycję listy kanałów TV Radio Channel List – Lista kanałów radiowych - pozwala na edycję listy kanałów radiowych Delete All – Usuń wszystko - usuwa wszystkie zaprogramowane kanały Aby edytować...
- Page 22 Naciśnij Exit, ikona serca pojawi się przy nazwie programu telewizyjnego. Naciśnij FAV, aby wyłączyć funkcję FAV Naciśnij Exit, aby wyjść z menu edycji (pojawi się okno z prośbą o potwierdzenie edycji Naciśnij Exit, aby wyjść z Menu głównego. Aby wyświetlić ulubiony program w Grupie Ulubionych Podczas oglądania programu naciśnij OK, aby wyświetlić...
- Page 23 DVBT Skanowanie kanałów: Scan mode – Tryb skanowania - według kanałów (zalecane) Wybierz pasmo skanowania (VHF lub UHF) Wybierz numer kanału nadawanego pakietu telewizyjnego Sprawdź, czy natężenie i jakość sygnału jest wystarczająco wysoka, aby odbierać nadawany program Pakiet. * UWAGA: w celu zapewnienia dobrych warunków odbioru zaleca się zainstalowanie anteny w taki sposób, aby Intensywność...
- Page 24 Menu ustawień systemowych: Konfiguracja tunera zgodnie z wymaganiami użytkownika Language – (Język) - umożliwia odpowiednie ustawienie języka menu OSD, audio i teletekstu System TV - pozwala na ustawienie rozdzielczości Video, trybu Aspect, trybu wyjścia Digital Audio oraz włączenie/wyłączenie korekcji HDR (High dynamic rate) *UWAGA: w przypadku korzystania z tunera z telewizorami LCD/LED 16:9 zaleca się...
- Page 25 Parental Lock – (Blokada rodzicielska) - Umożliwia ustawienie tunera w celu zablokowania menu, programów zgodnie z klasyfikacją, ustawienie nowego hasła dla systemu OSD Setting – możliwia ustawienie czasu wyświetlania na ekranie (timeout) I OSD Transparency (Przezroczystość) Favorite – (Ulubione) - Umożliwia zmianę nazwy grup ulubionych programów Audio Description setting (Opis dźwiękowy) - dostępność...
-
Page 26: Inne Funkcje
INNE FUNKCJE: Przewodnik po programach: Naciśnij przycisk [PRGM], aby wyświetlić ekran przewodnika po programach. Naciśnij przycisk [OK] w każdej pozycji, aby zobaczyć więcej szczegółowych informacji i naciśnij przycisk [RED], aby anulować. Menu języka audio: Naciśnij przycisk Audio na RCU, menu Audio pojawi się na ekranie z listą... -
Page 27: Rozwiązywanie Problemów
ROZWIĄZYWANIE PROBLEMÓW Możliwe przyczyny Co należy zrobić PROBLEM Zasilanie nie jest podłączone Podłącz zasilanie. Wyjście audio/wideo Brak obrazu Przełącznik zasilania nie jest włączony Włącz zasilanie Kabel DVB-T lub DVB-T2 nie jest podłączony Podłącz kabel DVB-T lub DVB-T2 Na ekranie pojawia się komunikat Brak sygnału Kabel antenowy jest uszkodzony Sprawdź...
Need help?
Do you have a question about the T2 265 HD and is the answer not in the manual?
Questions and answers