Table of Contents
Advertisement
Quick Links
Advertisement
Table of Contents

Subscribe to Our Youtube Channel
Related Manuals for Pulsar Ultra S


Summary of Contents for Pulsar Ultra S
- Page 1 Ultra S IR illuminator Manual...
-
Page 2: Table Of Contents
Content Description Package Contents Specifications Features Installing the IR Illuminator Powering on and Adjusting the IR Illuminator Removing the IR Illuminator Precautions Maintenance Troubleshooting Legal Compliances and Disclaimers... -
Page 3: Description
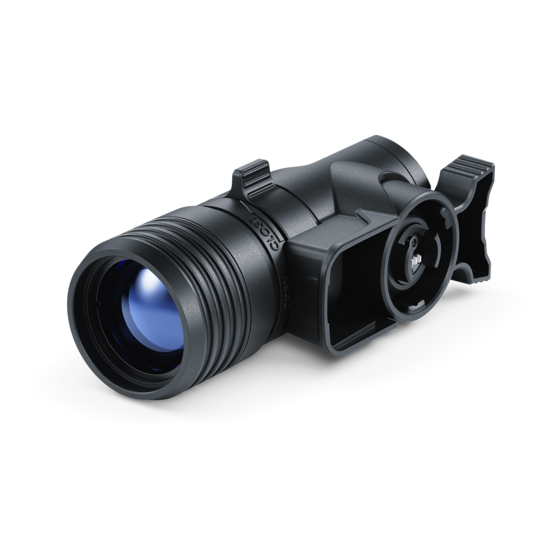
Description Attachable and interchangeable Pulsar Ultra-X850S/-X940SInfrared Illuminators are designed for use with Digisight Ultra N450/ N455, Digisight Ultra N450/N455 LRF digital riflescopes and other compatible Pulsar digital devices. The IR Illuminators provide additional infrared (IR) illumination during observation with night vision devices in low light conditions (no moon, night, thick cloud etc.) and ensure across the whole field of view. -
Page 4: Package Contents
Package Contents IR illuminator Pin protective cover Carrying case Operating manual... -
Page 5: Specifications
Specifications X850S Model X850S 79079 Type Wavelength, nm Lens diameter, Optical power of Up to 800 IR illuminator, mW Beam divergence angle, degrees The possibility of spot alignment in the field of view Operating temperature -25 °С ...+50 (-13...+122) range, °С (°F) Digisight Ultra N450/N455, Digisight Ultra Riflescope N450/N455 LRF, Forward F455, Forward... - Page 6 Weight (with 142 (5) battery), g (oz) ...
- Page 7 X940S Model X850S 79199 Type Wavelength, nm Lens diameter, Optical power of Up to 700 IR illuminator, mW Beam divergence angle, degrees The possibility of spot alignment in the field of view Operating temperature -25 °С ...+50 (-13...+122) range, °С (°F) Digisight Ultra N450/N455, Digisight Ultra Riflescope N450/N455 LRF, Forward F455, Forward...
-
Page 9: Features
Features Pulsar Ultra-X850S/-X940S illuminators make it possible to: identify the observed object; see the selected object in detail; increase the observation range; adjust the power of the illuminator depending on the observation conditions; adjust the position of the light spot in the field of view. -
Page 10: Installing The Ir Illuminator
N450/N455 digital riflescopes – pull down the lever (3). 5. Lift up the lever (3) of the IR illuminator. 6. Firmly attach the Pulsar Ultra-X850S/-X940S IR illuminator to the connector (5) in the device or battery (Digisight Ultra LRF riflescope). -
Page 11: Powering On And Adjusting The Ir Illuminator
Powering on and Adjusting the IR Illuminator 1. Make sure that the illuminator is mounted and connected to the device. To do this, turn on the device and check that there is no icon on the display. 2. To turn on the IR illuminator, briefly press the ON/OFF (2) button on the end of the illuminator. - Page 12 Image not found or type unknown Image not found or type unknown ) is displayed in the status bar on the display of the digital device. 5. To align the position of the light spot in the field of view, turn the lens lock knob (4) of the IR illuminator to the OPEN position.
-
Page 13: Removing The Ir Illuminator
Removing the IR Illuminator 1. To remove the Pulsar Ultra-X850S/-X940S illuminator, lift up or lower down the lever (3) (depending on the type of the device). Gently pull the illuminator away from the device. 2. Mount the connector plug (6) of the IR illuminator on the digital device. -
Page 14: Precautions
Precautions Keep water away from the device. This can disable it. Independent alterations or repair of the illuminator are prohibited. Contact the manufacturer for qualified support if any issues arise. -
Page 15: Maintenance
Maintenance Clean the outer surface with a cloth slightly soaked in synthetic detergent. Flick the dust off the lenses with a soft brush. If necessary, clean the lens with a soft cotton cloth moistened with ethyl alcohol or special multi-layer lens liquid. Condensation may form on optical surfaces when moving the illuminator from cold to warm. -
Page 16: Troubleshooting
Troubleshooting The illuminator is not working Possible cause No contact with the device. Solution Make sure that the illuminator is firmly fixed on the device. Check that the floating contacts of the illuminator and the device are not become jammed. Uneven light emission of IR spot Possible cause Dirty lens. -
Page 17: Legal Compliances And Disclaimers
Legal Compliances and Disclaimers This product is subject to change in line with improvements to its design. The device repair is possible within five years.
Need help?
Do you have a question about the Ultra S and is the answer not in the manual?
Questions and answers