Table of Contents
Advertisement
Quick Links
Advertisement
Table of Contents

Related Manuals for X2E XORAYA ML-N4000


Summary of Contents for X2E XORAYA ML-N4000
- Page 1 User Manual ML-N4000 ORAYA Edition: 1.1.3 / May 2022...
- Page 2 This user manual is copyrighted; all customary rights reserved. Reproduction of this manual, even in part, is only allowed with permission of X2E GmbH. Offenders shall be liable to pay compensation and may be subject to prosecution. All product names and trademarks used in this manual are the property of their respective owners.
-
Page 3: Table Of Contents
About this user manual ................5 Validity of the user manual ............... 6 Representation conventions ..............6 Pictograms ....................7 X2E-Wiki ....................8 Safety and warranty ....................... 9 Intended use ..................... 9 Safety label on the device ................ 10 General safety instructions ..............10 Product liability .................. - Page 4 ANUAL ABLE OF CONTENTS Maintenance.......................... 173 Safety measures ..................173 Cleaning ....................174 Repair ....................175 Storage, transport and disposal ................176 Storage ....................176 Transport ....................176 Disposal ....................176 Appendix..........................177 Technical data ..................177 ML-N4000 pin assignments ..............178 Cable pin assignments ................
-
Page 5: Introduction
ANUAL NTRODUCTION Introduction About this user manual Read this user manual completely before using the X ML-N4000 ORAYA for the first time. Please consider this user manual as part of the product and make sure it is easily accessible. ... -
Page 6: Validity Of The User Manual
ANUAL NTRODUCTION Validity of the user manual This user manual applies to X2E’s dataloggers of the X ML-N4000 ORAYA series. The exact type specifications can be found on the nameplate. (➔ Identification) The following instructions are key to operate the ML-N4000 and must be strictly observed under all circumstances. -
Page 7: Pictograms
ANUAL NTRODUCTION Pictograms This manual uses pictograms to highlight and ensure faster recognition of important or especially useful information. Warning: This type of symbols indicate warnings which must be observed. The following subsections contain a description of the basic structure and relevance of different warning levels. General information: This symbol indicates general information. -
Page 8: X2E-Wiki
▪ Latest firmware ▪ Latest licence file ▪ For access details, please send an email stating your contact data to wiki@x2e.de. We will send you the appropriate access data. You may request your access details at any time if necessary. -
Page 9: Safety And Warranty
Upon measuring, safety regulations of the professional associations must be observed. Please contact an expert or the service of X2E GmbH when in doubt about the operation, safety, or connection of the ML-N4000. Intended use The ML-N4000 is used for real-time acquisition of data communication in automotive bus systems. -
Page 10: Safety Label On The Device
ANUAL AFETY AND WARRANTY Safety label on the device You find the following safety label on the ML-N4000 top side: Burning hazard due to hot surfaces Continuous operation can strongly heat up the ML-N4000. As a result, it can burn the skin on the hands when touching it. - Page 11 Keep the ML-N4000 clean. Device damage due to device opening Unauthorised opening of the ML-N4000 can lead to abnormal behaviour or destruction of the device. CAUTION Never open the ML-N4000. Contact X2E GmbH should maintenance and repairs be required.
- Page 12 Safety defects due to incorrect accessories and spare parts Accessories and spare parts that have not been recommended by X2E GmbH negatively affect the safety, CAUTION functionality and precision of the ML-N4000. X2E GmbH shall assume no responsibility whatsoever or...
-
Page 13: Product Liability
Terms of use If the installation of the ML-N4000 in a vehicle is intended for operation on public roads, the user and the X2E GmbH must jointly perform a risk analysis beforehand. This analysis must take into account the specific installation requirements and the valid factory standards at the user's site. -
Page 14: Fcc Notice
After configuring, we recommend to verify the proper operation and plausibility of each sensor using some manual measurement over the entire measuring range. X2E GmbH shall assume no further liability. This limitation of liability also applies to the personal liability of employees, representatives and organs of X2E GmbH. -
Page 15: Product Description
ANUAL RODUCT DESCRIPTION Product description The X dataloggers are processor-controlled storage units, designed to ORAYA record data from several and different data sources simultaneously. These dataloggers are indeed unique in the automotive industry thanks to their central 100-ns timestamp on all interfaces. Furthermore, its modular design allows for a rapid and flexible adjustment to future demands. -
Page 16: Identification
ANUAL RODUCT DESCRIPTION Identification The top side of the ML-N4000 bears a silver nameplate, which contains the following information: Device type Product variant ▪ Serial number Unique identification number for this ML-N4000 ▪ Configuration First block: Product ID ▪ 0200 Datalogger ORAYA Second block: Product variant... -
Page 17: Scope Of Delivery
ANUAL RODUCT DESCRIPTION Scope of delivery The following components are part of the delivery: ML-N4000 ▪ ORAYA Power supply cable ▪ Software ▪ User manual ▪ Cable set, depending on the interface configuration ▪ The following accessories are optionally available: Power supply cable with AC adapter (recommended) ▪... -
Page 18: Connections And Controls
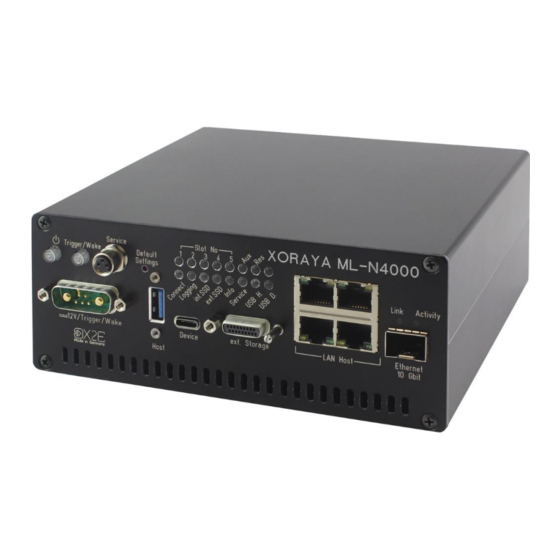
ANUAL RODUCT DESCRIPTION Connections and controls The front side of the ML-N4000 contains ports, buttons and LEDs for operation and elementary functions. The back side of the ML-N4000 contains, depending on the hardware configuration, up to five log interfaces. Front side From Rev. - Page 19 ▪ Long press (3 seconds at least): Stop current recording Service interface (C): In case of errors, this interface is used as a debugging interface by the X2E support team. Default button (D): Press the default button with a pointed object for at least 3 seconds to reset all ML-N4000 settings to factory defaults.
- Page 20 10 Gbit Ethernet interface (G): This interface can be used for data recording or as a faster alternative to the 1 Gbit host interfaces (H). A plugged-in SFP+ module is required. X2E recommends the module FTLX8573D3BTL from Finisar. LAN host interfaces (H): The ML-N4000 features four ports to connect to a switch or directly to a PC.
- Page 21 − Connect the drive and the firmware is automatically updated. Generating the supportfile ▪ − The supportfile is a set of files that you can send to X2E support to help solve technical issues. − Create the folder xoraya_supportfile on the USB flash drive.
- Page 22 ANUAL RODUCT DESCRIPTION Power/trigger/wake port (L): By default, the ML-N4000 must be supplied with 12 V DC voltage. Optionally, it can also operate with power supplies in a certain specified range. (➔ Technical data) Trigger input and trigger button offer an analogous operation. A +12 V signal level at the trigger input is equivalent to pressing the trigger button.
- Page 23 ANUAL RODUCT DESCRIPTION Back side (configuration examples) From Rev. 3.0 on: Log interfaces Base-T1 add-on Log interfaces (M): The slots can be variably equipped with up to five interfaces. Slot and channel number of each hardware interface are also displayed in multiple locations of the X Suite tool Configuration: ORAYA...
- Page 24 ANUAL RODUCT DESCRIPTION You find the switch assignments in the chapter Commissioning (➔ Configuring switches) and the pin assignments in the Appendix. (➔ ML-N4000 pin assignments) Base-T1 add-on (N): This interface is not part of the log interface slot system (M) but implemented as an add-on board.
-
Page 25: Commissioning
Please contact X2E GmbH immediately should the delivery be incomplete or upon damaged components. Do not put any defective component into operation. X2E GmbH can only accept your complaint and replace the affected component upon prompt notification. Keep original packaging Keep the original packaging and packing materials for later storage or further transport. - Page 26 Close all open programs. Use the X Suite setup wizard from the supplied data medium. ORAYA Download the latest version of the X Suite from the X2E-Wiki. ORAYA (➔ X2E-Wiki) Start the setup wizard and follow the instructions.
-
Page 27: Connecting The Ml-N4000 To The Measuring Environment
ANUAL OMMISSIONING Connecting the ML-N4000 to the measuring environment This section describes how to connect the ML-N4000 to the measuring environment. Device damage due to incorrect connection sequence The incorrect connection sequence can lead to abnormal behaviour or destruction of the ML-N4000. CAUTION ... - Page 28 ANUAL OMMISSIONING 4.5.2 Power supply This chapter describes the default connection to a DC power supply via the supplied power cable. If you use the optionally available power cable with AC adapter, please note the specifications on the adapter label. Electric shock due to improper connection of the power supply Introducing the 4-mm plugs of the supplied power cable...
-
Page 29: Oraya
ANUAL OMMISSIONING Continuous current of the DC power supply A 12 V DC power supply must deliver a continuous current of 1 A with 3.3 A peaks. Use a regulated power supply or a car battery and note the required voltage and current levels. -
Page 30: Connecting The Ml-N4000 To The Pc
ANUAL OMMISSIONING The ML-N4000 is equipped with an intelligent energy management system that lowers power consumption to about 1 mA (at 12 V supply voltage) in sleep mode. The device goes into sleep mode via the following actions or under the following conditions: Pressing and holding the power button (A) for at least 2 seconds. -
Page 31: Configuring Switches
ANUAL OMMISSIONING Configuring switches Configure the built-in terminators via the rotary switches on the back of the ML-N4000. For the LIN interface, select between internal or external power supply via the toggle switch. 4.7.1 4x CAN Position Resistance Open (∞) 2.6 kΩ... -
Page 32: Xoraya Suite
ANUAL ORAYA UITE Suite ORAYA This chapter describes the operation of the graphical user interface Suite. ORAYA Starting Perform all commissioning steps. (➔ Commissioning) Start the X Suite by double-clicking the desktop icon. ORAYA Start the X Suite from the Windows Start menu. -
Page 33: Menu Bar
ANUAL ORAYA UITE Menu bar This section describes the five main menus of the menu bar. Individual menu commands are not available in every tool. 5.2.1 File Among other things, you can use the File menu to open and save files, or close the tool. - Page 34 ANUAL ORAYA UITE 5.2.2 Logger Among other things, you can use the Logger menu to connect or disconnect the ML-N4000 with the X Suite. ORAYA Command Description Connect Connects the selected ML-N4000 Disconnect Disconnects the active connection to the ML- N4000 Offline-Logging >...
- Page 35 ML-N4000 Update software Opens the X2E-Wiki to download the current Suite version ORAYA Show logfile Displays a log file for the tool Supportfile Generates a set of files that you can send to X2E support to help solve technical issues...
-
Page 36: Status Bar
ANUAL ORAYA UITE 5.2.5 Language Use the Language menu to change the language of the X Suite. ORAYA Setting Description German (Deutsch) Changes the language of the X Suite to German ORAYA English (Englisch) Changes the language of the X Suite to English ORAYA Other menus... -
Page 37: Connecting And Disconnecting The Ml-N4000
ANUAL ORAYA UITE Connecting and disconnecting the ML-N4000 The ML-N4000 is connected and disconnected in the same way regardless of the X Suite tool. This section shows the process for the Configuration ORAYA tool as an example. 5.4.1 Connecting the ML-N4000 Display available loggers Display settings Establish connection to logger... - Page 38 ANUAL ORAYA UITE Edit the configuration file You can edit a configuration file (XML) previously created without connecting to the ML-N4000. To do so, select Offline Configuration in the drop-down list Display available Loggers (1) in the Configuration tool. 5.4.2 Disconnecting the ML-N4000 Release connection to logger Display settings...
- Page 39 ANUAL ORAYA UITE 5.4.3 Favourites You access the favourites list via Display settings button in the Configuration, Online-Logging Hdd-Download tools. Refresh the device list Devices in the network Add currently connected device to Add selected device to favourites favourites Add a device to favourites manually Remove device from favourite list Save frequently used dataloggers in the favourites list.
-
Page 40: Configuration
ANUAL ORAYA UITE The symbols in the columns Scan Ping display the current reachability of the dataloggers in the list. Ping reaches beyond subnet boundaries. Meaning of the symbols: reachable not reachable Configuration This tool allows the configuration of the ML-N4000 and its interfaces. ... - Page 41 ANUAL ORAYA UITE Release connection to logger Display settings Start Hdd logging Save configuration file Save changed configuration permanently Categories The tree structure on the left side of the window displays system settings, available interfaces and signals at the highest level. Expand the tree at the desired position and to the desired depth to access the sub-items.
- Page 42 ANUAL ORAYA UITE You can view the properties sorted either alphabetically or by category. Properties that cannot be modified by the user are greyed out. Configuration changes can be saved temporarily or permanently. Save temporarily: Change the desired default setting or property. ...
- Page 43 ANUAL ORAYA UITE 5.5.1 System configuration System settings are configured via properties stored on the ML-N4000. These properties fall under various categories: Main Settings ▪ Network ▪ Hard Disk ▪ Snapshot ▪ Versions ▪ Profile ▪ Select the category: Click the root element of System Settings to display the main settings of all categories.
- Page 44 ANUAL ORAYA UITE Setting Description Default Name Freely selectable name of the ML-N4000 XorayaMLZU- <Serialnumber> Comment Current system time, internally with a precision of 100 ns Also used as a timestamp during logging System Time Internally used property for the system time Automatically Time period after which the ML-N4000 10 min...
- Page 45 ANUAL ORAYA UITE System Settings > Network: The sub categories are assigned to the following interfaces (➔ Connections and controls): LAN Host eth0 LAN host interfaces (H) ▪ LAN Host eth1 10 Gbit Ethernet interface (G) ▪ Overall view Connection matrix Separate view by ports Open MAC-IP assignments Symmetrical editing...
- Page 46 ANUAL ORAYA UITE Setting Description Default dynamic assigned Activate DHCP IP-Address <DHCP-Server> ML-N4000 DHCP mode On: DHCP server Off: DHCP client IP Address IP address assigned to the ML-N4000 if: 10.104.2.21 <DHCP-Server> ▪ fixed IP-Address ▪ Gateway Address Gateway address assigned to the ML-N4000 0.0.0.0 <DHCP-Server>...
- Page 47 ANUAL ORAYA UITE Static MAC to IP assignment when DHCP server is active: Close MAC-IP assignments Refresh table of PCs in the network Delete MAC-IP assignment DHCP server mode is intended for direct connections to PCs. You can bind MAC addresses of up to five PCs to IP addresses. Type them in manually or double-click in a row of the table that contains the addresses of the PCs in the network.
- Page 48 ANUAL ORAYA UITE System Settings > Hard Disk: Compression method Activate ESU* Activate internal storage medium Remove ESU safely* * Only with connected X ORAYA These settings and displays refer to the currently active storage medium, represented by the blue background colour. If a X ESU is connected to interface (I), you change the active storage ORAYA...
- Page 49 ANUAL ORAYA UITE Setting Description Default Overwrite Control the ML-N4000 behaviour if the storage medium is full On: Oldest session or measurement is overwritten Off: Recording is terminated Autostart Immediate recording after switching on the ML-N4000 or after disconnecting with the X Suite ORAYA Compression...
- Page 50 ANUAL ORAYA UITE System Settings > Snapshot: Snapshots can be created during the measurement to track particularly interesting time periods. The moment you raise the corresponding trigger, all data received for a user-definable time before and after this moment, are stored in an additional snapshot measurement.
- Page 51 ANUAL ORAYA UITE Setting Description Default Trigger Pre-time Leading time of the snapshot for the default-queue (Default-queue) (in ms) Trigger Post-time Trailing time of the snapshot for the default-queue (Default-queue) (in ms) Trigger Pre-time Leading time of the snapshot for the stream-queue (Stream-queue)* (in ms) Trigger Post-time...
- Page 52 ANUAL ORAYA UITE System Settings > Profile: You can save different ML-N4000 configurations using profiles. The following names are reserved for special profiles: active the permanently saved configuration, which is ▪ loaded when the ML-N4000 starts default the factory default configuration ▪...
- Page 53 ANUAL ORAYA UITE Load default profile: Press the default button for at least 3 seconds. Protect active profile: Enter a Password. Click Activate password protection (1). In the main toolbar, click Save changed configuration permanently. Disconnect and reconnect again to the ML-N4000. ...
- Page 54 ANUAL ORAYA UITE System Settings > Export: You can save the export settings and output formats for the Hdd-Download tool on the ML-N4000 itself. This way, the settings are centrally defined and do not depend on the PC used for downloading later. Upload client settings onto the Delete client settings from the logger...
- Page 55 ANUAL ORAYA UITE System Settings > DLN: Set up a Distributed Logging Network, consisting of data sink (master) and one or multiple probes. For further information, see the quick manual for the X µT-Z7 probe. ORAYA...
- Page 56 ANUAL ORAYA UITE System Settings > Versions: All properties in this category are immutable and purely informative. Among other things, this displays version numbers for various ML-N4000 components, as well as additionally activated licences.
- Page 57 ANUAL ORAYA UITE 5.5.2 Interface configuration Interface settings are configured via properties stored on the ML-N4000. These properties fall under various categories: Settings ▪ Filter ▪ Trigger ▪ Routing ▪ Other ▪ Advanced ▪ Interface or channel selection: Click the root element Interfaces to display the main settings of all interfaces.
- Page 58 ANUAL ORAYA UITE Interfaces: Double-click a row in the table to jump directly to the corresponding interface or to the corresponding channel. Reducing power consumption of the ML-N4000 To reduce the ML-N4000 power consumption, disable all channels unneeded.
- Page 59 ANUAL ORAYA UITE CAN: The 4 channels of the CAN card with the lowest numbered slot are always FD-capable. By default, the FD-specific settings are missing on CAN channels belonging to other slots. CANFD_4PLUS_# For each of these licences, the number of CAN-FD- capable channels is increased by 4.
- Page 60 ANUAL ORAYA UITE Setting Description Default Enable Turn on logging for this channel CAN FD standard On: ISO 11898-1 Off: original standard by Bosch Alias Freely selectable channel name can# Bus ID Additional ID for subsequent evaluation Baudrate Transfer rate (in bit/s) 500 k Values: 100 k, 125 k, 200 k, 250 k, 400 k, 500 k, 666 k, 800 k, 1000 k...
- Page 61 ANUAL ORAYA UITE CAN > Trigger: Number of bytes for the trigger Number of bytes for the response 8-byte blocks of the trigger Byte values of the response...
- Page 62 ANUAL ORAYA UITE The following check boxes affect the IDs of the specified CAN messages in this category: Extended frame Use 29-bit ID instead of 11-bit ID ▪ Can FD Activate CAN FD mode ▪ Bit Rate Switch Transfer payload with CAN FD baudrate ▪...
- Page 63 ANUAL ORAYA UITE Configure trigger responses: Select the check box Send as response following CAN message. Specify the ID of the CAN message that is sent as response to a trigger. Select the check boxes Extended Frame, Can FD Bit Rate Switch desired.
- Page 64 ANUAL ORAYA UITE CAN > Routing: Here, you configure the routing of messages received on other CAN channels via the currently selected channel. The payload is not changed while the IDs of source and target message can differ. Add routing Save routing Delete routing Configure routing:...
- Page 65 ANUAL ORAYA UITE CAN > Other: Here, you specify if the ML-N4000 sends general system statistics and interface statistics as CAN messages during data recording. These CAN messages contain signals, which hold the specific values. General system statistics are, for example: RAM queue fill level ▪...
- Page 66 ANUAL ORAYA UITE The user-defined Offset within the 29-bit ID is displayed in green. This offset applies to each generated ID. The rest of the ID in orange is reserved and is automatically adjusted for each interface channel by the software. Click the button to open the generated messages and signals as a DBC file in a text editor and to save them for later analysis.
- Page 67 ANUAL ORAYA UITE FlexRay: FlexRay > Settings: Setting Description Default Enable Turn on logging for this channel Alias Freely selectable channel name flexray# Bus ID Additional ID for subsequent evaluation Channel Selection, which one of both bus channels is used Values: A, B Use Busspec Load configuration template provided by the vehicle...
- Page 68 ANUAL ORAYA UITE LIN: LIN > Settings: Setting Description Default Enable Turn on logging for this channel Alias Freely selectable channel name lin# Bus ID Additional ID for subsequent evaluation Baudrate Transfer rate (in bit/s) 19200 Values: 20000, 19200, 9600, 4800, 2400 Use Busspec Load configuration template provided by the vehicle manufacturer...
- Page 69 ANUAL ORAYA UITE LIN > Trigger: Configure triggers: Select the check box Enable Trigger from following LIN message. Under Id, specify the ID of the LIN message that raises a trigger. (➔ Changing the numbering system) Specify the payload bytes from to 8.
- Page 70 ANUAL ORAYA UITE RS-232:...
- Page 71 ANUAL ORAYA UITE Setting Description Default Protocol Raw, GNLog Enable Turn on logging for this channel Alias Freely selectable channel name rs232_# or gnlog# or DLT# Bus ID Additional ID for subsequent evaluation Use Busspec Load configuration template provided by the vehicle manufacturer Debug level** Detail level of the debug information...
- Page 72 ANUAL ORAYA UITE Ethernet: For X ML-N4000 with BroadR-Reach/Base-T1 switch, there are ORAYA additional settings available here. Ethernet > Settings: Setting Description Default Enable Turn on logging for this channel Alias Freely selectable channel name ethernet# Bus ID Additional ID for subsequent evaluation Use Busspec Load configuration template provided by the vehicle manufacturer...
- Page 73 ANUAL ORAYA UITE BroadR-Reach/Base-T1 switch: Reset link Link state of each port is represented as a red or green traffic light. Click (1) to reset the link. Data Sink switch operation mode, the data are only recorded. Pass Through mode, the BroadR-Reach ports are combined as pairs to allow a bus connection between ECU and BroadR-Reach component, for example a camera.
- Page 74 ANUAL ORAYA UITE A VLAN-ID is assigned to each port. During data recording, this ID is inserted into the Ethernet frame as the outer VLAN tag, so the measurement contains information on which port the data were received. You can change the VLAN-ID for each port separately via the property brr_vlan_outer_vid# the category other.
- Page 75 ANUAL ORAYA UITE Ethernet > Filter: Add pre-filter Increase pre-filter priority Delete pre-filter Decrease pre-filter priority Save pre-filter The filter is executed in two successive steps: Pre-filter MAC address ▪ Queue dispatching filter EtherType and VLAN ▪ Configure pre-filters: Click Add pre-filter (1).
- Page 76 ANUAL ORAYA UITE Priorities of pre-filters Change the priorities of the pre-filters with the buttons (4) and (5). The X Suite applies the first pre-filter from the top ORAYA that matches the condition. The other pre-filters are ignored. The ML-N4000 processes packet data in Online mode and HDD mode via the so-called default-queue.
- Page 77 ANUAL ORAYA UITE Ethernet protocols: In this configuration section, you can add, update and delete GNLog and DLT channels. Both protocols are recorded via the LAN host ports or the BroadR-Reach interface.
- Page 78 ANUAL ORAYA UITE Setting Description Default Enable Turn on logging for this channel Alias Freely selectable channel name gnlog# or DLT# Bus ID Additional ID for subsequent evaluation Source TCP (GNLog, DLT) or UDP (only DLT) IP address and port of the ECU Default sets the port to 851 (GNLog) or 3490 (DLT)
- Page 79 ANUAL ORAYA UITE VIDEO: Connect camera: Connect the camera to one of the Ethernet log interfaces (M). (➔ Connections and controls) Connect another Ethernet log interface (M) to one of the LAN host ports (H). Connect another LAN host port (H) to the PC. Control video recordings: ...
- Page 80 ANUAL ORAYA UITE Setting Description Default Enable Turn on logging for this channel Alias Freely selectable channel name video# Bus ID Text box Bus ID Additional ID for subsequent evaluation To control an IP camera default enters the sample configuration of a Basler camera Prevent Sleep ML-N4000 will not go into sleep mode as long as there...
- Page 81 ANUAL ORAYA UITE Configure triggers: On the header of the desired trigger action, click Add trigger (1). Select the desired Trigger type (2). Create a single condition or multiple combined conditions for this trigger. (➔ Create trigger conditions) ...
- Page 82 ANUAL ORAYA UITE DiagCCP: DiagCCP > Settings: Clear all settings Open selection file Edit CAN interface channel Settings Open A2L file Traffic light for the bus load Traffic light for the EPK check...
- Page 83 ANUAL ORAYA UITE PROTOCOL_CCP PROTOCOL_CCP_SPY The available modes (Master, Spy) depend on the activation of these licences. Check in category Versions of system settings to verify which licences are activated for your ML-N4000. (➔ Versions) Setting Description Default Enable Turn on logging for this channel Spy CCP CCP mode traffic...
- Page 84 ANUAL ORAYA UITE A2L configuration: Click Open A2L file (3) and select the description file that corresponds with the ECU. The X Suite reads the A2L file and configures the CCP ORAYA connection accordingly. Overwrite alias with ECU name under Settings (6) is activated,...
- Page 85 ANUAL ORAYA UITE DiagCCP > Filter: Show all signals Export signals Search box Display CCP main settings Refresh signal list Add polling channel* Display selected signals Status of the signal definition file Clear selected signals Prescaler* Import signals * Only if supported by the A2L file Select signals for the DAQ measurement mode: ...
- Page 86 ANUAL ORAYA UITE To allow a later MDF export of the data without A2L file, generate a signal definition file in the Other category and save it, optionally encrypted, on the ML-N4000. (➔ Other) Status of the signal definition file (10) displays the current state of the file and changes its state by clicking: not generated...
- Page 87 ANUAL ORAYA UITE DiagCCP > Trigger: Add trigger Delete trigger Trigger type Move trigger up Edit trigger Move trigger down Here, you create conditions that trigger the following pre-defined actions: Start CCP logging ▪ Stop CCP logging ▪ Start and stop without trigger conditions Even when you do not create trigger conditions, the CCP recording, provided it is activated, starts and stops automatically at the beginning or ending of the data...
- Page 88 ANUAL ORAYA UITE DiagCCP > Other: Show/hide A2L signals Additional signals Delete signal Signal selection Delete signal definition file To allow a later MDF export of the data without A2L file, generate a signal definition file as a reduced A2L file and save it, optionally encrypted, on the ML-N4000.
- Page 89 ANUAL ORAYA UITE DiagCCP > Advanced: Add basic structure of the function Execute function Input data This category displays an overview of the configured event channels and allows the definition of a seed and key function for the encrypted communication with the ECU. Create and test the seed and key function: ...
- Page 90 ANUAL ORAYA UITE DiagXCP: DiagXCP > Settings: Clear all settings Open selection file Edit interface channel Settings Open A2L file Traffic light for the bus load Traffic light for the EPK check Engine RPM* * Only for angle-synchronous event channels...
- Page 91 ANUAL ORAYA UITE PROTOCOL_XCP_MASTER PROTOCOL_XCP_SPY PROTOCOL_XCP_ON_CAN PROTOCOL_XCP_ON_FLEXRAY The available modes (Master, Spy) and physical buses (CAN, FlexRay) depend on the activation of these licences. Check in category Versions of system settings to verify which licences are activated for your ML-N4000. (➔...
- Page 92 ANUAL ORAYA UITE Meaning of the symbols for the available CAN or FlexRay channels: transmission-capable transmission-capable, but currently set to passive not transmission-capable (only for CAN) not enabled Edit interface channel (2) button, you can enable it, activate its transmission capability or change its baudrate if necessary. A2L configuration: ...
- Page 93 ANUAL ORAYA UITE Signal configuration: Click Open selection file (5) and select a suitable XML, CFG or LAB file. Click Signal selection and select the signals manually. (➔ Filter) The X Suite calculates the expected percentage of the bus load ORAYA increase.
- Page 94 ANUAL ORAYA UITE DiagXCP > Filter: Show all signals Export signals Search box Display XCP main settings Refresh signal list Add polling channel* Display selected signals Status of the signal definition file Clear selected signals Prescaler* Import signals Change column order * Only if supported by the A2L file Select signals for the DAQ measurement mode: ...
- Page 95 ANUAL ORAYA UITE To allow a later MDF export of the data without A2L file, generate a signal definition file in the Other category and save it, optionally encrypted, on the ML-N4000. (➔ Other) Status of the signal definition file (10) displays the current state of the file and changes its state by clicking: not generated...
- Page 96 ANUAL ORAYA UITE DiagXCP > Trigger: Add trigger Delete trigger Trigger type Move trigger up Edit trigger Move trigger down Here, you create conditions that trigger the following pre-defined actions Start XCP logging ▪ Stop XCP logging ▪ Start and stop without trigger conditions Even when you do not create trigger conditions, the XCP recording, provided it is activated, starts and stops automatically at the beginning or ending of the data...
- Page 97 ANUAL ORAYA UITE DiagXCP > Other: Show/hide A2L signals Additional signals Delete signal Signal selection Delete signal definition file To allow a later MDF export of the data without A2L file, generate a signal definition file as a reduced A2L file and save it, optionally encrypted, on the ML-N4000.
- Page 98 ANUAL ORAYA UITE DiagXCP > Advanced: Add basic structure of the function Execute function Input data This category consists of the following elements: Overview of the configured event channels ▪ Timeout values (changeable) ▪ FlexRay buffer configuration (partly changeable) ▪ Mapping of the FlexRay buffers to the event channels (changeable) ▪...
- Page 99 ANUAL ORAYA UITE Create and test the seed and key function: Click Add basic structure of the function (1). Insert the algorithm that corresponds with the ECU. Define the Input data (2) to test the function. Click Execute function (3).
- Page 100 ANUAL ORAYA UITE Event: This interface must be activated for proper functioning of: Triggers ▪ Snapshots ▪ Button interface ▪ Event > Settings: Setting Description Default Enable Turn on logging for this channel Alias Freely selectable channel name event# Bus ID Additional ID for subsequent evaluation Prevent Sleep ML-N4000 will not go into sleep mode as long as there...
- Page 101 ANUAL ORAYA UITE Event > Trigger: Add trigger Delete trigger Trigger type Move trigger up Edit trigger Move trigger down Here, you create trigger conditions that write custom event messages. Configure triggers: Click Add trigger (1). Select the desired Trigger type (2).
- Page 102 ANUAL ORAYA UITE Button: Use this interface to define which actions are triggered by the following trigger types. Each trigger type is assigned a channel of the button interface as follows (➔ Connections and controls): trigger_button Pressing the trigger button (B) ▪...
- Page 103 ANUAL ORAYA UITE Setting Description Default Enable Turn on logging for this channel Alias Freely selectable channel name trigger_button or wake_line Bus ID Additional ID for subsequent evaluation Prevent Sleep ML-N4000 will not go into sleep mode as Mode long as there is activity on this channel Send Event Generate an additional event message either Rising edge...
- Page 104 ANUAL ORAYA UITE 5.5.3 Signal configuration In this section, you configure signals and define signal processings and triggers. Messages and signals The payload of a message consists of signals with variable bit length. Messages and signals are assigned names for easier handling.
- Page 105 ANUAL ORAYA UITE Signal processing: Configured signal processings Add signal processing Add the desired signal processing to the list (1). This list is stored temporarily or permanently on the ML-N4000. DATA_BINNING This licence is required for signal processing. Check in category Versions of system settings to verify which licences are activated for your ML-N4000.
- Page 106 ANUAL ORAYA UITE Log: Save signal processing Cancel signal processing Add signal processing: Select an already configured Signal. (➔ Settings) Specify the Interval. Click Save signal processing (1). The log signal processing is stored on the ML-N4000. Interval of the log signal processing If you specify an interval, the last measured value of the signal is counted in this time range.
- Page 107 ANUAL ORAYA UITE Count: Save signal processing Cancel signal processing Add signal processing count: Specify a Binning name. Select an already configured Signal. (➔ Settings) Select from Assignment way which three out of five text boxes, i.e. Number of classes, Begin, End, Width...
- Page 108 ANUAL ORAYA UITE Interval of count signal processing If you specify an interval, the first measured value of the signal is counted in this time range. If you do not set an interval (corresponding to a in the text box), each signal value is counted. Compound: Save signal processing Signal 1...
- Page 109 ANUAL ORAYA UITE Edit or delete signal processing: Configured signal processing Edit signal processing Delete signal processing Edit signal processing: Select the signal processing in the list (1). Click Edit signal processing (3). Right-click the signal processing and then click Edit signal processing.
- Page 110 ANUAL ORAYA UITE Trigger: Add trigger Delete trigger Trigger type Move trigger up Edit trigger Move trigger down Here, you create conditions that trigger the following actions: Start Logging ▪ Stop Logging ▪ Shutdown Logger ▪ Shut down logger without wake up ▪...
-
Page 111: Resetting To Factory Defaults
ANUAL ORAYA UITE Resetting to factory defaults For unwanted or defective system or interface configurations, it is recommended to reset the ML-N4000 back to its factory defaults. In the Logger menu, click Reset configuration to factory settings reset the system configuration or one or all interfaces to their factory defaults. -
Page 112: Data Recording
ANUAL ORAYA UITE Data recording Data may be recorded in two ways: Online mode ▪ The ML-N4000 transmits received messages directly to a PC, where they are stored in log files. To do so, the ML-N4000 must be connected to the PC. HDD mode ▪... - Page 113 ANUAL ORAYA UITE Release connection to logger Open the latest created session or measurement in the Viewer tool Start online logging Start Hdd logging Trigger acoustic signal to identify ML- N4000 Display settings Displays the current bus traffic Display settings (6) to customise the following: Path and filename (➔...
- Page 114 ANUAL ORAYA UITE Release connection to logger Displays the current bus traffic Stop online logging Trigger acoustic signal to identify ML- N4000 Start Hdd logging Set Trigger for later evaluation Online logging information is distributed over several tabs. The following table describes the general function of each tab and the options offered in the context menu when right-clicking.
- Page 115 ANUAL ORAYA UITE Function and context menu Interface Summary of recorded messages and errors grouped by interfaces and channels Context menu: ▪ Show or hide columns ▪ Hide inactive interfaces or channels Message Summary of recorded messages and errors grouped by messages Context menu: ▪...
- Page 116 ANUAL ORAYA UITE Messages and signals The payload of a message consists of signals with variable bit length. Messages and signals are assigned names for easier handling. Timemaster An additional column Timediff. is displayed when you set the Timemasters on a particular record. This column contains the time difference of each record to the Timemaster.
- Page 117 ANUAL ORAYA UITE 5.7.2 HDD mode In this mode, the ML-N4000 saves to one of the following media: Internal storage medium (default) ▪ USB flash drive if Record on USB stick in the Hard Disk category is ▪ checked and the conditions described there are met (➔ Hard Disk) Additional device X ESU (automatically if detected by the ML- ▪...
- Page 118 ANUAL ORAYA UITE New sessions are created under the following conditions: The HDD recording is started manually by a trigger or via the ▪ Suite. ORAYA The ML-N4000 is turned on or woken up and Autostart in the Hard ▪ Disk category is checked.
- Page 119 X2E-Native format are stored in various files with the same base name but different file extensions. (➔ X2E-Native) The master file with the file extension DLI serves as link. This file contains information about the included log interfaces and references to the corresponding binary files.
-
Page 120: Hdd-Download
ANUAL ORAYA UITE Hdd-Download This tool allows downloading log data stored on the datalogger storage medium or a USB flash drive. Connect the ML-N4000 to the PC. (➔ Connecting the ML-N4000 to the PC) Optionally: Connect a X ESU to the corresponding interface (I). - Page 121 ANUAL ORAYA UITE Release connection to logger Display settings Start Hdd logging Open last used path in Windows Explorer Start download Show download statistics Change disk* * Only with connected X ORAYA Click Change disk (4) to change between the internal storage medium and a connected X ESU.
- Page 122 ANUAL ORAYA UITE There are different ways to select the log data to download: Edit menu: Select all Select none ▪ Sessions Measurements tabs ▪ Calendar ▪ Time range ▪ Sessions/Measurements: You can show and hide the Sessions tab in the settings. ...
- Page 123 ANUAL ORAYA UITE Calendar: Displayed date and Zoom: Filter the displayed measurements, for example, by default or streaming queue (a). Specify a start date (b). Choose between Week (c) as the displayed time unit. Click the single arrows (d) to jump one day or one week forward or backward.
- Page 124 ANUAL ORAYA UITE Time range: Specify start date (a) and start time (b) of the desired time range. Specify the end date (c). Use the arrows (d) optionally to apply the start date or to jump one day forward or backward. ...
- Page 125 ANUAL ORAYA UITE Settings: Specify the Export settings. (➔ Export settings) Specify the Output formats. (➔ Output formats selection) Load settings from ML-N4000 If you have previously used the Export category to save client settings on the ML-N4000, then you can load these via this button.
-
Page 126: Viewer
ANUAL ORAYA UITE Viewer This tool allows display and analysis of records. No ML-N4000 connection is necessary to do this. Start the Viewer tool of the X Suite. (➔ Starting) ORAYA The subsequent view is divided into four panels, which can be resized at will: Data (1) ▪... - Page 127 ANUAL ORAYA UITE 5.9.1 Data This panel displays the record set of the opened measurement. Open measurement Display settings Close selected measurement Opened measurements Open measurement: Click Open measurement (1) and select the DLI file. In the File menu, click Open and select the DLI file.
- Page 128 ANUAL ORAYA UITE Close measurement: Click Close selected measurement (2). In the File menu, click Close. Right click the desired measurement tab and then on Close the file. Right-click the desired record to view further options in the context menu: Set timemaster ▪...
- Page 129 ANUAL ORAYA UITE On the right edge of the panel, there are two scroll bars that can be adjusted independently. Left-click (1) to specify whether scrolling is by row numbers or time. Right-click (1) to specify how many rows or how much time is scrolled per click on the double-arrow buttons (2).
- Page 130 ANUAL ORAYA UITE 5.9.2 Information This panel displays information about active measurement and search results. Tabs: Info ▪ Detail ▪ Search ▪ Trace ▪ Signals ▪ Comment ▪ Info: This tab displays general information about all records for the open measurement.
- Page 131 ANUAL ORAYA UITE Detail: This tab displays detailed information about the currently selected record. The display changes depending on the interface type. Data Data values Raw data Raw data values Right-click anywhere on the white or green background part of the user interface to select whether the underlying raw data (2) is also displayed alongside the data (1).
- Page 132 ANUAL ORAYA UITE Search: This tab displays records found by search processes using the button since cursor. The button All since cursor can be found in the following panels and tabs: Information panel, Signals ▪ Search, filter and export panel, Browse ▪...
- Page 133 ANUAL ORAYA UITE Signals: Use this tab to search for specific signals in the records of the opened measurement. The right-side view is different depending on whether Show signal details (13) or Manage signal lists (12) is activated. Show signal details (13) is activated: Signal description settings Next Sort alphabetically...
- Page 134 ANUAL ORAYA UITE Display signal details (15): Select a message in the signals overview (14) to view details for all signals of this message. Select a signal to view details for this signal. Display signals graphically: Select a signal in the signal details (15). ...
- Page 135 ANUAL ORAYA UITE Manage signal lists (12) is activated: Manage signal lists Add signal to list Signals overview Delete signal from list Signal lists Find signal Add new signal list Draw signal Create new signal list: Click Add new signal list (16).
- Page 136 ANUAL ORAYA UITE 5.9.3 Search, filter and export Use this panel to search the open measurement according to different criteria, filter records and export them to other output formats. Tabs: Browse ▪ Event ▪ Find ▪ Interface ▪ Export ▪ Browse: Use this tab to specify search criteria to move to the corresponding records in the...
- Page 137 ANUAL ORAYA UITE Depending on the search criteria, the search condition is either unique or not. You will find one record at the most when searching by: Message number (7) ▪ Date and time (8) ▪ In certain circumstances, you may find multiple records in the search for: Messages of certain interfaces (9) ▪...
- Page 138 ANUAL ORAYA UITE History Click History (14) to access the latest search conditions. This list is reset every time you exit the tool. Bookmarks To add a record to the bookmarks, right-click it in the Data panel and select the appropriate option. Use the Browse tab to navigate between bookmarks or to...
- Page 139 ANUAL ORAYA UITE Search: User this tab to build complex searches. Field Next Relation All since cursor Value Previous Add constraint Cancel Constraint expression Select the Field (1) that you would like to add to your search. Select the Relation (2) between field and value.
- Page 140 ANUAL ORAYA UITE Navigate between records: Click Previous (8) to go to the previous record found. Click Next (6) to go to the next record found. Click All since cursor (7) to display all records of this message, starting at the current position, in a list.
- Page 141 ANUAL ORAYA UITE Apply filter: Add the desired filter. Click Start (1). Records in the Data panel are filtered. Cancel filter: Click Cancel (2). Export: Use this tab to export the records to various output formats. Export settings Source region selection Output formats selection...
- Page 142 ANUAL ORAYA UITE Source region selection: Whole measurements All records ▪ Fine zone Zone specified in the Overview tab of the ▪ Graphical output panel (➔ Overview) Custom region Region specified in the Data panel (➔ Data) ▪ Selection Selected records ▪...
- Page 143 ANUAL ORAYA UITE 5.9.4 Graphical output This panel displays the open measurement graphically. Tabs: Overview ▪ Graphic ▪ Video ▪ Overview: This tab displays the timeline of the opened measurement. Icons represent events, bookmarks and search results. You can also specify a Fine zone to filter the records to display and export.
- Page 144 ANUAL ORAYA UITE Graphic: This tab shows selected values of the open measurement as time curves. Display data graphically: In the Data panel, right-click a record of the interface channel that you would like to see in graphical format. (➔ Data) ...
-
Page 145: Statistic
ANUAL ORAYA UITE 5.10 Statistic This tool allows the evaluation of statistical data during ML-N4000 operation, also simultaneous to data recording. Connect the ML-N4000 to the PC. (➔ Connecting the ML-N4000 to the PC) Turn on the ML-N4000. ... - Page 146 ANUAL ORAYA UITE The buttons in the toolbar change to reflect the current state of the statistic display: Freeze statistic Continue statistic Display remote statistic counter Statistic since the start of the tool and connection to the ML-N4000 Display local statistic counter Statistic since last click on Reset local statistic counter...
-
Page 147: Convert
ANUAL ORAYA UITE 5.11 Convert This tool allows converting the log data recorded in the X2E-Native output format into various formats. (➔ Output formats) No ML-N4000 connection is necessary to do this. Start the Convert tool of the X Suite. - Page 148 ANUAL ORAYA UITE Manually sort log files in the list: Select a row in the list. Click Move selection up (3). Click Move selection down (4). Automatic sorting Start and stop times of log files are displayed in red colour if shown out of chronological order in the list.
- Page 149 Open result DLI file (10) to open the path of the converted files in the Windows Explorer. If you select the output format X2E-Native, you have the choice between opening the DLI files in the Explorer of directly in the Viewer tool for analysis purposes.
-
Page 150: Firmware-Update
Connect to the desired ML-N4000. (➔ Connecting the ML-N4000) Release connection to logger Open SWU/XSWU file Start Hdd logging Launch firmware update Perform firmware update Download the latest firmware version from the X2E-Wiki. (➔ X2E-Wiki) Click Open SWU/XSWU file (3). In the File... - Page 151 ANUAL ORAYA UITE Do not interrupt the update process Power supply interruptions can destroy the ML-N4000. Do not interrupt the ML-N4000 power supply while CAUTION updating the firmware. Confirm the ML-N4000 restart twice, if Ask before restart in the Option menu is activated.
-
Page 152: Tk Commandline
ANUAL ORAYA UITE 5.13 TK Commandline This tool provides access to the X Toolkit, a collection of commands ORAYA optimised for script-oriented application. Connect the ML-N4000 to the PC. (➔ Connecting the ML-N4000 to the PC) Turn on the ML-N4000. ... - Page 153 Scans the network for dataloggers XLogFile Starts data recording in online mode and writes log data in various output formats XConvFile Filters X2E-Native log files and converts them into different output formats XJoinFile Joins X2E-Native log files XFileInfo Displays information about X2E-Native log files...
-
Page 154: Common Elements
ANUAL ORAYA UITE 5.14 Common elements This section describes GUI elements used in different parts of the Suite albeit in substantially the same way. ORAYA This manual makes reference to subsections of this section as required. 5.14.1 Changing the numbering system For numerical values in text boxes, you can switch the display between three numbering systems. - Page 155 ANUAL ORAYA UITE 5.14.2 Set bits In certain interface configuration categories, you specify the bytes of messages: Trigger ▪ Trigger ▪ Ethernet Filter ▪ Click an in the bottom row of a byte (1) once or twice to set the desired bit to 0 or 1.
- Page 156 ANUAL ORAYA UITE 5.14.3 Export settings This control element can be found in the following tools: Configuration, Online-Logging, Hdd-Download, Viewer and Convert. Download from ML-N4000* Store sessions in separate files** Attributes Overwrite files Browse for folder * Only in Hdd-Download ** Only in Hdd-Download Convert...
- Page 157 ANUAL ORAYA UITE 5.14.4 Output formats selection This control element can be found in the following tools: Configuration, Hdd-Download, Viewer and Convert. Activate Delete Output format Show log file of export filter Filter settings Export settings Interface filter Save this export setting Attributes Delete this export setting Create export filters:...
- Page 158 ANUAL ORAYA UITE Save export setting for later reuse: Enter a name in the text box Export settings (8). Click Save this export setting (9). Load export setting: Select the desired export setting in Export settings (8). Delete export setting: ...
- Page 159 ANUAL ORAYA UITE 5.14.5 Signal selection This control element can be found in the following tools: Configuration Online-Logging. The right-side view is different depending on whether Show signal details (9) or Manage signal lists (8) is activated. Show signal details (9) is activated: Signal description settings Add this signal Sort alphabetically...
- Page 160 ANUAL ORAYA UITE Display signal details (11): Select a message in the signals overview (10) to view details for all signals of this message. Select a signal to view details for this signal. Add signal: Select the signal in the signal overview (10). ...
- Page 161 ANUAL ORAYA UITE Delete signal list: Select the signal list (11). Click Delete signal from list (14). Display signal from signal list (11) in the signals overview (10): Select the signal in the signal list (11). Click Find signal (15).
- Page 162 ANUAL ORAYA UITE 5.14.6 Signal description settings This control element can be found in the following tools: Configuration, Online-Logging and Viewer. Here, load description files and assign them to signal groups. Supported description file types: ▪ ▪ FIBEX (XML) ▪ ▪...
- Page 163 ANUAL ORAYA UITE 5.14.7 Create trigger conditions You use this control element to configure general signal triggers or triggers of the VIDEO, DiagCCP, DiagXCP and Event interfaces. The following trigger types are available: Value compare Raise trigger if a single condition or combined ▪...
- Page 164 ANUAL ORAYA UITE Add condition: Select an already configured Signal (9). (➔ Settings) Select the Relation (10) between signal and value. Select the Relation type (11). Depending on the relation type, specify the Raw value or the time (in ms).
- Page 165 ANUAL ORAYA UITE Apply conditions: Select the Execution time. If necessary, change the automatically generated Description. Only for event triggers: Under Arguments, specify the payload (32 bit) and the ID (8 bit) of the event message to be sent. ...
- Page 166 ANUAL ORAYA UITE 5.14.8 Graph View This control can be found in the following tools: Online-Logging, Hdd-Download and Viewer. Toolbar Time pointer area Timeline Red time pointer To the left Blue time pointer* To the right Green time pointer Graph name * Only in Viewer ...
- Page 167 ANUAL ORAYA UITE The following table describes the control elements on the toolbar (1) from left to right. Symbol Function Zoom in Zoom out Adjust the zoom level so that the Fine zone is visible Adjust the zoom level so that the entire measurement is visible Switch between previous and current zoom level Change the visibility of the blue time pointer, which represents the current position in the...
-
Page 168: Output Formats
The following table shows an overview of all output formats relevant for the ML-N4000 that you can select when downloading and converting log data. Output format File extension Exported message types X2E-Native DLI/DLM/DLF/DLS X2E Ascii DLASC Carmen-Journal (V3.0) Wireshark PCAP PCAP Ethernet Vector BLF... - Page 169 Maximum file size of a binary file (DLF) in MB WriteStatistics Create statistics file (DLS) CreateZIP Store log files as a compressed ZIP archive 5.15.2 X2E Ascii Setting Description Default ShowTimestamp Write time stamp for each message ShowCounter Write counter for each message...
- Page 170 ANUAL ORAYA UITE 5.15.5 Vector BLF Setting Description Default UseCommonStartTimeStamp Use common start timestamp WriteCANmsg4Trigger ( x ) Write triggers as virtual CAN messages: ▪ User-defined or ▪ Automatically generated (compatible with CANoe) 5.15.6 Vector ASC Setting Description Default NewASConMaxFileSizeReached Create a new file when max file size is reached MaxFileSize_MB (x)
- Page 171 ANUAL ORAYA UITE 5.15.9 System Events Setting Description Default Generate one Journal Write all selected sessions in one file including all Sessions 5.15.10 Raw for RS232/RawSocket Setting Description Default NewRAWonMaxFileSizeReached Create a new file when max file size is reached MaxFileSize_MB (x) Maximum file size in MB Extension ( x )
- Page 172 ANUAL ORAYA UITE 5.15.12 CSV for Signals Setting Description Default Raster If multiple signal messages occur within this rastering interval (in ms), the last value is used 0: Raster disabled AddSignalDefinition ( x ) Add custom signal list (➔ Signal selection) NewSCSVonMaxFileSizeReached Create a new file when max file size is reached...
-
Page 173: Maintenance
Safety defects due to incorrect accessories and spare parts Accessories and spare parts that have not been recommended by X2E GmbH negatively affect the safety, CAUTION functionality and precision of the ML-N4000. X2E GmbH shall assume no responsibility whatsoever or... -
Page 174: Cleaning
ANUAL AINTENANCE Cleaning Device damage due to pollution Avoid any contamination in plugs and sockets to ensure a reliable contact. CAUTION Keep the ML-N4000 clean. Device damage due to penetration of dust or liquids Dust or moisture inside the ML-N4000 may cause abnormal behaviour or destruction of the device. -
Page 175: Repair
Contact X2E GmbH should maintenance and repairs be required. Upon malfunction or defect, return the ML-N4000 without any accessories to X2E GmbH. You can find the address on page 2 of this manual. Before submission, please take the following measures: Clean the ML-N4000. (➔ Cleaning) ... -
Page 176: Storage, Transport And Disposal
ANUAL TORAGE TRANSPORT AND DISPOSAL Storage, transport and disposal Storage If the ML-N4000 will remain unused for an extended time, we recommend storing it in the original packaging. Adopt the following precautions to avoid damage to the ML-N4000: Protect the ML-N4000 from intense sun, heat, as well as from severe shocks. -
Page 177: Appendix
ANUAL PPENDIX Appendix Technical data The following table provides an overview of technical data and properties of the ML-N4000. Property Value/Characteristic Timestamp resolution 100 ns for all interfaces Storage capacity 256 GB (internal) 1 TB (external) Operating temperature range -40 to +60 °C Air humidity range 10 to 95 % (non-condensing) Supply voltage... -
Page 178: Ml-N4000 Pin Assignments
ANUAL PPENDIX ML-N4000 pin assignments The following tables show the pin assignments of the log interfaces and of the power/trigger/wake port. Figures show the external view of the ML- N4000 contacts. 8.2.1 4x CAN Function CAN 3 Low CAN 1 Low CAN 4 Low CAN 2 Low CAN 3 High... - Page 179 ANUAL PPENDIX 8.2.4 8x RS-232 Function RX 8 TX 8 RX 7 TX 7 3M, 10220-5212 PL RX 6 (+ 2x spacer bolt: 3M, 3341-31) TX 6 RX 5 TX 5 RX 4 TX 4 TX 1 RX 1 TX 2 RX 2 RX 3 TX 3...
- Page 180 ANUAL PPENDIX 8.2.5 12x Base-T1 Function CH 2 P CH 2 N CH 4 P 3x HARTING ix Industrial type A CH 4 N CH 1 P CH 1 N CH 3 P CH 3 N CH 6 P CH 6 N CH 8 P CH 8 N CH 5 P...
- Page 181 ANUAL PPENDIX 8.2.6 Power/trigger/wake Function Wake Trigger/Wake Trigger...
-
Page 182: Cable Pin Assignments
PPENDIX Cable pin assignments The following pin assignments refer to the cables manufactured by X2E GmbH: on the left, you see the connection on the ML-N4000 side and on the right, one or more connectors in the measurement environment or to the power supply. - Page 183 ANUAL PPENDIX 8.3.2 2x FlexRay (x2) Function Function FR BM A FR BM A/B FR BP A/B FR BM B FR BP A FR BP B 8.3.3 7x LIN (x9) Function Colour Function LIN 1 Yellow LIN # LIN 2 VBAT LIN 3 Black...
- Page 184 ANUAL PPENDIX 8.3.4 8x RS-232 (x8) Function Function RX 8 RX # TX 8 TX # RX 7 TX 7 RX 6 TX 6 RX 5 TX 5 RX 4 TX 4 GND* TX 1 GND* RX 1 TX 2 RX 2 RX 3 TX 3...
- Page 185 ANUAL PPENDIX 8.3.5 Power/trigger/wake (x5) Function Colour Function Black Wake Yellow Wake Trigger/Wake Black Trigger/Wake Trigger Green Trigger...
- Page 190 X2E GmbH Grosse Ahlmühle 19 76865 Rohrbach GERMANY Phone +49 6349 99599 200 E-mail xoraya@x2e.de Internet www.x2e.de Wiki wiki.x2e.de...
Need help?
Do you have a question about the XORAYA ML-N4000 and is the answer not in the manual?
Questions and answers