
Related Manuals for Egnite Querx


Summary of Contents for Egnite Querx
- Page 1 Querx Network Thermometer, Hygrometer, Barometer and Data Logger User Guide Querx TH Querx WLAN TH Querx THP Querx WLAN THP Querx PT Querx WLAN PT Handbook version 6.1 Firmware version 6.0...
- Page 2 Notes on the User Guide Safety Notices Declaration of EU Conformity Chapter 2: Introduction Models and Options egnite Querx egnite Querx WLAN Hardware Accessories and Spare Parts Additional Software Chapter 3: Initial Setup Before the Initial Setup Network Connection Power Supply...
- Page 3 Chapter 7: Configuring Basic Settings Chapter 8: Setting Date and Time Setting Date and Time via the Network Setting Time and Date Manually Chapter 9: Network Configuration Ethernet Interface WiFi Interface Deactivating the Discovery Feature Chapter 10: Configuring the Data Logger Chapter 11: Creating a New User Account User Administration Logging In and Out...
- Page 4 Activating SNMP Traps Chapter 17: Configuring Syslog Chapter 18: Configuring the Signalers Optical Signals Acoustic Signals Chapter 19: Configuring Actions Configuring an Action Configuring an HTTP Push Action Configuring Email Actions Configuring a Signaler Action Configuring an SNMP Trap Action Configuring an MQTT Action Configuring an FTP Action Cofiguring Sensor Alarm Events...
- Page 5 Cleaning Changing the Battery Chapter 23: Miscellaneous Manufacturer and Contact Information Disclaimer...
-
Page 6: Safety Notices
Please read this manual carefully and be aware of the following safety notices, in order to minimize the risk of damage or injury. querx is intended to monitor and analyze climate data and make this data available via various interfaces. -
Page 7: Declaration Of Eu Conformity
The manufacturer egnite GmbH Erinstr. 18 44575 Castrop-Rauxel declares that the product ranges egnite Querx und egnite Querx WLAN featuring the sensor interfaces TH, THP, PT100 und PT1000 conform to the following legal guidelines and norms: EU Guideline 2014/30/EU EN 61000-6-2:2019-11 Generic standards - Immunity standard for industrial... -
Page 8: Chapter 2: Introduction
(SCADA). Querx can operate as a stand-alone device. A cloud service is not necessary, though it offers simpler, global and central access to all data. In addition to palamoa.de, which can be used free of charge, most other IoT clouds can also be... - Page 9 Simple Pt100 test sensor without pocket sleeve egnite Querx PT100 Set (item number EGN600414) Like egnite Querx PT100 (item number EGN600514), but also includes USB power adapter with micro-USB cable and interchangeable plugs for UK, EU, US and AU outlets Ethernet patch cable ...
- Page 10 Ethernet patch cable egnite Querx THP egnite Querx THP (item number EGN601116) egnite Querx THP with integrated sensors for temperature, humidity and air pressure egnite Querx THP Set (item number EGN601216) Like egnite Querx THP (item number EGN601116), but also includes USB power adapter with micro-USB cable and interchangeable plugs for UK, EU, ...
- Page 11 WiFi antenna egnite Querx WLAN PT100 Set (item number EGN601315) Like egnite Querx WLAN PT100 (item number EGN601415), but also includes USB power adapter with micro-USB cable and interchangeable plugs for UK, EU, US and AU outlets Ethernet patch cable ...
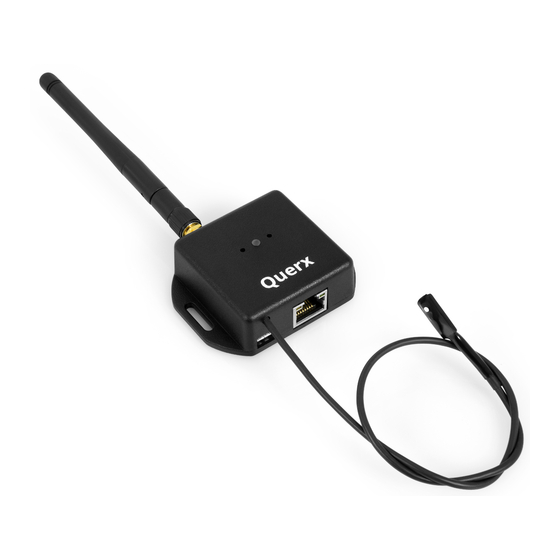
- Page 12 RJ45-socket for Ethernet connection Network activity LED egnite Querx WLAN TH egnite Querx WLAN TH (item number EGN601215) egnite Querx WLAN TH with integrated sensors for temperature and humidity WiFi antenna egnite Querx WLAN TH Set (item number EGN601115)
-
Page 13: Additional Software
A selection of Pt100 and Pt1000 sensors for the PT models is also available from store. Additional Software In general, all that is required to run Querx is a current web browser. However, the manufacturer also offers additional free software. - Page 14 Raspberry Pi. This is the successor to the Device Discoverer application and offers additional features. Querx Panel Querx Panel can turn an HDMI monitor into a large display for egnite Querx. The current version is available for Windows and as an image for Raspberry Pi. Palamoa for Android Free Android app for our IoT cloud Palamoa that lets you monitor Querx data from any location.
-
Page 15: Chapter 3: Initial Setup
An Ethernet cable and a free Ethernet port to connect the device to the network that your PC is using. Alternatively, Querx can be connected to your PC via an Ethernet cable. Network Connection Connect the device to your network or directly to your network or directly to the PC that you will use for the configuration via a network cable. -
Page 16: Power Supply
Alternatively, you can use a common USB charger to power Querx. Querx can also be connected to a free USB-Port, if no free power outlet is available. In this case, please ensure that the port supplies enough current and does not unexpectedly turn off in power-saving mode. - Page 17 Accessing the Web Interface After successfully configuring the network connection, further settings can be adjusted via the Querx web interface. Open a web browser on your PC and enter the IP address that was previously configured for Querx into the address-bar, if it is known to you.
-
Page 18: Installing The Sensor
The home screen of the web interface displays a comprehensive overview of the data gathered by Querx. JavaScript must not be deactivated in your browser, for the data to be displayed correctly. For the configuration pages, however, JavaScript is not required. - Page 19 Two DIP switches located above the terminals for the cable cores are used to select whether the sensor is connected to Querx PT using two, three or four cable cores. The above illustrations tell you which switch position your sensor requires.
- Page 20 Possibly a magnifying glass Two DIP switches located above the terminals for the cable cores are used to select whether the sensor is connected to Querx PT using two, three or four cable cores. 2-wire sensor 3-wire sensor...
- Page 21 The illustrations provided above detail which switch position your sensor requires. Use a tool with a fine tip to set the DIP switches to the required position. If necessary, use a magnifying glass. Connect the individual cable cores to the terminals as displayed in the images. Use the biro to depress the fixture corresponding with the terminal to which you want to connect the cable core.
-
Page 22: Chapter 4: First Settings
Chapter 4: First Settings Chapter 3: Initial Setup explains how to use a web browser to access the egnite Querx web interface. If the device is still in default settings, you should first configure some basic settings. Click the button Configuration in the upper right corner of the screen to access the configuration area. - Page 23 Open the page System / Time. Select the correct time zone for your country from the drop down menu time zone. Now select the settings for daylight saving time: If your country uses daylight saving time and the time changes on the last Sundays of March and October, please activate auto in the section DST.
- Page 24 Confirm that you wish to delete all data saved on the device by activating the button labelled Are you sure? Click Yes. Please be patient, as this process may take a few minutes. Querx will reboot and begin logging new data once the process is completed. This concludes the initial setup.
- Page 25 Chapter 5: Home Page Features The web interface displays current values and alerts. An interactive diagram on the home page additionally lets you view logged data. The current values are displayed in the right column in the right sidebar. If a threshold value is transgressed, the current value is displayed in red alongside a corresponding icon.
- Page 26 In a narrow browser window clicking the layout button will toggle between displaying the graph and the current measurement data. This ensures that the most pertinent data is always displayed clearly. If you only want to display the current data in a compact way, click the small triangle next to the corresponding display field.
-
Page 27: Line Graph
Line Graph The line graph is the standard display mode when the home page is opened. Hovering over a point in the graph displays the time and corresponding values in the sidebar (2). Configuring Display Options The components that are displayed in the graph can be selected in the sidebar. You can select the following settings for each sensor: Display graph. - Page 28 Display grid lines. Display threshold values. These options let you tailor the line graph to your personal requirements. The solid lines display the timeline of the average values. The lighter areas that surround the graph indicate the max- and min-values that occured during the corresponding timeframe.
- Page 29 Select the day for the start date. Select the month for the end date. Select the day for the end date. The second mode, "W, M, Y" (“Week, Month, Year”) is particularly useful if you want to quickly browse different time frames. Select the W, M, Y mode.
-
Page 30: Customizing The Display
move the time period that is displayed. Auto-Update mode → If the graph is set to „D D“ mode and the last 24 hours being displayed, both sliders will turn red (3), when the right slider control touches the bar’s right edge. This means that auto- update mode is activated and the graph will always display the current values. -
Page 31: Exporting Data
(8). You can display a week or an entire year and navigate the history via the two arrows. Exporting Data The data gathered by Querx can be exported via the web interface. egnite Querx supports the following formats for data export: ... - Page 32 Embedding Graphs Into Other Sites Wherever Querx can be reached via a network, Iframe can be used to embed the graph from the Querx home page into any other site, for instance on your local network.
-
Page 33: Viewing Device Information
Viewing Device Information You can open a field with further general information on this device by clicking the button Device Info in the header. The first section displays the device’s name, type and the active firmware. The device name can be changed in the configuration area. In its default settings, the system name is querx000000, where the six zeros are a placeholder for the last six digits of the device’s MAC-address. - Page 34 Chapter 6: Features of the Configuration Area Chapter 4: First Settings introduces some parts of the configuration area that are used to configure the most basic settings. Each page of the configuration area is divided into four sections. Header The upper section of each page displays current data, which is automatically updated.
- Page 35 Header The configuration area’s header displays the current measurements and any occurring alerts. The update indicator flashes when new data is received Temperature Humidity (TH and THP models) Dew point or dew point spread (TH and THP models) Air pressure (THP models) One of the following symbols is displayed next to the corresponding value if an alert occurs.
-
Page 36: Chapter 7: Configuring Basic Settings
It also functions as the host name when accessing Querx via a web browser (cf. Chapter 3: Accessing the Web Interface). A maximum of 15 letters and digits can be used for the system name. -
Page 37: Chapter 8: Setting Date And Time
The page System / Time displays the current date and time and offers several ways to set date and time manually or automatically. Querx requires this data, in order to track measurements. It is usually updated automatically via the Internet or a local time server. Querx also features an internal clock that enables the device to continue tracking data if the network connection fails. -
Page 38: Setting Time And Date Manually
Setting Date and Time via the Network If the device is connected to the internet or an internal NTP server is available on the network, it is advisable to configure time and date automatically via SNTP. Enter the name or IP address of an NTP server. Click Sync NTP to test the configuration. - Page 39 Alternatively, time and date can be synced with your PC. In order to do this, click Sync PC.
-
Page 40: Chapter 9: Network Configuration
Chapter 9: Network Configuration egnite Querx can be connected to a network via an Ethernet LAN cable. The WLAN models can additionally be connected to wireless networks. The Ethernet interface needs to detect a network connection, in order to activate the wired network interface. -
Page 41: Dynamic Network Configuration
Dynamic Network Configuration Select Obtain IP address automatically. Choose whether you want to Obtain the DNS server automatically or Set the DNS server manually. Although a static DNS server can be set up with a dynamic IP address, this should only be done in very specific scenarios. -
Page 42: Wifi Interface
Click Save to apply your settings. WiFi Interface Open the configuration page System / WiFi to set up the WiFi interface for an egnite Querx WLAN device. Check Activate to activate the WiFi interface. Select your network. Either enter you network's SSID into the field SSID, or click Choose Network to select your network from a list of wireless networks available in the area. - Page 43 Selecting the Active Interface The network interface is selected depending on whether Querx WLAN detects a wired connection. If the device detects a functioning Ethernet connection, the wired interface is activated. If no such connection is detected or a working connection is interrupted, the device will activate the WiFi interface.
- Page 44 Open the configuration page System / Network to deactivate these services. The discovery feature allows Querx Hub to display all devices on the local network. In the case of larger setups, these can be grouped, with each group being assigned a specific port number.
-
Page 45: Chapter 10: Configuring The Data Logger
Querx THP, this equates to a timeframe of 25 days at an interval of one entry per minute. In the case of Querx TH / PT it is sufficient for at least 25 days, while the WLAN models can log data for 7.5 years. -
Page 46: Chapter 11: Creating A New User Account
The user can read the data gathered by Querx. Read Data / Read Configuration The user can read the data gathered by Querx and the device's configuration. Read Data / Write Configuration The user can read the data gathered by Querx and the device's configuration. - Page 47 Enter a user name into the input field User name. You can use up to 15 lower- and upper-case letters, as well as digits and the underscore sign. Enter a password for the new user. The same characters that can be used for the user name can be applied for the password.
-
Page 48: Logging In And Out
Once a password protected user with writing privileges has been set up, the anonymous access can be limited or deactivated. Logging In and Out If you have set up a user with access privileges, you will need to log into the web interface. - Page 49 Once a user is successfully logged in, the user name will be displayed on the right side of the header (1). Clicking (logout) will log the user out of the interface.
-
Page 50: Chapter 12: Configuring Sensors
Chapter 12: Configuring Sensors The various models support different sensors. An overview is available in Chapter 2: Models and Options. egnite Querx can inform you if the following critical environmental conditions occur: Lower alert threshold value transgressed Lower warning threshold value transgressed ... - Page 51 In this scenario, a delay of two minutes is set up. The threshold is transgressed after one and a half minutes (1). However, the device only sounds an alarm after the limit has been transgressed for the full two minutes specified as the delay time (2).
- Page 52 Additionally, it may be necessary to monitor whether measurements fluctuate too greatly within a certain timespan. This diagram visualizes how Querx reacts to a window being opened. The maximal fluctuation is set to 5°C within 30 minutes. The sensor measures a temperature of 30°C at 0:20 (1). A window is opened at 0:50, causing the temperature to fall to 20°C rapidly.
-
Page 53: Chapter 13: Email Configuration
This requires an email account on an email server and the configuration of specific actions that Querx will execute when alerts occur. egnite Querx WLAN can also be configured to only activate the email interface at specific times, such as during the day or on weekends. - Page 54 Enter the mail address for the account that you wish to send email alerts from in the input field Sender. Enter the address or IP-address for the mail-server used by the mail account in the input field SMTP server. Enter the SMTP Port used by the email account. This is usually 587. Most mail servers require user data.
- Page 55 Click the Delete button next to the account you wish to delete in the section Email accounts. Confirm that you want to remove the account by clicking Yes on the following page. Managing Email Actions Open the configuration page Interfaces / Email. The section Add new email action can be used to set up specific actions based on certain types of events.
-
Page 56: Alarm Event
Give the action a suitable name, for instance refrigeration alert. Enter the recipient's email address in this field. Select which account the email will be sent from. All the configured accounts are listed with the corresponding user name and server. Select a template for the email. - Page 57 Select the sensor that will trigger the email notification. The asterisk means that all sensors can trigger the event. Select the events that will trigger the email notification. Emails can be sent repeatedly, if alarms or sensor errors persist. If you want to activate this feature, select Repetition and enter the interval in minutes.
- Page 58 System Event The only system event that is currently supported is an email notification after the system boots up. Click Add to save your settings. Clicking Cancel will discard your changes. Testing the Email Action If you would like to test your setup, click the button Test to send an email to the recipient immediately.
- Page 59 Enable will „arm“ the operation. It can be „disarmed“ at a later time by clicking the button Disable. On Querx WLAN, the activation can be automated. Click the button Enable with timefilter. Specify the time at which the action shall be activated.
- Page 60 SCADA systems. Querx will operate as a client that will send data on a customizable topic to a broker. Other clients can subscribe to this topic, in order to receive the data sent by Querx for further processing.
- Page 61 Time Repeating occurence of a specified daily, weekly or monthly point of time. System Triggered when a system event occurs. Click the button Add to create the selected action. Refer to Chapter 19: Configuring an MQTT Action for more detailed information on configuring MQTT actions.
-
Page 62: Chapter 15: Configuring Modbus/Tcp
Chapter 15: Configuring Modbus/TCP egnite Querx supports data transfer via Modbus/TCP, which can be used to integrate the device into industrial process monitoring systems (SCADA). Activating Modbus/TCP Open the configuration page Interfaces / Modbus. Enable Modbus/TCP. If you want to permit changes to the Modbus/TCP configuration, deactivate the Write protection checkbox. - Page 63 Holding Register Address Offset Format Contents 40006 int16 Modbus device address 40007 int16 Options 40021 int16 Lower temperature threshold in Centigrade * 10 40022 int16 Upper temperature threshold in Centigrade * 10 40023 int16 Temperature dead-band in Kelvin * 10 40024 int16 Lower temperature threshold in Fahrenheit * 10...
-
Page 64: Chapter 16: Configuring The Snmp-Agent
Chapter 16: Configuring the SNMP-Agent The Simple Network Management Protokoll makes it easy to integrate egnite Querx into network management systems such as Nagios, OpenNMS or Zabbix. SNMP MIB The Management Information Base (MIB) can be downloaded from the manufacturer's website. The corresponding link can be found on the configuration page Interfaces / SNMP. -
Page 65: Activating The Snmp Agent
The description of the location can be up to 63 characters long and is accessible via the SNMP object system.sysLocation.0. The object system.sysDescr.0 is used by the system to identify the device's model, as well as the active firmware version, e.g. "egnite Querx WLAN THP, Version 6.0.2.0". Activating the SNMP Agent Open the page Interfaces / SNMP. -
Page 66: Chapter 17: Configuring Syslog
Enter the Syslog port. The default setting is 514. Click Save to apply your settings. The Querx Hub application features an integrated syslog server that can receive notifications from egnite Querx. Refer to the page Service / Tutorials on www.egnite.de... -
Page 67: Optical Signals
Optical Signals Open the page Interfaces / Signalers to configure alert notifications on the device. Select the interval in seconds in which Querx will flash in its normal state. WLAN Models: Select the LED's brightness in its normal state. WLAN Models: Select the LED's Brightness when signalling alerts. -
Page 68: Chapter 19: Configuring Actions
Chapter 19: Configuring Actions The settings that have been explained thus far enable Querx to trigger actions such as sending emails when specific events, such as sensor alerts, occur. This chapter will deal with events and triggered actions in a more general sense. - Page 69 The first section is used to select the current state. Enable activates the action permanently. Enable with timefilter activates the action during specific times. Disable deactivates the action. However, it will be saved, so it can be re- activated at a later time. You can enter an explanatory Name for the action.
- Page 70 Chapter 21: Custom Templates for detailed instructions. Some templates require additional parameters. These input fields can remain empty for the standard template email.tpl. Continue configuring the event. Configuring a Signaler Action Acoustic signals are only available on Querx WLAN models.
- Page 71 Continue configuring the event. Configuring an MQTT Action The MQTT network protocol is only supported by egnite Querx WLAN. Name of the template file, refer to Chapter 21: Custom Templates. For now we will use the prepared file mqtt.tpl.
- Page 72 Configuring an FTP Action Querx WLAN can transmit data to an FTP server. This requires the following information: The FTP endpoint's Service-URL, e.g. yourcloudservice.cloud/path/to/endpoint. The FTP Method that the server uses for queries. Typically this is STORE. The Password to access the FTP server.
- Page 73 Configuring Time interval Events Specify the Update rate at which the event is triggered. If the option On change only is activated, the event will only be triggered if the sensor data has changed since the last event.
-
Page 74: Configuring System Events
Configuring Defined times Events The event is triggered daily at the specified time. The event is triggered weekly at the specified time on the specified weekday. The event is triggered monthly at the specified time on a specific day of each month. - Page 75 Thus, it will suffice to save the certificates of a small number of certification authorities. These need to be saved in a file in the PEM format and installed as content on Querx. Since this is a text-file, it can be created with any text editor, e.g. Notepad.
- Page 76 After it has been successfully transferred, the file should appear in the list. The device then needs to be rebooted, as certificates are only recognized during the boot process. Activating Certificate Verification Open the page Interfaces / Email to activate the certificate verification for the email account.
- Page 77 CA certificates have am expiry date. If this option is selected, the certificate will need to be updated on time. Additionally, the server may begin using a certificate from a different CA, which will also prevent Querx from communicating with the server. Hence, you may want to evalute which situation is worse –...
-
Page 78: Chapter 21: Custom Templates
Chapter 21: Custom Templates egnite Querx needs to provide its data in a specific format, in order to communicate with other services, to ensure that they can interpret the information correctly. In an email, for instance, data will be sent in a format that is readable by a human recipient. - Page 79 will display 40 + 8 = 48 as the result. 12345 Constant number 'abc' or "abc" Constant string true or false Boolean constant Mathematical expressions can contain the following options: exp1 + exp2 Addition exp1 - exp2 Subtraction exp1 * exp2 Multiplication exp1 / exp2 Division...
- Page 80 -var Mathematical negation !var Logic negation The operations in combined expressions are listed in the following order: Numeric and logic negations -a and !a. Multiplications and divisions, a*b, a/b and a%b. Addition and subtraction a+b and a-b. Comparisons a==b, a!=b, a<b, a<=b, a>b and a>=b Logic operation a and b and a or b The usual parentheses can be used to designate a sequence.
- Page 81 {% endif %} The expression can be any required template expression, which is then reduced to true or false. All lines between the if command and endif are ignored if the expression is false. The expression does not necessarily need to be a comparison. A simple variable, for instance, can suffice.
-
Page 82: Escape Command
lines, the values of individual elements of a table can be output. The following example creates a list of all sensors with their current values: <ul> {% for sensortab %} <li>{{ sensortab_name }} {{ sensortab_value }}</li> {% endfor %} </ul> use command This command is similar to the for command. -
Page 83: Option Command
The escape command will execute the current replacements until the next occurence of the escape command or until the end of the template. An if command can also be used to skip the escape command. The following replacements can currently be used: Name Description none... - Page 84 Omitting the End of a Line Outputs, commands and comments can optionally include a – at the end. This omits all following spaces up to the end of the line, as well as the line break. Templates can thus be formatted to be more readable without superfluous lines in the output.
- Page 85 In general, a distinction is made between simple variables and tables. The prior are simply referenced by their names. Example: {{fw_manufacturer}} is replaced by the string egnite Variables that are organized in tables can additionally include an index, separated by a period. Example: {{sensortab_name.1}} is replaces by the name of the second sensor.
- Page 86 Name Type Content dst_auto bool Automatic DST change active dst_ena bool Summer time active event_drop char[15] Text for state change "dropping" event_error char[15] Text for state change "sensor error" event_lolim char[15] Text for state change "low" event_ok char[15] Text for state change "back to normal" event_rise char[15] Text for state change "rising"...
- Page 87 Name Type Content led_ps uint8 Color of LED in alert state for sensor 4 led_rate uint8 LED flash rate in normal state led_tf uint8 Color of LED for sensor error led_ts uint8 Color of LED in alert state for sensor 1 login_group uint8 Login group of current user...
- Page 88 Name Type Content rega4 char[128] Alphanumeric register free usage reset_req bool Reboot required sensor_rate uint16 Sensor query-rate in seconds snmp_ena check SNMP activated snmp_port uint16 SNMP agent's port snmp_wrprot check SNMP is read-only snmpd char[] SNMP server's host name or IP address support_tpl_options bool Always 1 for firmware that supports the template command...
- Page 89 Name Type Content actiontab_alarm uint32 Activated alert ebents: Bit 0: back to normal Bit 1: too low Bit 2: too high Bit 4: falling too rapidly Bit 5: rising too rapidly Bit 6: error Bit 8: too low (warning) Bit 9: too high (warning) actiontab_alarm_repeat check Repetition activated...
- Page 90 Name Type Content actiontab_typedesc char[] Type of action as text actiontab_url char[] URL / mail address of recipient actiontab_var1 char[] First variable for template actiontab_var2 char[] Second variable for template actiontab_var3 char[] Third variable for template actiontab_var4 char[] Fourth variable for template actiontab_var5 char[] Fifth variable for template...
- Page 91 Name Type Contents filetab_date date Date on which the content file was uploaded filetab_name char[] Name of content file filetab_path char[] Path of content file filetab_size uint32 Size of content file in Bytes filetab_time time Time of last change to content file Fwtab Table The fwtab table contains information about the two firmware buffers.
- Page 92 Name Type Contents histotab_s2_hi fixed Maximal value sensor 2 histotab_s2_lo fixed Minimal value sensor 2 histotab_s3_avg fixed Average value sensor 3 histotab_s3_hi fixed Maximal value sensor 3 histotab_s3_lo fixed Minimal value sensor 3 histotab_time time Time of measurement (local time) histotab_timestamp Time stamp of measurement (UTC) Logtab Table...
- Page 93 Name Type Contents netiftab_mdns_ena bool MDNS activated netiftab_syslog char[] Syslog server host name or IP address netiftab_syslog_port uint16 Port number of Syslog server Sensortab Table The sensortab table contains information on up to 4 sensors. Name Type Contents sensortab_alert uint32 Bits for activate alerts sensortab_alert_fd bool...
- Page 94 SMTP server port smtptab_sender char[] Sender address smtptab_tls_flags uint32 Reaction to invalid server certificate Usrtab Table The usrtab table contains information on the four users supported by Querx. Name Contents usrtab_group uint8 Index of the user's group usrtab_name char[] User name...
- Page 95 Name Contents usrtab_password char[] Password usrtab_password_check char[] Passwort for verification Wifitab Table The wifitab table contains information on all discovered WiFi networks. Name Contents wifitab_level int32 Signal strength or 0 for blank entry wifitab_name char[] Name of network wifitab_security int32 Security type supported by network (also see web variable wifit_secu)
-
Page 96: Chapter 22: Maintenance
The offset is a fixed value that is added to any value measured by the sensor. In order to adjust your Querx by this method, please take the following steps: Establish the required offset to correct the measuring error. This value is... - Page 97 – value displayed by Querx). Open the page for the corresponding sensor in the Querx configuration area: Sensors > Temperature / Humidity / Pressure. Click the Adjustment button. Enter the offset previously determined into the field Offset. Leave the Gain value at the standard 1.000.
- Page 98 (see above), are known. The device applies the same formulas as detailed in the section Manual Adjustment with Offset and Gain. In order to let Querx adjust offset and gain automatically, please proceed as follows: Open the page Sensors / Temperature, Sensors / Humidity or Sensors / Air Pressure in the Querx configuration area.
-
Page 99: Calibration History
Calibration history by entering any string of text into the input field Annotation before clicking Save. Since Querx can only save the data of up to 30 calibration processes, and it can not be deleted once saved, it is recommended to only use this feature after making sure that you will really require the data in the history permanently. -
Page 100: Restoring The Configuration
The button's label depends on the browser you are using. Click Upload. Finally, restart Querx via the web interface as detailed in Chapter 22: Soft Boot. Firmware-Updates The manufacturer occasionally makes new firmware versions available, in order to expand the functionality of the Querx product range. - Page 101 Select the Buffer containing the firmware image you want to activate in the section Activate firmware. Click the button Activate to activate the new firmware. Querx will now copy the buffer's contents into its internal memory and then reboot. ⚠...
- Page 102 Activating an Alternative Firmware Image Querx can activate the firmware image stored in the second buffer, if you encounter any unexpected problems after updating the firmware. You will require a biro. Some biros' tips are not thin enough to press the button.
-
Page 103: Rebooting The System
Rebooting the System There are two different ways of rebooting egnite Querx – via the web interface (soft boot) or by interrupting the power supply (cold boot). Please note that Querx logs every reboot along with the data its sensors measures. -
Page 104: Resetting The Configuration
Reboot when Establishing an Ethernet Connection egnite Querx can function as a data logger when it is not connected to a network. The tracked data can be retrieved at a later date, when the connection is re- established. If an Ethernet cable is plugged into a running device, it will reboot. A reboot will also be triggered if the connection is interrupted and re-established at a different point. -
Page 105: Performing A Hardware Reset
Performing a Hardware Reset Should you not be able to access the configuration area, for instance because you do not have the access data at hand, Querx can be returned to the factory settings via a hardware reset. You will require a biro. Some biros' tips are not thin enough to press the button. - Page 106 If the time server can not be reached, for instance due to a network error, Querx is fitted with a battery that is used to operate the internal clock in the case of a power shortage.
- Page 107 A second screw is located inside the casing. It is marked red in the image. Undo this screw using the PH1 screwdriver. Carefully lift the circuit board up at the edge opposite the sensor cable. Press the old battery out of the fixture using one of the screwdrivers. Press the new battery into the fixture.
-
Page 108: Chapter 23: Miscellaneous
Fax +49 (0)2305 441487 www.egnite.de Disclaimer egnite can not be held responsible for technical or typographical mistakes. We reserve the right to alter the documentation without further announcements. © 2022 egnite GmbH, Germany. All rights reserved. All trademarks used are the property of the respective holders of the rights.
Need help?
Do you have a question about the Querx and is the answer not in the manual?
Questions and answers