
Subscribe to Our Youtube Channel
Related Manuals for Bogen Nyquist NQ-T1100


Summary of Contents for Bogen Nyquist NQ-T1100
- Page 1 Admin Phone User Guide Nyquist NQ-T1100 © 2018–2022 Bogen Communications LLC All rights reserved 740-00036F 220525...
-
Page 2: Table Of Contents
Contents Using the Admin Phone ..........1 Hardware Components and Features . - Page 3 Walking CoS ............. . .28 Dial Codes Used for Simulating Calls to Admin Station from Station Call Switches .
-
Page 4: Using The Admin Phone
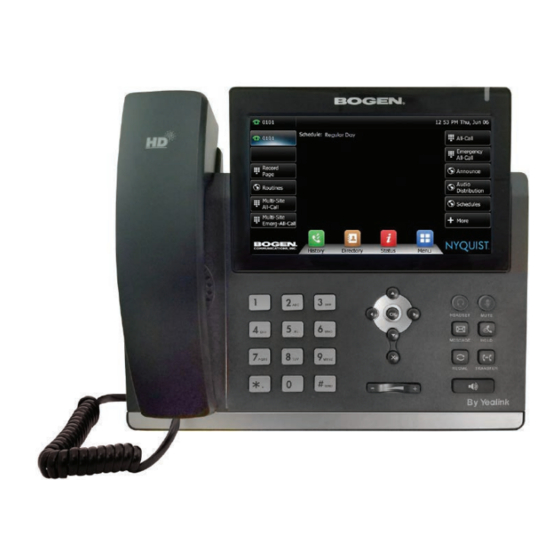
Using the Admin Phone The Bogen Model NQ-T1100 by Yealink is designed to serve as the Administrative Display Phone, or Admin Phone, for Nyquist Series systems. This phone combines a traditional telephone keypad with a color touch screen to provide rapid, efficient, and reliable control over many Nyquist features, such as launching Emergency-All-Call pages and managing school/site bell schedules. - Page 5 The feature keys are described in the following table: Table 1. Feature Keys Headset Toggles and indicates the headset mode. Mute Toggles and indicates the mute feature. Allows you to retrieve voice mail messages, Message provided your Nyquist system has been set up to allow voice mail messages for this phone.
- Page 6 The touch screen displays information about calls, messages, and status and provides a graphical user interface (GUI) that allows you to quickly launch pages, access and change Schedules, start Routines, manage Audio Distribution, and use other Nyquist features. The touch screen makes switching between different screens swift, easy, and convenient.
-
Page 7: Viewing Nws Alert Text On Nq-T1100 Admin Phone
Viewing NWS Alert text on NQ-T1100 Admin Phone National Weather Server Alerts text can be viewed on the NQ-T1100 Admin Phone display. To view the text of all active National Weather Service Alerts, press the NWS Alerts softkey found on the bottom of the NQ-T1100 Admin phone display: Figure 3. - Page 8 When NWS alerts are active, a scrollable text window will open in the center of the phone’s screen to display the text of active alerts: Figure 5. NWS with scrollable window Use the scrollbar to advance through the alert text pages. Press the (Back) button (on the bottom left) to go back to the phone’s Idle screen.
-
Page 9: Configuring The Admin Phone
192.168.0.10) in the address bar, and then press Enter. The computer will display the Admin Phone’s web UI. On the logon page, enter the Username (default is admin) and Password (default is bogen) and click Login. Click the Settings tab. -
Page 10: Setup With Static Ip Address, No Dhcp, No Dhcp Option 66
192.168.0.10) in the address bar, and then press Enter. The computer will display the Admin Phone web UI. On the logon page, enter the Username (default is admin) and Password (default is bogen) and click Login. Click the Settings tab. - Page 11 Configuring the Admin Phone using the NQ-T1100 Phone touch screen Interface On the Admin Phone’s touch screen interface, touch the Menu button. Touch Advanced. Enter the admin password (default is bogen), touch OK. Select Auto Provision. Select Off for DHCP Active.
-
Page 12: Making Pages
Making Pages Nyquist allows the following types of pages: • Multi-Site All-Call • Multi-Site Emergency-All-Call • All-Call • Emergency All-Call • Zone or Station Note: The ability to make Multi-Site All-Call and Multi-Site Emergency-All-Call pages is determined by the Class of Service (CoS) configuration assigned by your system administrator for your Admin Phone. Multi-Site Emergency-All-Call Paging A Multi-Site Emergency-All-Call page is an emergency page that plays simultaneously throughout multiple sites that are configured in the facilities list. -
Page 13: Emergency-All-Call Paging
Touch the Multi-Site All-Call button. Talk into the handset. Hang up the handset when finished. Emergency-All-Call Paging An Emergency-All-Call page is a high priority page that simultaneously plays throughout the facility. An Emergency-All-Call page has a higher priority than an All-Call or Normal page. To make a hands-free Emergency-All-Call page using the touch display: Touch the Emergency-All-Call button. -
Page 14: Zone Paging
Zone Paging You can choose to page only certain areas of the facility, called zones. The zones, which are collections of stations, must be created through the Web-based System Admin User Interface (UI) before zone paging from the Admin Phone can occur. Zones appear in the phone’s Directory under the Paging menu. -
Page 15: Making Calls
zones. All re-queued messages will play again from the beginning of the message when the applicable zones become idle. Selecting Disable Audio will cause playback paging of all recorded messages to stop. The messages will resume play from the beginning when audio is re-enabled. To record a page for page queuing: Do one of the following: •... -
Page 16: Changing The Event Schedule
Changing the Event Schedule Nyquist allows the setting of bells and announcements to be played at specific times and in specific zones. More than one schedule can be created for a school/site. For example, a school/site may have an early release day on Wednesday and have classes begin and end at different times on that day than on the other days of the week. -
Page 17: Playing Tones
Playing Tones Nyquist provides tones that can be used with events, such as bell schedules or announcements. In addi- tion to the default tones, tones can also be created or downloaded through the Admin Web UI. To play a tone: Do one of the following: •... -
Page 18: Using The Voice Mail Feature
To ensure that the desired call forwarding is activated and to receive audio feedback on setting up call forward, use the following steps. To call forward from the Directory: Touch Directory. Touch Features. Touch Call Forwarding. Select one of the following from the interactive audio menu: 1 –... -
Page 19: Recording Announcements
Recording Announcements You can record announcements to be played immediately after they are recorded or to play at a later date and time. To record an announcement: Do one of the following: • Touch Directory. • Pick up the handset, and then select Directory. Ensure Remote Phone Book is selected, select Features, and then select Record Announcement. -
Page 20: Restart Nyquist Server
Restart Nyquist Server To restart the Nyquist Server: Touch Directory. Select Features. Select Restart Nyquist Server. Enter the system password. Note: Restart Nyquist Server only restarts the Nyquist application; it does not reboot the server or restart the Operating System. Stop Announcement To stop an announcement if the Announce key is present: Touch the Announce button. -
Page 21: Launching Routines
To start audio distribution: Touch Audio Distribution. From the menu, select the audio distribution that you want to start. After an audio distribution is started, the entry displayed in the menu will be prefixed with (P) to indicate that it’s playing. To stop audio distribution: Touch Audio Distribution. -
Page 22: Customizing Line Keys
A routine launched from the Admin Phone can end with any of the following page commands, provided the Admin Phone has the appropriate CoS enabled: • All-Call • Emergency-All-Call • Facility-Page • Mutli-Site-All-Call • Multi-Site-Emergency-All-Call • Zone-Page Customizing Line Keys Line keys are the soft keys that appear on the display window (see "Display Window Features”... -
Page 23: Appendix A: Nyquist Dtmf Feature Dialing Codes
Appendix A: Nyquist DTMF Feature Dialing Codes Note: The use of feature dial codes is restricted by the station’s CoS assignments. Alarm/Tone Activation Description DTMF Code Required CoS Start Alarm specified by {DTMF-code} Activate Alarm Signals *91{DTMF-code} Activate Alarm Signals 0000091{DTMF-code} Start Tone specified by {DTMF-code}, play to {zone} Manually Activate Tone... -
Page 24: Announcements
Announcements Description DTMF Code Required CoS Start Announcement specified by {DTMF-code} to All-Call Page *92{DTMF-code} station’s configured “Announcement Zone” All-Call Page 0000092{DTMF-code} Note: If “Announcement Zone” is not configured, the caller will be prompted to enter a zone number. Start Announcement specified by {DTMF-code}, Zone Paging *92{DTMF-code}*{zone} play to {zone}... -
Page 25: Calling
Calling Description DTMF Code Required CoS Call {extension} speaker (intercom, auto-answer) Call Any Station {extension} Call {extension} ringer (telephonic, ringing) Call Any Station *{extension} Join conversation at {extension} Join Conversation *#{extension} Call {extension} at {facility-page-number} Inter-Facility Call/Page ##*{facility-page-number}*{extension} Place long distance call with area code (AAA = Area Outside Access rights 981AAANNNNNNN code, NNNNNNN = number) -
Page 26: Call Parking/Call Pickup
Call Forwarding Description DTMF Code Required CoS Call Forwarding Menu Call Forwarding All-Calls (CFALL) Call Forwarding 971{extension} When Busy (CFBS) Call Forwarding 972{extension} When No Answer (CFNA) Call Forwarding 973{extension} When Busy or No Answer (CNBN) Call Forwarding 974{extension} Cancel Call Forwarding Call Forwarding Call Forwarding Status (Caller only) Call Forwarding... -
Page 27: Conferencing
Call Transfer Description DTMF Code Required CoS Blind transfer (during call) Call Transfer #1{extension} Attended transfer (during call) Call Transfer *1{extension} Complete attended transfer, dropping out of call Call Transfer Complete attended transfer, but stay in the call Call Transfer Swap to the other party (during attended transfer) Call Transfer Transfer (drop) call from Speaker to associated... -
Page 28: Monitoring/Recording
Monitoring/Recording Description DTMF Code Required CoS Monitor call or location at {extension} 978{extension} Monitor Calls/Locations Note: Spy Mode monitoring cannot be used on a station that has been set to Privacy Mode. Enable “spy mode“ (MUTE) during call monitoring Enable “whisper mode“ during call monitoring Enable “barge mode“... -
Page 29: Paging
Paging Note: The “##” prefix is used to indicate multi-facility paging operations. Description DTMF Code Required CoS Multi-Site Emergency All-Call Page Emergency All-Call ##0911 Multi-Site Paging Multi-Site All Call Page All-Call Paging Multi-Site Paging Emergency All-Call Page Emergency All-Call #0911 Multi-Facility Emergency All-Call Page Emergency All-Call ##0912{facility-page-number}*{facility-... -
Page 30: Voicemail
Paging (Continued) Note: The “##” prefix is used to indicate multi-facility paging operations. Description DTMF Code Required CoS Real-time page to {zone-number} that belongs to a Inter-Facility Call/Page ##{facility-page-number}#{zone-number}* queue at {facility-page-number} Record page; system will prompt for Zone Number Zone Paging *991 Record page for {zone-number}... -
Page 31: Walking Cos
Walking CoS Description DTMF Code Required CoS Current IP phone's extension becomes {extension} Walking Class of Service 3*{auth-code}*{extension} Note: If Auth Code is set to 0000 in the Admin Web UI’s System Parameters, this feature is disabled. Dial Codes Used for Simulating Calls to Admin Station from Station Call Switches Description DTMF Code... -
Page 32: Audio Distribution
Routines Description DTMF Code Required CoS Execute Routine with {routine-DTMF-code} Execute Routines *94{routine-DTMF-code} Note: Only routines with Allow DTMF can be exe- Execute Routines 0000094{routine-DTMF-code} cuted from the Admin Phone. Execute Routine with {routine-DTMF-code} specify- Execute Routine *94{routine-DTMF- ing values for parameters $cmdParam1 and $cmd- code}*{parameter1}*{parameter2} Param2. -
Page 33: Miscellaneous Dial Codes
Miscellaneous Dial Codes Description DTMF Code Required CoS Restart Nyquist system server #*349 Note: User is prompted for System Password. Toggle Audio Distribution to associated speaker Disable Audio Disable Audio 0000097 Enable Audio Enable Audio 0000098 Stop Scheduled Audio Audio Distribution Close {contact-number} on I/O Controller {exten- Manage Output 942#{extension}#{contact-number}...
Need help?
Do you have a question about the Nyquist NQ-T1100 and is the answer not in the manual?
Questions and answers