Table of Contents
Advertisement
Quick Links
Advertisement
Table of Contents

Related Manuals for TRYSIGHT MERCURY 13


Summary of Contents for TRYSIGHT MERCURY 13
- Page 1 MERCURY 13/PORTABLE CCTV with SPEECH User Guide / Version 1.0...
-
Page 2: Table Of Contents
TABLE OF CONTENTS Introduction to Mercury 13……………………..1 Safety and Care……………………………………..2 What’s Included…………………………………….3 Using the Mercury 13…………………………..4-8 Powering On and Charging……………………..4 Ejecting and Inserting the Tablet…………….5 Quick On/Off………………………………………...6 LED Light……………………..……………………..7 Keyboard………………………….….……………….8 Reference Guide……………………………..…9-10 Locations………………………………………………9 LED Light & Camera………………………………10 Starting the Software……………………………11 Top Menu Bar……………………………………….12... - Page 3 TABLE OF CONTENTS Settings……………..…………………….…...28-32 General Options…………………….…………….29 Speech Options……………..…….….…………..30 Reading Options………………….………….31-32 Power Off ..………………….…….….………33-34 Warranty Conditions…………...….……..……35 Contact Us……………………………..…..…….36 Technical Specifications….………….………..37...
-
Page 4: Introduction To Mercury 13
The Mercury 13 has been designed with the low vision user in mind. It doubles as a magnification system and a Windows laptop by using a large print Bluetooth keyboard. -
Page 5: Safety And Care
SAFETY AND CARE S a f e t y A n d C a r e Do not expose the Mercury 13 to extreme or rapid changes in temperature or humidity. Do not place Mercury 13 near a radiator or heater, or where it will be exposed to direct sunlight. -
Page 6: What's Included
WHAT’S INCLUDED W h a t ' s I n c l u d e d Mercury 13 unit should come with these items: 1X - Laptop travel case 1X - Mercury 13 tablet with stand 1x - Second Monitor (optional) -
Page 7: Using The Mercury 13
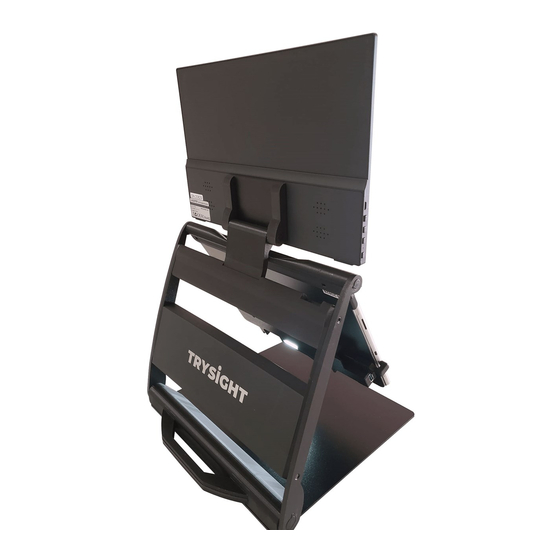
U s i n g T h e M e r c u r y 1 3 Powering On and Charging Mercury 13 comes with a stand which holds the tablet. There is a handle on the stand to carry the unit. Simply open the stand and this will unveil the tablet. -
Page 8: Ejecting And Inserting The Tablet
USING THE MERCURY 13 U s i n g T h e M e r c u r y 1 3 Ejecting and Inserting the Tablet To eject the Microsoft Surface tablet from its stand, slightly press down the bracket on the top right plate of the stand and gently slide the tablet out by pushing it to the right. -
Page 9: Quick On/Off
USING THE MERCURY 13 U s i n g T h e M e r c u r y 1 3 Quick On and Off To enable quick on/off functionality, the unit can go into "Sleep" mode. The unit can wake up instantly from sleep mode in 2 seconds. -
Page 10: Led Light
USING THE MERCURY 13 U s i n g T h e M e r c u r y 1 3 LED Light The LED flash light is built separately in to the stand to provide better image quality. It is located behind the tablet. -
Page 11: Keyboard
“Fn” + “C” and a blue light will blink on the keyboard indicating it is ready to pair. Then go into Windows Bluetooth settings and add a new Bluetooth device. Search for a device called “TrySight Keyboard” and click on it to complete pairing. -
Page 12: Reference Guide
REFERENCE GUIDE U s i n g T h e M e r c u r y 1 3 Device Overview Camera Mount Monitor Mount Ejector Bracket Charging Port Volume Button USB C Port USB C Port Power Button... -
Page 13: Led Light & Camera
REFERENCE GUIDE R e f e r e n c e G u i d e Device Overview LED Light, USB Port and Camera LED Light Port Surface Camera LED Switch Ejector Bracket USB Port... -
Page 14: Starting The Software
STARTING THE SOFTWARE Starting the Software To start the software, double click the ReadDesk icon on desktop. The software starts in Live Magnification mode. Place the paper or text you want to magnify or read under the camera. Focusing Text To focus text, simply tap the screen once. -
Page 15: Top Menu Bar
TOP MENU BAR TOP MENU BAR The software starts in Live Magnification mode. Clicking or tapping a small arrow on the top allows the opening of a menu bar which has various magnification options as shown in images below. -
Page 16: Top Menu Bar
TOP MENU BAR When the distance camera is plugged in, the top menu bar changes the Switch Camera icon to a Distance View icon as shown below... -
Page 17: Magnifying
MAGNIFYING (ZOOM IN AND OUT) Zooming In and Out Three ways to Zoom In and Out: 1. Using the menu on top of the screen. Click on the down tab to make the menu appear (picture 14.1). Choosing the magnifying glass with plus (+) sign will allow you to zoom in and choosing the magnifying glass with minus (-) sign will make the screen zoom out. -
Page 18: Changing Colors
CHANGING COLOR You can change to your preferred color by tapping on the paint brush icon on the menu or pressing the letter ‘C’ on the keyboard. Options for contrast are as follows: Original (color), High Contrast (color), Black on White, White on Black, Black on Yellow, Yellow on Black, Black on Green, Green on Black, Yellow on Blue, Blue on Yellow and Grayscale. -
Page 19: Capturing And Saving Pictures
CAPTURING AND SAVING PHOTOS Capture & Save Pictures To capture and save a picture, move the stand to an almost horizontal position, with the tablet almost straight down. Press the save icon (Floppy disk icon) and select the camera icon. Once the picture is taken, tilt the screen back to a comfortable position. -
Page 20: Capturing And Saving Videos
Opening a Video Videos that were taken using the Mercury 13 are automatically saved on video folder of the device. Simply open This PC -> Videos -> Read Desk folder... -
Page 21: Reading Text
READING TEXT To Read: To read a full A4 document, raise the stand and position the tablet to an almost horizontal position with the camera pointing straight down (as shown below). Press the read icon. You may then reposition the stand to a comfortable viewing angle and listen to the document. -
Page 22: When Reading
READING TEXT When Reading: By default, reading will start upon completion of processing. To pause, tap anywhere on the screen with one (1) finger, then tap again to resume. Zoom in and out in reading mode using the same two- finger pinch gesture as in magnification mode (see page 14, item 2). -
Page 23: Distance Viewing(Optional)
DISTANCE VIEWING Camera Placement Insert the camera into the slot on the top left corner of the stand Connect the camera to the tablet using the provided USB. In approximately 10 seconds, the "Distance View Camera" will be activated and the icon will appear on the menu. Camera Port... -
Page 24: Distance Viewing Controls
DISTANCE VIEWING Distance Viewing Controls (distance view camera icon) (magnification buttons) • You can zoom in and out the image by using the magnification buttons on the slide down menu • Pressing the bigger button allows you to zoom in to the image •... - Page 25 DISTANCE VIEWING Pressing both buttons at the same time locks in the current live view and lets you control the focus manually by pressing either the bigger or the smaller button. Pressing the buttons again will bring you back to zoom in and out mode. To view both near and far simultaneously, press the split screen icon to view both from the distance camera and the tablet camera on one screen.
-
Page 26: Dual Monitor
DISTANCE VIEWING Dual Monitor If you have a 2 screen for the Mercury 13, rotate the monitor hook and insert it into the center slot on the stand as shown below. - Page 27 DISTANCE VIEWING Then connect one end of the USB-C monitor cable to the monitor as shown below.
- Page 28 DISTANCE VIEWING Then, connect the other end of the cable to the tablet as shown below...
- Page 29 DISTANCE VIEWING Charging Port Second Monitor LED/HUB Connector Camera Port If the second monitor is not displaying any content, configure Windows Display Settings to extend the screen to the external monitor. Once content is showing on the 2 monitor, pressing the Split Screen Icon on the ReadDesk software will automatically send the distance camera video to the 2 monitor...
- Page 30 DISTANCE VIEWING Pressing the top half of the screen will move the menu bar arrow to the top of the screen and will control the distance camera. Pressing the bottom half of the screen will move the menu bar arrow to the bottom of the screen and will control the tablet camera.
-
Page 31: Settings
SETTINGS Tap the Settings icon to open the settings menu. There are 3 Types of Settings General Options Speech Options Reading Options... -
Page 32: General Options
SETTINGS General Options This allows you to change the Menu, Language, Menu bar Alignment and the default folders where pictures and text files are saved. -
Page 33: Speech Options
SETTINGS Speech Options This allows you to change language, voices, speech volume and speech speed. -
Page 34: Reading Options
SETTINGS/ READING OPTIONS This will let you switch between original and wrapped text... - Page 35 SETTINGS/ READING OPTIONS Wrapped Text Wrapped text will digitally re-render the text in crisp text to make reading easier and fit is horizontally on the screen. However, the layout of the original document will be lost. Original It maintains the original layout of text while reading but the quality of the text will degrade the more you zoom in.
-
Page 36: Power Off
POWER OFF To power off the device, you may use the standard Windows shutdown procedure OR press the power button for three seconds and then swipe down from the top of the screen. -
Page 37: Warranty Conditions
WARRANTY CONDITIONS TrySight's Mercury 13 warranty is free of defect in material, software and hardware for one (1) year from purchase date. This warranty extends only to the original purchaser and is not transferrable. For any manufacturer's warranty claim/s, contact TrySight or your authorized nearest distributor. -
Page 38: Contact Us
Visit us online: www.trysight.com E-mail us: sales@trysight.com Call us: 1-866-499-2921 Meet us: 2364 Haines Rd, Unit 16, Mississauga, ON, Canada, L4Y 1Y6 For online video tutorials on operating the Mercury 13, please visit: https://trysight.com/tutorials/...
Need help?
Do you have a question about the MERCURY 13 and is the answer not in the manual?
Questions and answers