Advertisement
Quick Links
Advertisement

Related Manuals for TRYSIGHT Mercury 12


Summary of Contents for TRYSIGHT Mercury 12
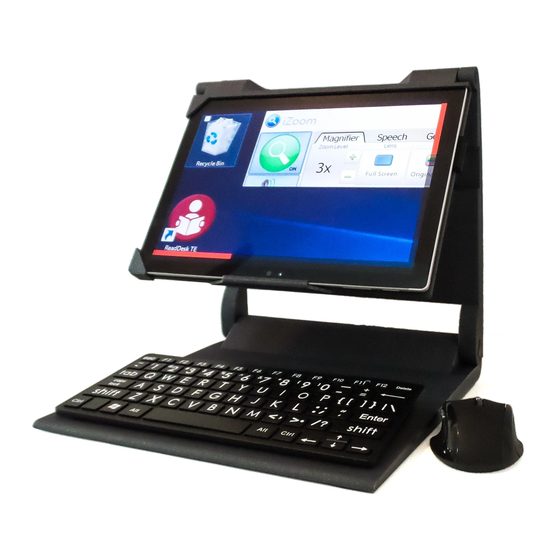
- Page 1 Mercury 12 INDOWS CCTV ORTABLE WITH PEECH UIDE support@trysight.com Version 2.2...
- Page 2 Congratulations on the purchase of your Mercury 12 unit. Please read the manual fully before using. Mercury 12 is an advanced tablet based magnifier with highly accurate reading capabilities, allowing you to listen to printed material in a clear natural sounding voice. The latest version of this manual is available on our website at www.trysight.com...
-
Page 3: Opening The Stand
OPENING THE STAND Mercury 12 incorporates a stand which holds the tablet. There is a handle on the stand to carry the unit. To open the stand, pull the base plate and the top plate apart on the side opposite the handle as shown below. This will unveil the tablet... -
Page 4: Power On/Off
POWER ON/OFF The power button is located on the bottom right of the tablet and is smaller than the volume button located right next to it. Hold down the Power button for 3 seconds to start the unit. After about 30 seconds the unit should boot up. - Page 5 connector port on the tablet (On the left side when the tablet is on the stand). After charging for 30 minutes the unit should have sufficient power to start. However, to fully charge the unit it will take 3-4 hours. Ejecting from Stand To eject the tablet from the stand slightly press down the bracket on the top right plate of the stand and gently slide the tablet out of the stand.
- Page 6 A wireless keyboard/mouse (included) is the preferred method of using the Mercury 12 as a Windows machine. This allows use of the device as a laptop without having to repeatedly remove it from the stand.
- Page 7 LED Light The LED Flash light is built separately in to the stand to provide better image quality. It is located behind the tablet. There is a switch on the right side of the LED. It has 3 possible positions 1) On - LED Permanently On 2) Off - LED Permanently Off 3) Auto - LED automatically turns on when motion is detected.
- Page 8 To charge the LED, use the provided Micro-USB to USB cable. Connect one end to the tablet and the other end to the charging port of the light present on the left side of the stand as shown below: Mouse and Keyboard The keyboard and mouse are connected by Bluetooth.
- Page 9 MAGNIFICATION MODE Pull the tablet forwards so the arms on the stand are at a 45 degree angle. Then angle the tablet so you can comfortably see it as shown below. Position your document on the base plate and start the magnifier application by selecting the “ReadDesk TE”...
- Page 10 Live Magnification The software starts in Live Magnification mode. Clicking or tapping a small arrow on the top allows the opening of a menu bar which has various magnification options as shown in images below.
- Page 11 The distance view icon will only appear if the distance camera is connected via the USB cable. Some functions do not have an icon in the menu or can be controlled using touch gestures as well. They are as follows: 1) Single Finger Tap to Focus or ENTER...
- Page 12 Color Modes Tap the “Toggle Color” icon to find a color that’s easy to see. The color options are: 1) Original 2) High Contrast 3) White on Black – White text on a black background 4) Black on White – Black text on a white background 5) Black on Yellow –...
- Page 13 disable the column detection. 1) Pause/Play By default, reading will start upon completion of processing. To pause, tap anywhere on the screen with a single finger. To resume, tap again with a single finger. Note that when resuming, the location you tap matters. If you tap on a specific word it will start reading from that word and not where you left off.
- Page 14 4) Exit Reading Mode To read something else, tap the X on the top left or press Escape. Load/Save Pictures To save a picture, tap the “Save Picture” icon. The current image will be saved to the M y Pictures\Read Desk\[ C urrent Date] f older. ...
- Page 15 Split Screen Feature The split screen icon appears only when the distance camera is active. The split screen function helps reader to display both the distance camera and the tablet camera at the same time on one screen. This is useful for taking notes while viewing the blackboard.
- Page 16 Settings Tap the “Settings” icon to open the settings menu. The settings are divided by category in multiple tabs. They are as follows: Speech Options: This will let you change language, voices, speech volume and speech speed. Reading options: This will let you switch between original and wrapped text. Wrapped text is digitally rendered and fits horizontally on the screen whereas original maintains the original layout of text while reading.
Need help?
Do you have a question about the Mercury 12 and is the answer not in the manual?
Questions and answers