Table of Contents
Advertisement
CASCADE
SERIES P20
INSTRUCTION MANUAl
Models:
10416A - P20 SP
10419A - P20
10425A - P20 OZ SP
10426A - P20 OZ
10427A - P20 OZ SP 230V
10428A - P20 OZ 230V
Read all instructions before using this machine.
IMPORTANT SAFETY INSTRUCTIONS
This manual is to ensure that the CFR Cascade is operated correctly.
All operators must read, understand and practice the following safety instructions.
72596A 10/2006
Advertisement
Table of Contents

Related Manuals for CFR CASCADE P20 Series

Summary of Contents for CFR CASCADE P20 Series
- Page 1 CASCADE SERIES P20 INSTRUCTION MANUAl Models: 10416A - P20 SP 10419A - P20 10425A - P20 OZ SP 10426A - P20 OZ 10427A - P20 OZ SP 230V 10428A - P20 OZ 230V Read all instructions before using this machine. IMPORTANT SAFETY INSTRUCTIONS This manual is to ensure that the CFR Cascade is operated correctly. All operators must read, understand and practice the following safety instructions. 72596A 10/2006...
-
Page 2: Table Of Contents
The Cascade P20-SP, self-propelled cord electric model, Preparing for cleaning ....6 and Cascade P20 wand systems, are high efficiency clean- Operating instructions ....7 ing systems. Standard CFR hoses and tools can be used Pre-use inspection ..... 7 with all Cascade P20 models. Filling the tank ......8 This manual has been provided, along with a training video, Operating the Cascade ..... -
Page 3: Unpacking Instructions
Side plate 7. Insert a quick release pin in each of the clevis. 8. Press the quick disconnect of the solution hose onto the quick disconnect of the inline strainer assembly. CFR CASCADE... -
Page 4: Components
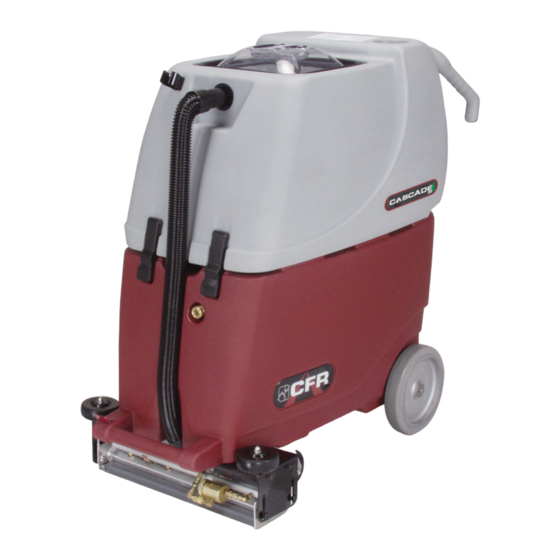
Vacuum Pump Ozone (OZ model only) Vacuum Motor Switch..Turn vacuum motor on/off. Pump Motor Switch ....Turn pump motor on/off. Ozone Switch ......Turn ozone on/off. Speed Dial ........Select speed control from 0-11. Pump Circuit Breaker ...5 AMP breaker provides overload protection for the pump motor. The breaker will pop out if tripped. To reset, wait several minutes and push the breaker back in. Hour Meter ........Displays number of hours machine has been used. The hour meter only runs when the pump is on. Trigger ..........Activates solution dispensing. Circuit breaker Hour meter WARNING! Do not turn power off on the machine by disconnecting the cord. The electronic drive control will sense a power failure and shut off, requiring it to be reset. Always turn off all switches before you turn off the power. WARNING! Do not force the engagement of the trigger by tying or taping the trigger in the “on” position. The electronic drive control will sense a power failure and shut off, requiring it to be reset. CFR CASCADE... -
Page 5: Safety Instructions
5. Do not handle plug or unit with wet hands. 6. Do not pull or carry by cord, use cord as a handle, close a door on cord, or pull cord around sharp edges or corners. Do not run machine over cord. Keep cord away from heated surfaces. 7. Turn off all controls before unplugging. 8. Do not unplug by pulling on cord. To unplug, grasp the plug, not the cord. 9. Do not put any object into openings. Do not use with any opening blocked; keep free of dust, lint, hair, and anything that may reduce air flow. 10. Do not use without filters in place. 11. Do not use to pick up flammable or combustible liquids such as gasoline or use in areas where they may be present. 12. Do not expose to rain. Store indoors. 13. If unit is not working as it should, has been dropped, damaged, left outdoors, or dropped into water, take it to a local CFR service center. Grounding Instructions This unit must be grounded. Grounding provides the path of least resistance for electric current, in the event of malfunction or breakdown, to reduce the risk of elec- tric shock. This unit is equipped with a cord having an equipment-grounding conductor and grounding plug. The plug must be inserted into an appropriate outlet that is properly installed and grounded in accordance with all local codes and ordinances. WARNING! Improper connection of the equipment-grounding conductor can result in a risk of electric shock. Check with a qualified electrician or service person if you are in doubt as to whether the outlet is properly grounded. Do not modify the plug provided with the appliance – if it will not fit the outlet; have a grounded outlet installed by a qualified electrician. CFR CASCADE... -
Page 6: Transporting The Cascade
Preparing for Cleaning Vacuuming Planning Vacuuming is very important to the maintenance of The area to be cleaned should be reviewed to deter- carpet. Vacuuming removes the dry soil; loose dust, dirt mine the most efficient cleaning plan to minimize turns and soil before it is worked down into the carpet. Built and utilize power outlets advantageously. up soil is much more difficult to clean out of the carpet. If you have a rectangular room: Pre-Spraying • Establish a path down the length of the room, overlap- Doorways and other heavy traffic areas will require ping each pass by a minimum of 2 inches. additional maintenance and care. Pre-spraying these areas prior to cleaning will allow the chemicals addi- If you have an irregularly shaped room: tional time to work. • Establish a path down the length of the room at the longest point, overlapping each pass by a minimum of Spotting 2 inches. The difference between a spot and a stain is how long it sits on the floor. Pre-vacuuming provides an excellent opportunity to locate and pre-treat spots. CFR CASCADE... -
Page 7: Operating Instructions
WARNING! Do not fill the Cascade tank prior to the pre-use inspection. 1. To prepare the Cascade for use, remove the clear tank lid and disconnect the vacuum hose. 2. Unlatch the fasteners on the front of the machine, open the top. ❷ 3. Inspect the solution lines and the vacuum hose checking for any damage. 4. Close the machine fastening the latches. 5. Reconnect the vacuum hose and replace the clear tank lid. The Cascade utilizes multiple filters in the recycling of cleaning solution. It is imperative to the operation of the machine that filters are kept clean and in good working order with no tears, holes, or obvious signs of wear. Visually check all filters prior to use. 6. Remove the inlet filter, the main filter and both ball filters inspecting them for damage. ❸ 7. Check the low water shut off float, making sure the float moves freely. 8. Replace each filter. Inlet filter Tank lid Main filter ❻ Ball filter low water float CFR CASCADE... -
Page 8: Filling The Tank
Filling the Tank ❶ 1. Fill the tank with water to the desired level. For the full 25 gallon capacity fill to the 25 gallon mark on the level gauge inside the tank. The Cascade requires a minimum of approximately 15 gallons to operate properly. This partial fill level is perfect for smaller areas or when you are doing maintenance cleaning. CAUTION! Water should never be higher than the inlet filter. Doing so will activate the automatic vac- uum shut off and the machine will not operate. CAUTION! Water temperature above 140° F (60°C) will cause the tank to buckle from the strong vacuum suction. ❷ 2. Add CFR’s in-tank cleaner at the proper ratio as 25 gallons described on the chemical label instructions. CFR’s in-tank cleaners are A Excell, Excell and Perform-All. 3. Add CFR’s Defoam to the tank, per label instructions, 15 gallons to prevent excess foaming. WARNING! Do not use any other defoaming product other than CFR’s Defoam. CFR CASCADE... -
Page 9: Operating The Cascade
is well primed. • Turn speed dial to 0 (zero). • lower the floor tool. • Turn vacuum switch on. • Turn pump switch on. • Squeeze the trigger for 30 seconds. • Adjust p.s.i. from 0 to 400, if necessary. Note: For P20 OZ models, turn on vacuum, pump and ozone switches on and let machine run for 15 minutes before use. P20 – The easy to use wand system cleans in the forward direction. 1. Prior to cleaning, purge the air in the solution line by circulating solution into the tank through the hose. • Attach hose and solution line without tool attached and place hose end in tank opening • Turn pump switch on and engage trigger for 30 seconds. • Adjust p.s.i. from 0 to 400, if necessary. This primes the pump, purges air from the lines, and automatically mixes the chemicals. The Cascade P20 is ready for cleaning. Note: If priming does not work, refer to page 16. CFR CASCADE... - Page 10 5. When cleaning, monitor foam in the solution tank. Residue left in the carpeting or upholstery from other cleaning methods may cause excessive foam to collect in the solution tank. If vacuum flooding occurs foam and fluid will spill out onto the floor. 6. If flooding occurs turn off the pump switch. 7. Remove the vacuum hose from the machine. 8. Remove clear plastic lid. CAUTION! If foam continues to cause flooding, empty the solution tank and refill with fresh 9. Add DEFOAM to the tank according to bottle instructions. fluid, adding CFR DEFOAM before restarting. 10. let vacuum run for 3-5 minutes to clear foam and dry 13. When finished cleaning, drive the Cascade to vacuum turbines. the janitor’s closet or to where the waste water can be dumped. 11. Replace clear plastic lid. 14. Follow instructions for routine daily maintenance. 12. Continue cleaning. CFR CASCADE...
-
Page 11: Maintenance
Tank and Filters 1. Make sure all power is off. 2. Empty the tank. • Remove the drain hose from the clamp on the rear of the machine. • Remove the plug and hold hose over the drain ❸ area until tank is empty 3. Remove clear plastic lid. 4. Remove the inlet filter and rinse. 5. Rinse out the tank and drain hose with clean water. 6. Remove the main filter and the ball filters, rinse and replace. 7. Replace the inlet filter. 8. Replace the clear plastic lid. ❻ Inlet filter Tank lid Main filter Ball filter low water float CFR CASCADE... - Page 12 tool head and slide the tool head off. 4. Remove the spray bar and rinse. 5. Visually inspect quick disconnect spray tips for blockage. 6. Open and clean the in-line strainer filter and replace. • Disconnect the in-line strainer filter by using the quick disconnect coupler. • Remove any debris from the strainer. • Keep o-ring and threads of the plug lubricated. CFR DEFOAM is a good lubricant or use a non-petroleum based lubricant. This will ensure a tighter seal. 7. Remove any large debris from underneath the tool head. Rinse the vacuum chamber on the tool head. 8. Replace spray bar. 9. Connect the tool head. • Connect the solution hose. • Replace the two quick release tool pins. ...
-
Page 13: Optional Accessories
1. Rinse opening of tool with water to eliminate any debris. 2. Wand only – open and clean in-line strainer. A. Disconnect the In-line Strainer by using the quick disconnect coupler. B. Remove the filter and rinse with water. C. Remove any debris from the strainer. D. Keep o-ring and threads of the plug lubricated. CFR DEFOAM is a good lubricant or use a non-petroleum based lubricant. This will ensure a tighter seal. 3. Wipe tool with damp cloth and store with head up to prevent clogging of nozzle. OPTIONAL ACCESSORIES Wand and Tool Usage Attaching Wand/Hand Tool The Cascade self-contained cleaning system works with all CFR wands and tools. To attach a wand or hand tool: 1. Verify that all power is off. ... - Page 14 Carpets/Hard Floor and Surfaces 1. Place the wand on the surface to be cleaned and move it at the rate of a slow walk. 2. Apply solution by engaging the trigger. CAUTION! When using CFR carpet wands, solution is applied on the forward stroke only. Use only enough downward pressure on the wand to move it effectively on both the push and pull stroke. Use of excessive downward pressure on the wand will decrease the efficiency. 3. Always finish cleaning with a dry stoke. CAUTION! It is very important to keep wands properly seated to the surface being cleaned to produce maximum cleaning effectiveness and minimum dry times. Upholstery 1. Place tool on surface to be cleaned. 2. Move (pull and push) tool at a rate of about one foot per second. 3. Apply solution on the pull stroke only. 4. Overlap passes by about 1 inch. When cleaning upholstery edges, hold finger over part of the tool to prevent overspray. Edges can also be cleaned by placing the tool on the edge of the upholstery and moving it parallel to the edge. CAUTION! When using CFR hand tools, solution is applied on the pull stroke only. Use only enough downward pressure on the tool to move it effectively on both the push and pull stroke. Use of excessive downward pressure on the hand tool will decrease the efficiency. CFR CASCADE...
-
Page 15: Periodic Maintenance
1. Check power cord for any breaks, separations, or cuts. Make sure the ground pin on the connector is intact or the machine will be unsafe. Make sure the ground pin on all three prongs on the connector are intact. 2. It is very important to monitor machine operating hours for proper maintenance of the motors and pumps. After 700 hours of operation or once a year, the vacuum motor brushes should be inspected by an authorized repair center and replaced if worn (length is 1/2 inch or less).When replacing brushes, carefully insert brushes without crimping brush follower spring. 3. Check vacuum motor performance using a vacuum gauge. Place this gauge on the tank inlet fitting with the vacuum turned on. Water lift should be between 120 and 135 inches. If the reading is lower, check for air leaks in the tank, cover gasket, and drain hose. 4. Check pump performance occasionally against built-in pressure gauge. Pump running pressure should be 380-400 p.s.i. When pumping fluid through the tool head, the minimum pressure should be 310-350 p.s.i. If the pumping pressure is outside of this range, check and clean the main filter and the ball filters to ensure the pump is getting enough fluid. After 500 hours, check pressure regulator and pump. If signs of wearing present, rebuild. 7. For extended storage or between uses in cold climates drain the system and flush pump with automobile windshield washer fluid. If the pump is frozen it can be severely damaged. 8. Check main filter for blockage. A blocked filter will cause problems not only to daily operations but to the equipment itself. Once the filter is blocked, rinsing is not enough. Clean the tank and fill with fresh water. Using filter cleaning nozzle assembly with pressure of 400 p.s.i. washes off all debris inside out. CFR CASCADE... -
Page 16: Trouble Shooting Guide
surfaces with ridges and bumps. It is difficult to get good drying times with this type of installation. • Check drain hose plug, it must be securely fastened to prevent air leaks to vacuum causing vacuum flooding. Hose will vibrate if there is an air leak. Streaks on carpet or no fluid • Check nozzles for full spray. Clean if clogged or replace if worn. from tool head • Check tool and hose for obstructions. • Check and clean inline strainer filter. • Check and clean main filter and ball filters. Pump will not prime • Attach priming hose assembly to quick disconnect on front of machine. Place hose end in solution tank and run pump for 30 seconds. • Remove priming hose assembly, attach main solution line and check p.s.i. • If above does not work, reattach priming hose. Seal priming hose end in the vacuum hose inlet on front of machine. Run vacuum and pump motors for 30 seconds to siphon solution into pump. CFR CASCADE... -
Page 17: Parts And Drawings
* For self-propelled models only – Add 2 for 230V models 72433A Terminal Block 3 Positions ** Use only three in non self-propelled models 04*** 71379A Relay, 25A, 120V 72650A Fuse, 5A / 32V *** Use only one in non self-propelled models CFR CASCADE... - Page 18 Screw, ?-20 x 2 Socket Cap 7DL005 Hose Clamp, 1-1/2” SS 7BF004 Nut, Kep ?-20 Zinc 72388A Screw, #10 x 5/8 Phil Tap 72559A Label, Base (CFR) 72538A Panel, Vacuum Motor 72511A Wheel, 10” Diameter 72540A Gasket, Vacuum P-20 72571A Bushing, 7/8”...
- Page 19 Hose Clamp, 1-1/2” SS 72567A Cover, Relay Bracket 72388A Screw, #10 x 5/8 Phil Tap SW158 Cable Clamp 72538A Panel, Vacuum Motor 72559A Label, Base (CFR) 72540A Gasket, Vacuum P-20 72592A Bushing, 7/8” 72535A Transaxle Cover Plate 72580A Wheel, 10” Diameter CFR CASCADE...
- Page 20 Tank Assembly CFR CASCADE...
- Page 21 1/8 Street Elbow, 90 Degree 72413A Valve, Check 72557A Header, Cascade 20 72437A Pad, Tool Head 72541A Tool Head Bracket Sides, P-20 X8218 Washer, 5/16 SAE, Flat Zinc 72486A Spacer, Toolhead Wheel 72485A Tape, Toolhead Pad 72533A Tool Head Bracket Left, P-20 CFR CASCADE...
-
Page 22: Preventative Maintenance
WARRANTY CFR, a Tacony company, warrants new products manufactured and sold under the name CFR to be free from defects in materials and workmanship under normal use and service. CFR’s obligation under this warranty is limited to repair- ing or replacing, at our option, such products or parts which are returned to our factory authorized service center, freight prepaid, within the warranty period and are found to be defective in materials or workmanship. For rotationally molded polyethylene housings and aluminum frames and chassis this warranty expires 60 months from the date of registration; if the warranty is not registered, it expires 60 months from the factory shipment date. For all other components, with the exception of wear items (i.e. filter, nozzles, etc.) this warranty expires 12 months from the date of registration on the warranty. If not registered, is expires 12 months from the factory shipment date. For hoses, tools, and other attachments manufactured and sold by CFR, this warranty expires 12 months from factory shipment date. Parts replaced or repaired under warranty are guaranteed for the remainder of the original warranty period. Replacement parts that have become defective through wear or abuse are not included in this warranty. CFR will pay service labor to the distributor or autho- rized service repair center per the warranty flat rate schedule. Service labor will be paid for two years on all warranted polyethylene housings, aluminum frames and chassis, and one year on all other warranted components. CFR systems are designed for use only with specially formulated CFR Recyclable Cleaning Chemicals. Use of any other chemical in CFR systems may cause damage to the pump, motor and other components and may void the warranty. This warranty shall cease to be in effect if repairs, replacements or alterations are made by the purchaser or any non- authorized service center. This warranty does not apply to damage caused by misuse, abuse, or negligence of the buyer or third party, or damage due to transportation of product. CFR makes no warranty, express or implied, including without limitations, any warranties of fitness or merchantability, except as expressly set forth above with respect to such products or parts therein. Nor shall cfr have incurred any other obligations or liabilities on its part or be liable for any anticipated or lost profits, incidental damages, consequential dam- ages, time charges or any other losses incurred in connection with the purchase, installation, replacement or repair of such products or any parts therein whether original equipment or installed as a replacement, covered by this warranty or otherwise; and cfr does not authorize any person to assume for cfr any other liability in connection with the products or parts therein. CFR CASCADE... - Page 23 CFR CASCADE...
- Page 24 Cascade SERIES P20 INSTRUCTION MANUAl Models: 10416A - P20 SP 10419A - P20 10425A - P20 OZ SP 10426A - P20 OZ 10427A - P20 OZ SP 230V 10428A - P20 OZ 230V 3101 Wichita Court n Fort Worth, TX 76140 n 800.533.2557 n www.cfrcorp.com 72596A 10/2006...
Need help?
Do you have a question about the CASCADE P20 Series and is the answer not in the manual?
Questions and answers