Table of Contents
Advertisement
Advertisement
Table of Contents

Related Manuals for microbeau Flux Mini


Summary of Contents for microbeau Flux Mini
- Page 1 Wireless Cartridge Machine USER MANUAL FK Irons, Flux Mini 5-10VDC 2022...
-
Page 2: Table Of Contents
INDEX Safety Notice Machine Overview The Grip The Body The PowerBolt Detaching PowerBolt USB-C Connection Connecting your Machine Adjusting Needle Depth Additional Information Troubleshooting... -
Page 3: Safety Notice
Although the grip is autoclavable, we strongly suggest the use of barrier products to protect your machine. For a visual demonstration of many barrier protection methods, please visit our YouTube channel Microbeau. “This machine is not to be used by persons (including children) with reduced physical, sensory or mental capabilities,... -
Page 4: Machine Overview
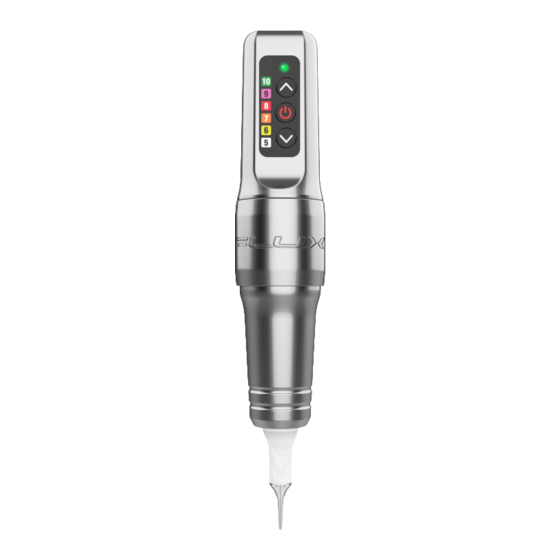
USER MANUAL MACHINE OVERVIEW USB-C connectivity Flux Mini manual. Powered by a USB-C Li-ion battery, with a charge and voltage LED indicator. Detachable battery: instantly switch to auxiliary battery (included) Proprietary motor design with a Direct Drive 2.5 mm stroke... -
Page 5: The Grip
Autoclavable Ergonomic Grip Design Compatible with most membrane needle cartridges on the market THE GRIP The Flux Mini grip allows artists options will be available soon. anodized grip is safe to be ratcheting control over needle The Grip is crafted from a solid sterilized under steam, in an depth. -
Page 6: The Body
USER MANUAL THE BODY Flux Mini Body Ratcheted Disk System Flux Mini Body Friction Stabilizing O-Rings THE BODY The Body is the core of the machine. Constructed from a solid rod of 6061 T6 aircraft- grade aluminum, this module should be sanitized by wiping it with cold sterilization solutions only. -
Page 7: The Powerbolt
USER MANUAL THE BATTERY Flux Mini Battery Housing BATTERY HOUSING LED indicator: LED Indicator Solid Color = Whole Value Blinking Color = Half Increment Voltage Up 100 - 98% Ex. Solid green indicates 10V Flashing green indicates 10.5V Power Button... -
Page 8: Detaching Powerbolt
USER MANUAL DETACHING THE BATTERY Twist the battery housing as shown and remove. Get a firm grip and turn the body as shown with the Grip. DETACHING THE BATTERY To detach your battery, ensure To attach the battery, push the power leads align. Avoid you have a firm grip on the in while twisting clockwise. -
Page 9: Usb-C Connection
USER MANUAL USB-C CONNECTION USB-C Connector Fast charging speed: Up to 1.0 A USB-C CONNECTION This connecting terminal is compatible with most USB-C cables on the market. We recommend you use the included cable for recharging the battery. USB-C Darklab supplied cord... -
Page 10: Connecting Your Machine
YOUR Hover or power socket. Make sure the cable is properly The battery can be recharged MACHINE whether or not it is connected seated and is fully inserted to the Flux Mini. into battery. The battery is... -
Page 11: Adjusting Needle Depth
USER MANUAL ADJUSTING NEEDLE DEPTH Increases needle depth Decreases needle depth ADJUSTING NEEDLE DEPTH To adjust needle depth, hold the machine body and battery while turning the Grip. A counter clockwise turn decreases depth, while a clockwise turn increases depth (also known as needle hang). -
Page 12: Additional Information
MAINTENANCE • Flux Mini is sold pre-lubricated from the factory and does not need internal lubrication. • Prevent any type of external elements from entering inside the machine as they will disrupt the motion of the component and contaminate lubrication. -
Page 13: Troubleshooting
USER MANUAL ADDITIONAL INFORMATION HANDY TIPS The following tips will help you get the most out of your Flux Mini and avoid potential issues: • Always secure your machine. Dropping the machine can cause damage to the magnets, bearings and brushes of the motor.
Need help?
Do you have a question about the Flux Mini and is the answer not in the manual?
Questions and answers