MHC Medical Products Easy Touch User Manual
Hide thumbs
Also See for Easy Touch:
- Quick reference manual (2 pages) ,
- User manual (49 pages) ,
- User manual (49 pages)
Table of Contents
Advertisement
Advertisement
Table of Contents

Subscribe to Our Youtube Channel
Related Manuals for MHC Medical Products Easy Touch


Summary of Contents for MHC Medical Products Easy Touch
- Page 1 Easy•Touch ® Glucose Monitoring System User Manual...
- Page 2 Easy•Touch ® Glucose Monitoring System See our other products at www.MHCmed.com...
-
Page 3: Table Of Contents
Table of Contents Introduction ....................3 About the Product ..................4 ® About the EasyTouch Meter ..............5 ® About the EasyTouch Meter Display ........... 7 ® About the EasyTouch Test Strip ............9 ® About the EasyTouch Test Strip Vial ..........10 Installing/Replacing the Battery ............ - Page 4 Testing Your Blood Glucose Level ............17 Preparing the Test Strip ..............18 Obtaining a Blood Sample..............19 Important Information ................ 20 ® Applying Blood Sample to the EasyTouch Test Strip ....... 24 The Control Solution Test ................. 27 How to Perform a Control Solution Test ..........28 Comparing Control Solution Results ..........
-
Page 5: Introduction
Introduction ® Thank you for choosing the EasyTouch Glucose Monitoring System, the latest advancement in biosensor technology. ® Recognized for its ease of use and quick response time, the EasyTouch Glucose Monitoring System is designed to process accurate results utilizing ®... -
Page 6: About The Product
About the Product ® The EasyTouch Glucose Meter & Monitoring System is available in two different package options with the following contents: ® A. Your EasyTouch Glucose Monitoring System contains: ® • EasyTouch Meter • One Lancing Device • Ten Lancets •... -
Page 7: Meter
About the EasyTouch Meter Easy•Touch ® Blood Glucose Meter For In Vitro Diagnostic Use Only Made in Taiwan. Distributed by: MHC Medical Products, LLC 8695 Seward Road Fair eld, OH 45011 Toll #: 877.358.4342 AD-041919.8 Rev. date: 04/2019 S/N:M14KG020001 Meter Label Icons... - Page 8 1. Display Your test results are displayed here. The large, easy to read screen guides you through the test by using numbers and symbols. 2. M Button (mode/power) button is used to set time, alarm, enters the memory mode to show the consecutive 7/14/30-day average results and turns the Meter on and off.
-
Page 9: Meter Display
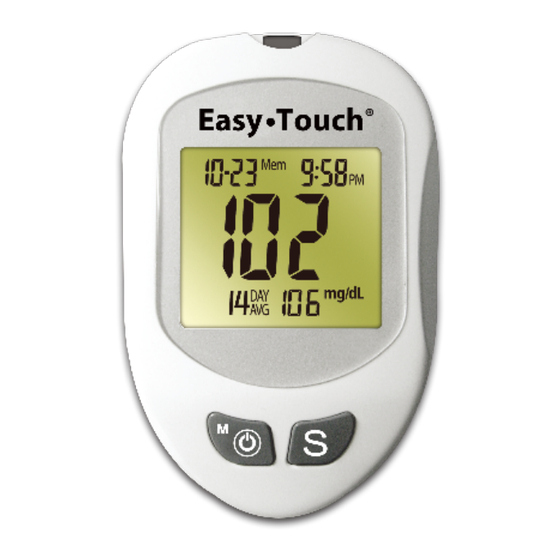
® About the EasyTouch Meter Display 1. Date 2. Time 3. Control Solution Test Appears when doing a control solution test and marking the result as a control solution test. 4. Memory Symbol Indicates in memory mode. 5. Units of Measurement Unit of mmol/L or mg/dL will appear with the test result. - Page 10 7. Blood Drop Symbol Flashes when it is ready to apply sample to Test Strip. 8. Warning Symbol Appears when result is out of the range of your setting reference value. 9. Alarm Function Symbol Appears when the clock alarm is set. 10.
-
Page 11: Test Strip
® About the EasyTouch Test Strip ® The EasyTouch Test Strip is used to perform the blood glucose test in conjunction with the ® EasyTouch Meter. Each strip can be used only once. The Test Strip consists of the following parts: 1. -
Page 12: About The Easytouch
Discard Date: ______________ Discard 3 months after opening. Discard 3 months after opening. Made in Taiwan. Distributed by Made in Taiwan. Distributed by MHC Medical Products, LLC AD-DH-042221.2 MHC Medical Products, LLC AD-DH-042221.2 8695 Seward Rd, Fair eld, OH 45011... -
Page 13: Installing/Replacing The Battery
Installing/Replacing the Battery When the battery is low, the Meter will show a warning signal. When the “ ” or “ ” display appears, it is time to replace a new battery. When the “ ” battery warning signal is shown, the Meter will provide accurate results for approximately 50 more measurements. -
Page 14: Setting Up The Meter
Setting Up the Meter To turn the Meter on, first insert a battery, then press the reset button located at the back of the Meter and proceed with the following instructions. Setting the Date, Time 1. Setting the Clock Mode: Press and hold down button for 6 seconds to enter the meter setup mode. -
Page 15: Setting Up Alarms
4. Setting the Time: Press and release the S button until the correct hour appears, please be sure the AM/PM is indicated to the right of the minutes if you have chosen standard time in Step 1. Once the correct hour is set, press and release the button once. - Page 16 7. If you would like to set a second alarm, press and release button to indicate YES. If you would not like to set any more alarms, press and release the S button to indicate NO. Press and release the button one time then press and release the S button to change the minutes.
- Page 17 release the S button to change the minutes. (Fig. 11) After setting the fourth alarm, press and release the button to move on to the Health Management settings. 10. Health Management Settings: The HI alarm setting alerts you with “ ” next to the glucose reading when you test above the glucose level you have determined is too high for yourself.
-
Page 18: Unit Selection
Meters used in the United States must be set to read in mg/dL. Easy•Touch ® Blood Glucose Meter For In Vitro Diagnostic Use Only Made in Taiwan. Distributed by: MHC Medical Products, LLC 8695 Seward Road Fair eld, OH 45011 Toll #: 877.358.4342 AD-041919.8 Rev. date: 04/2019... -
Page 19: Testing Your Blood Glucose Level
Testing Your Blood Glucose Level Before testing blood glucose, you need the following items: ® 1. EasyTouch Meter ® 2. EasyTouch Test Strip 3. Adjustable Lancing Device 4. Sterile Lancet Caution: To reduce the chances of infection: • Never share a lancing device and lancet with another person. •... -
Page 20: Preparing The Test Strip
Preparing the Test Strip 1. Wash hands using soap and warm water. Rinse and dry thoroughly. 2. Pull out a Test Strip from the vial and re-cap the vial immediately. 3. Insert a Test Strip, white side face up with the Contact Bar end first. Push all the way into test port until meter automatically turns on. -
Page 21: Obtaining A Blood Sample
Obtaining a Blood Sample SAMPLE MAY BE OBTAINED FROM FINGER, PALM or FOREARM For further instructions please see the insert provided with lancing device. 1. Unscrew and remove the endcap of the lancing device. 2. Insert the lancet into the lancet holder. 3. -
Page 22: Important Information
Important Information Available Alternate Sites Testing : Palm and Forearm. Alternate Site Testing (AST) means you can use other parts of the body other than your more sensitive fingertips to check your blood glucose levels. ® The EasyTouch Glucose Monitoring System allows you to test on the palm and the forearm with the equivalent results to fingertip testing. - Page 23 Alternative site results differ from fingertip results when glucose levels are changing rapidly such as after a meal, after taking insulin, during exercise, or when you are ill or under stress. Use blood from a fingertip rather than an alternative site if: •...
- Page 24 2. Talk to your doctor to see if alternate site testing is right for you. With a little bit of education, you can give your fingertips a rest and maybe test more often than you do now. For people with diabetes, more frequent testing is a good thing.
- Page 25 • Low or high blood glucose readings can indicate a potentially serious medical condition. If your blood glucose reading is unusually low or high, or if you do not feel the way your reading indicates, repeat the test with a new test strip. If your reading is not consistent with your symptoms or if your blood glucose result is less than 60 mg/dL (3.3 mmol/L) or higher than 240 mg/dL (13.3 mmol/L) you should contact your healthcare professional and follow his or her treatment advice.
-
Page 26: Applying Blood Sample To The Easytouch ® Test Strip
® Applying Blood Sample to the EasyTouch Test Strip 1. After obtaining a blood sample, place the drop onto the test well of the Test Strip. Blood is automatically drawn into the Test Strip. 2. As soon as enough blood has filled the Confirmation Window (see picture) of the Test Strip, the Meter will beep and begin counting down from 5 to 1. - Page 27 3. After the test result appears, if no further tests are performed, the Meter will automatically shut off after 3 minutes. After finishing the test, we recommend using a tissue to remove the used strip from the Meter for proper disposal.
- Page 28 HI and LO Readings 1. The test results range between 20 to 600 mg/dL (1.1 to 33.3 mmol/L). If a “HI” message appears on the display, your Meter has detected that your blood glucose level is higher than 600 mg/dL(33.3 mmol/L). It is suggested that you review your testing procedure and test again with a new Test Strip to confirm the result.
-
Page 29: The Control Solution Test
The Control Solution Test ® The Control Solution can be used to check and ensure that the EasyTouch ® Glucose Monitoring System and EasyTouch Test Strip are working together properly and that you are performing the test correctly. When to Perform a Control Solution Test 1. -
Page 30: How To Perform A Control Solution Test
How to Perform a Control Solution Test 1. Make sure the Control Solution is at room temperature (15˚C to 35˚C or 59˚F to 95˚F) prior to testing. 2. Insert a Test Strip, white side face up, Contact Bar’s end first, into the test port. - Page 31 5. Discard the first drop of Control Solution and squeeze a small drop of Control Solution on a clean nonabsorbent surface (such as a clean piece of wax paper). Do not apply Control Solution to the Test Strip directly from the bottle. 6.
-
Page 32: Comparing Control Solution Results
Comparing Control Solution Results ® The EasyTouch Glucose Monitoring System is functioning properly if the results fall inside the specified ranges printed on the Test Strip vial. If the test results fall outside the specified ranges, repeat the test. Results falling outside the specified range may be caused by •... -
Page 33: Memory Features
Memory Features ® The EasyTouch Meter automatically stores the 300 most recent blood glucose results with date and time in its memory. It also provides you with a consecutive 7/14/30-day average of your blood glucose test results. 1. Press button to turn on the meter. All segments of the LCD display will appear. - Page 34 6. Press S button, the most recent test result will appear. If it has 14-day average result, it will show under the screen at the same time. Each time you press the S button, the meter will recall the last 300 test results accordingly. When the memory is full, the oldest result is removed and Example reading replaced with the newest result.
-
Page 35: Transfer Test Results To A Computer
Transfer Test Results to a Computer ® You can use your meter with EasyTouch Link Health Management Software to transfer test results to your personal computer: 1. Obtain the required software and cable Download software at MHCmed.com. To order a cable, call Customer Service at 1.877.358.4342 (Mon-Fri, 9am–5pm, EST) 2. -
Page 36: Care And Storage
Care and Storage 1. Handle the Meter with care. Dropping or throwing the meter may cause damage to the device. 2. Do not expose the Meter, Test Strips, and Control Solution to extreme conditions, such as high humidity, heat, freezing cold or dust. 3. -
Page 37: Display Messages
Display Messages DISPLAY WHAT IT MEANS ACTION System check for verifying No action necessary that all segments of the meter are functioning. The system is ready to You may now apply a accept a blood sample. blood sample. The system is ready to You may now apply a accept a Control Solution drop of Control Solution... - Page 38 DISPLAY WHAT IT MEANS ACTION Indicate the result is For your reference or you can change the default HIGHER than the “HI setting value 100 mg/dL alarm setting” of the health according to page 19. management. Example Reading Indicate the result is For your reference or you LOWER than the “LO can change the default...
- Page 39 DISPLAY WHAT IT MEANS ACTION Meter detects blood Indicates low blood glucose glucose level is lower than level. Repeat test. If result 20 mg/dL (1.1 mmol/L). still occurs, consult your physician immediately. Result may be larger Temperature is high during variation.
- Page 40 DISPLAY WHAT IT MEANS ACTION Temperature is too high to Repeat the test in a cooler perform the test. setting (10 - 40°C or 50 - 104°F). Wait 15 minutes before re-testing. Temperature is too low to Repeat the test in a warmer perform the test.
- Page 41 DISPLAY WHAT IT MEANS ACTION Press “reset” button and An error message check the meter again with indicating a problem with the test strip. If the problem the meter. persists, contact Customer Service for help. Battery power is low. Meter Replace with a new 3-Volt will provide approximately lithium battery (CR-2032).
- Page 42 DISPLAY WHAT IT MEANS ACTION All testing values recorded Press or S button or in the memory have been wait for 3 minutes to turn off shown. the meter. An alarm set by the user Press or S button to is ringing as a reminder shut off or the alarm will to perform a blood...
- Page 43 Other problems that may occur Action Review the instructions and re-insert The Test Strip has not been inserted the Test Strip correctly (white side into the Meter properly. face up, red arrow pointing down into meter port). Replace with a new Test Strip. Defective Test Strip.
-
Page 44: Specifications
Specifications Meter Operating Conditions Temperature 10°C ~ 40°C(50°F ~ 104°F) Humidity 10 ~ 90% RH Hematocrit 35 ~ 55% Test Sample Capillary whole blood from fingertip, palm and forearm Sample Volume >0.5 µl Measuring Unit mg/dL or mmol/L Measuring Range 20-600 mg/dL (1.1-33.3 mmol/L) Test Time 5 sec... -
Page 45: Limitations Of The Procedure
Limitations of the Procedure ® Caution: The EasyTouch Glucose Monitoring System is designed for in vitro diagnostic use only and is not intended to test on newborns or animals. Any change or administer of medication based on the ® EasyTouch blood glucose test results without the consent advice of a physician or healthcare professional is not recommended. -
Page 46: Service And Warranty
Service and Warranty MHC Medical Products, LLC cannot endorse the performance of the ® EasyTouch Meter when used with Test Strips other than those designed ® ® for the EasyTouch Glucose Monitoring System. The EasyTouch Glucose Monitoring System manufacturer warranty is valid only when used properly within the guidelines of the provided User’s Manual and is invalid when the... - Page 47 TRUE Lifetime Warranty MHC Medical Products, LLC guarantees that this device will be free of defects in materials and workmanship for lifetime duration from the date ® of original purchase. Our company will repair or replace any EasyTouch Glucose Monitoring System found defective with a new unit at our discretion.
-
Page 48: Customer Service
Test Strip and all other supplies available. This will allow us to answer any of your questions with speed and efficiency. Made in Taiwan. Distributed by: MHC Medical Products, LLC AF004-0011000N (05) 8695 Seward Road, Fairfield, OH 45011 Rev. date: 4/2021... - Page 52 Toll: 1.877.358.4342 Web: www.MHCmed.com Email: info@MHCmed.com 8695 Seward Road Fairfield, OH 45011...
Need help?
Do you have a question about the Easy Touch and is the answer not in the manual?
Questions and answers
What does LEI message mean
Monitor not reading test slip says Err 2 Blinking apple looking imagine in lower bottom