Samsung PL20 User Manual
Samsung digital camera user manual
Hide thumbs
Also See for PL20:
- User manual (127 pages) ,
- Manual del usuario (105 pages) ,
- User manual (103 pages)
Table of Contents
Advertisement
User Manual
PL20/PL21
Thank you for buying a Samsung Camera.
This user manual includes detailed usage
instructions for your camera. Please read
this manual thoroughly.
Click a topic
Basic troubleshooting
Quick reference
Contents
Basic functions
Extended functions
Shooting options
Playback/Editing
Settings
Appendixes
Index
Advertisement
Table of Contents
Troubleshooting

Related Manuals for Samsung PL20


Summary of Contents for Samsung PL20
- Page 1 User Manual PL20/PL21 Thank you for buying a Samsung Camera. This user manual includes detailed usage instructions for your camera. Please read this manual thoroughly. Click a topic Basic troubleshooting Quick reference Contents Basic functions Extended functions Shooting options...
-
Page 2: Health And Safety Information
The camera may over-heat, which may distort the camera or cause a fire. If liquid or foreign objects enter your camera, immediately disconnect all power sources, such as the battery or charger, and then contact a Samsung service center. - Page 3 • Unauthorized batteries, chargers, cables or accessories can cause batteries to explode, damage your camera, or cause injury. • Samsung is not responsible for damages or injuries caused by unapproved batteries, chargers, cables or accessories. Do not use batteries for unintended purposes.
- Page 4 Health and safety information Do not force the camera’s parts or apply pressure to the camera. This may cause your camera to malfunction. Exercise caution when you connect cables or adapters and install batteries and memory cards. If you force the connectors, improperly connect cables, or improperly install batteries and memory cards, you can damage ports, connectors, and accessories.
- Page 5 Copyright information • Microsoft Windows and the Windows logo are registered trademarks of the Microsoft Corporation. • Mac is a registered trademark of the Apple Corporation. • Trademarks and trade names used in this manual are the property of their respective owners. • Camera specifications or contents of this manual may be changed without prior notice due to upgrade of camera functions.
- Page 6 Indications used in this manual Shooting mode Indication Smart Auto Program Photo Help Guide Scene Movie Shooting mode icons These icons indicate that a function is available in the corresponding modes. The mode may not support functions for all scenes. e.g.) Icons used in this manual Icon...
- Page 7 Expressions used in this manual Pressing the shutter • Half-press [Shutter]: Press the shutter halfway down • Press [Shutter]: Press the shutter all the way down Half-press [Shutter] Subject, background, and composition • Subject: The main object of a scene, such as a person, animal, or still life.
-
Page 8: Basic Troubleshooting
Basic troubleshooting You can get answers to common questions. Solve problems easily by setting shooting options. The subject's eyes appear red. Photos have dust spots. Photos are blurred. Photos are blurred when shooting at night. Subjects come out too dark because of backlighting. -
Page 9: Table Of Contents
Quick reference Taking photos of people • mode > Beauty Shot • mode > Portrait • Red-eye, Red-eye Fix (to prevent or correct red-eye) • Face Detection Taking photos at night or in the dark • mode >... - Page 10 Contents Basic functions ... 11 Unpacking ... 12 Camera layout ... 13 Inserting the battery and memory card ... 15 Charging the battery and turning your camera on ... 16 Charging the battery ... 16 Turning on your camera ... 16 Performing the initial setup ...
- Page 11 Contents Playback/Editing ... 52 Playing back ... 53 Starting Playback mode ... 53 Viewing photos ... 57 Playing a video ... 58 Playing voice memos ... 59 Editing a photo ... 60 Resizing photos ... 60 Rotating a photo ... 60 Applying smart effects ...
-
Page 12: Basic Functions
Basic functions Learn about your camera’s layout, icons, and basic functions for shooting. Unpacking ………………………………… 12 Camera layout ……………………………… 13 Inserting the battery and memory card Charging the battery and turning your camera on …………………………………… 16 Charging the battery ………………………… 16 Turning on your camera ………………………... -
Page 13: Unpacking
Unpacking Check your product box for the following items. Optional accessories Camera Rechargeable battery Camera case Memory cards AC adapter / USB cable Strap Battery charger A/V cable Quick Start Manual Software CD-ROM (User manual included) The illustrations may differ from your actual items. Basic functions... -
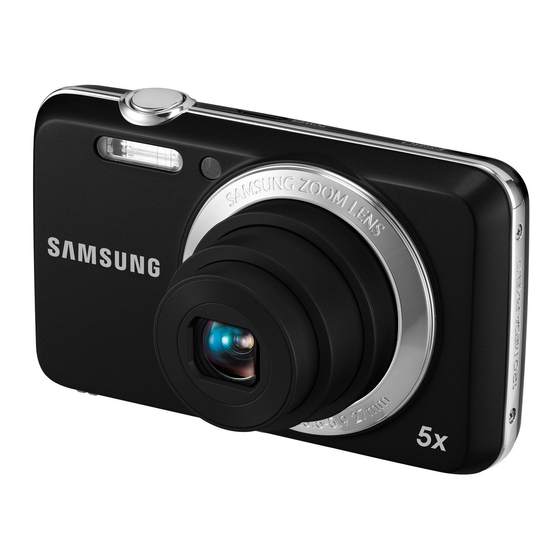
Page 14: Camera Layout
Camera layout Before you start, familiarize yourself with your camera's parts and their functions. POWER button Shutter button Flash AF-assist light/timer lamp Microphone Battery chamber cover Insert a memory card and battery Basic functions Speaker Lens Tripod mount... - Page 15 Camera layout Status lamp • Blinking: When the camera is saving a photo or video, being read by a computer or printer, or out of focus • Steady: When the camera is connecting to a computer or in focus Display Button Description In Shooting mode...
-
Page 16: Inserting The Battery And Memory Card
Learn to insert the battery and an optional memory card into the camera. Insert a memory card with the gold-colored contacts facing down. Memory card Insert the battery with the Samsung logo facing down. Battery Removing the battery and memory card Memory card Battery lock Battery • You can use the internal memory as a temporary storage device... -
Page 17: Charging The Battery And Turning Your Camera On
Charging the battery and turning your camera on Charging the battery Before using the camera for the first time, you must charge the battery. Attach the USB cable to the AC adapter, and then plug the end of cable with the indicator light into your camera. Indicator light • Red: Charging • Green: Fully charged... -
Page 18: Performing The Initial Setup
Performing the initial setup When the initial setup screen appears, follow the steps below to configure the camera’s basic settings. Press [ POWER • The initial setup screen appears when you turn on the camera for the first time. Press [ ] or [ ] to select Language and press [ ] or [ Language... -
Page 19: Learning Icons
Learning icons The icons displayed will change according to the mode you select or the options you set. A. Information Icon Description Selected shooting mode Available number of photos Available recording time Memory card is not inserted Memory card inserted •... -
Page 20: Selecting Options
Selecting options You can select options by pressing [ You can also access shooting options by pressing [ In Shooting mode, press [ Use the navigation buttons to scroll to an option or menu. • To move left or right, press [ ] or [ • To move up or down, press [ ] or [ ]. - Page 21 Selecting options Example: Selecting a White Balance option in the P mode In Shooting mode, press [ Press [ ] or [ ] to scroll to Mode, and then press [ ] or [ Press [ ] or [ ] to scroll to Program, and then press [ ] or [ Smart Auto Program...
-
Page 22: Setting The Display And Sound
Setting the display and sound Learn how to change the basic display and sound settings. Changing the display type Select a display type for Shooting or Playback mode. Each type displays different shooting or playback information. Press [ ] repeatedly to change a display type. Show all photographic information. -
Page 23: Taking Photos
Taking photos Learn how to take photos easily and quickly in the In Shooting mode, press [ Press [ ] or [ ] to scroll to Mode, and then press [ ] or [ Press [ ] or [ ] to scroll to Smart Auto, and then press [ Smart Auto Program... -
Page 24: Zooming
Taking photos Zooming You can shoot close-up photos by adjusting the zoom. Your camera has a 5X optical zoom, 2X Intelli zoom, and 3X digital zoom. Intelli zoom and digital zoom cannot be used at the same time. Push [Zoom] up to zoom in on your subject. Push [Zoom] down to zoom out. - Page 25 Taking photos Intelli zoom If the zoom indicator is in the Intelli range, your camera is using the Intelli zoom. Photo resolution varies according to the zoom rate if you use the Intelli zoom. By using both the optical zoom and Intelli zoom, you can zoom in up to 10 times.
-
Page 26: Set Iso Speed Options. (P
Tips for getting a clearer photo Holding your camera correctly Half-pressing the shutter button Half-press [Shutter] and adjust the focus. The camera adjusts the focus and exposure automatically. The camera sets the aperture value and shutter speed automatically. Focus frame • Press [Shutter] to take the photo if the focus frame appears in green. -
Page 27: Turn On The Flash. (P
Preventing your subject from being out of focus It may be difficult to get your subject in focus when: there is little contrast between the subject and background (When your subject is wearing clothing that is similar in color to the background) the light source behind the subject is too bright the subject is shiny... -
Page 28: Extended Functions
Extended functions Learn how to take a photo by selecting a mode and how to record a video or voice memo. Shooting modes …………………………… 28 Using the Smart Auto mode ………………… 28 Using the Photo Help Guide mode ………… 29 Using the Scene mode ………………………... -
Page 29: Shooting Modes
Shooting modes Take photos or record videos by selecting the best shooting mode for the conditions. Using the Smart Auto mode In this mode, your camera automatically chooses the appropriate camera settings based on the type of scene it defects. Smart Auto Mode is helpful if you are not familiar with the camera settings for various scenes. -
Page 30: Using The Photo Help Guide Mode
Shooting modes Half-press [Shutter] to focus. Press [Shutter] to take the photo. • If the camera does not recognize a proper scene mode, appears and the camera uses default settings. • Even if it detects a face, the camera may not select a portrait mode depending on the subject's position or lighting. -
Page 31: Using The Scene Mode
Shooting modes Using the Scene mode Take a photo with options preset for a specific scene. In Shooting mode, press [ Select Mode → Scene → a scene. Smart Auto Beauty Shot Program Night Portrait Photo Help Guide Landscape Scene Close Up Movie Sunset... -
Page 32: Using The Dis Mode
Shooting modes Select Shooting → Face Retouch → an option. • Select a higher setting to hide a greater number of imperfections. Face Retouch Back Move Align your subject in the frame, and then half-press [Shutter] to focus. Press [Shutter] to take the photo. The focus distance will be set to Auto Macro. -
Page 33: Using The Program Mode
Shooting modes Using the Program mode In the Program mode, you can set various options except the shutter speed and aperture value, which the camera sets automatically. In Shooting mode, press [ Select Mode → Program. Smart Auto Program Photo Help Guide Scene Movie Exit... - Page 34 Shooting modes Press [ Select Movie → Voice → a sound option. Option Description On: Record a video with sound. Off: Record a video without sound. Zoom Mute: The camera stops recording sound temporarily when you use the zoom. Set other options as desired. (For options, refer to “Shooting options.”) Press [Shutter] to start recording.
-
Page 35: Recording Voice Memos
Recording voice memos Learn how to record a voice memo that you can play back at any time. You can add a voice memo to a photo as a short reminder of shooting conditions. You will get the best sound quality when recording 16 inches (40 cm.) away from the camera. -
Page 36: Shooting Options
Shooting options Learn about the options you can set in shooting mode. Selecting a resolution and quality ………… 36 Selecting a resolution ………………………… 36 Selecting image quality ……………………… 36 Using the timer ……………………………… 37 Shooting in the dark ……………………… 39 Preventing red-eye ……………………………... -
Page 37: Selecting A Resolution And Quality
Selecting a resolution and quality Learn how to change the image resolution and quality settings. Selecting a resolution As you increase the resolution, your photo or video will include more pixels, so it can be printed on larger paper or displayed on a larger screen. -
Page 38: Using The Timer
Using the timer Learn how to set the timer to delay shooting. In Shooting mode, press [ ]. Select an option. Option Description Off: The timer is not active. 10 Sec: Takes a photo in 10 seconds. 2 Sec: Takes a photo in 2 seconds. Double: Takes a photo in 10 seconds, and then takes another 2 seconds later. - Page 39 Using the timer Using the motion timer In Shooting mode, press [ ]. Select Press [Shutter]. Stand within 10 ft. (3 m) of the camera within 6 seconds after pressing [Shutter]. Make a motion, such as waving your arms, to activate the timer.
-
Page 40: Flash Options
Shooting in the dark Learn how to take photos at night or in low light conditions. Preventing red-eye If the flash fires when you take a photo of a person in the dark, a red glow may appear in the person's eyes. To prevent this, select Red-eye or Red-eye Fix. -
Page 41: Adjusting The Iso Speed
Shooting in the dark Option Description Red-eye Fix*: • The flash fires twice when the subject or background is dark. The subject should not move until the flash fires a second time. • The camera corrects red-eyes through its advanced software analysis. -
Page 42: Changing The Camera's Focus
Changing the camera’s focus Learn how to adjust the camera's focus. Using macro Use macro to take close-up photos of subjects, such as flowers or insects. Refer to macro options in “Using auto focus.” • Try to hold the camera very still to prevent blurry photos. • Turn off the flash if the distance to the subject is less than 15.7 in. -
Page 43: Adjusting The Focus Area
Changing the camera’s focus Adjusting the focus area You can get clearer photos by selecting an appropriate focus area according to your subject’s location in the scene. In Shooting mode, press [ Select Shooting → Focus Area → an option. Option Description Center AF: Focus on the center. -
Page 44: Using Face Detection
Using face detection If you use face detection options, your camera can automatically detect a human face. When you focus on a human face, the camera adjusts the exposure automatically. Take photos quickly and easily by using Blink Detection to detect closed eyes or Smile Shot to capture a smiling face. -
Page 45: Taking A Self-Portrait Shot
Using face detection Taking a self-portrait shot Take photos of yourself. The camera automatically sets the photo distance to close-up and emits a beep when ready. A beeping sound will start and increase in frequency as the face comes into focus. In Shooting mode, press [ Select Shooting →... -
Page 46: Detecting Eye Blinking
Using face detection Detecting eye blinking If your camera detects closed eyes, it automatically takes two photos in succession. In Shooting mode, press [ Select Shooting → Face Detection → Blink Detection. • Hold your camera still while “Capturing” is displayed on the screen. • When blink detection fails, the “Picture taken with eyes closed.”... -
Page 47: Continuous, Motion Capture
Adjusting brightness and color Learn how to adjust the brightness and color for better image quality. Adjusting the exposure manually (EV) Depending on the intensity of the ambient light, your photos may be too bright or dark. In these cases, you can adjust the exposure to get a better photo. -
Page 48: Metering
Adjusting brightness and color Changing the metering option The metering mode refers to the way in which a camera measures the quantity of light. The brightness and lighting of your photos will vary depending on the metering mode you select. In Shooting mode, press [ Select Shooting →... - Page 49 Adjusting brightness and color In Shooting mode, press [ Select Shooting → White Balance → an option. Icon Description Auto WB: Automatically sets the white balance based on the lighting conditions. Daylight: Select when taking outdoor photos on a sunny day. Cloudy: Select when taking outdoor photos on a cloudy day or in shadows.
-
Page 50: Using Burst Modes
Using burst modes It can be difficult to take photos of fast-moving subjects or capture natural facial expressions and gestures of your subjects in photos. In these cases, select one of the burst modes to take multiple pictures rapidly. In Shooting mode, press [ Select Shooting →... -
Page 51: Improving Your Photos
Improving your photos Learn how to improve your photos by applying smart filter effects, or by making some adjustments. Applying filter effects Apply various filter effects to your photos to create unique images. Vivid Retro In Shooting mode, press [ Select Shooting →... -
Page 52: Adjusting Your Photos
Improving your photos Adjusting your photos Adjust the contrast, sharpness, and saturation of your photos. In Shooting mode, press [ Select Shooting → Image Adjust. Select an adjustment option. • Contrast • Sharpness • Saturation Select a value to adjust the selected item. Contrast option Description Decrease the color and brightness. -
Page 53: Playback/Editing
Playback/Editing Learn how to play back photos, videos, or voice memos and edit photos or videos. You will also learn how to connect your camera to your photo printer or TV. Playing back ………………………………… 53 Starting Playback mode ……………………… 53 Viewing photos ………………………………... -
Page 54: Playing Back
Playing back Learn to play back photos, videos, or voice memos, and manage files. Starting Playback mode View photos or play videos and voice memos stored in your camera. Press [ • The most recent file you have taken or recorded is displayed. • If the camera is off, it will turn on. -
Page 55: Smart Album
Playing back Viewing files by category in Smart Album View and manage files by categories, such as date, file type, or week. In Playback mode, push [Zoom] down. Press [ Select a category. Type Date Color Week Back Option Description Type View files by file type. - Page 56 Playing back Viewing files as thumbnails Scan thumbnails of files. In Playback mode, push [Zoom] down to display 9 or 20 thumbnails (push [Zoom] up to return to the previous mode). Filter Do this Scroll through files Press [ ], [ Delete files Press [ ], and then select Yes.
- Page 57 Playing back Deleting files Delete single files or all files at once. You cannot delete protected files. To delete a single file, In Playback mode, select a file, and then press [ Select Yes to delete the file. To delete multiple files, In Playback mode, press [ Select Multiple Delete.
-
Page 58: Viewing Photos
Playing back Viewing photos Zoom in on part of a photo or view photos in a slide show. Enlarging a photo In Playback mode, push [Zoom] up to enlarge a photo (push [Zoom] down to reduce a photo). The enlarged area and zoom ratio are indicated on the top of the screen. -
Page 59: Playing A Video
Playing back Set the slide show effect. Select Start → Play. • To loop the slide show, select Repeat. • Press [ ] to pause or resume the slide show. To stop the slide show and switch to Playback mode, press [ [ ] or [ ]. -
Page 60: Playing Voice Memos
Playing back Capturing an image during playback Press [ ] at the point where you want to save a still image. Press [ ]. A captured image has the same resolution as the original video file and is saved as a new file. Playing voice memos Playing a voice memo In Playback mode, select a voice memo, and then press... -
Page 61: Editing A Photo
Editing a photo Perform photo editing tasks, such as resizing, rotating, eliminating red-eyes, and adjusting brightness, contrast, or saturation. The camera saves edited photos as new files. Resizing photos In Playback mode, select a photo, and then press Select Edit → Resize → an option. •... -
Page 62: Applying Smart Effects
Editing a photo Applying smart effects Apply various filter effects to your photos to create unique images. The edited photo will be saved as a new file but it could be resized to a lower resolution. Miniature Vignetting Fish-eye In Playback mode, select a photo, and then press Select Edit →... -
Page 63: Correcting Exposure Problems
Editing a photo Correcting exposure problems Adjust ACB (Auto Contrast Balance), brightness, contrast, or saturation; remove red-eye; hide facial imperfections; or add noise to the photo. Adjusting ACB (Auto Contrast Balance) In Playback mode, select a photo, and then press Select Edit →... -
Page 64: Creating A Print Order (Dpof)
Editing a photo Creating a print order (DPOF) Select photos to be printed and set options, such as the number of copies or paper size. • You can take the memory card to a print shop that supports DPOF (Digital Print Order Format) or you can print photos directly through a DPOF-compatible printer at home. -
Page 65: Viewing Files On A Tv
Viewing files on a TV Play back photos or videos by connecting your camera to a TV using the A/V cable. In Shooting or Playback mode, press [ Select Settings → Video Out. Select a video signal output according to your country or region. -
Page 66: Transferring Files To Your Windows Computer
Transferring files to your Windows computer Transfer files by connecting your camera to your Windows PC. Requirements for Intelli-studio Item Requirements Intel Pentium 4, 3.2 GHz or higher/ AMD Athlon™ FX 2.6 GHz or higher Minimum 512 MB RAM (1 GB and above recommended) Windows XP SP2/Vista/7 Hard disk 250 MB or more (1 GB or more recommended) - Page 67 Transferring files to your Windows computer Installing Intelli-studio Insert the installation CD in a compatible CD-ROM drive. When the setup screen appears, click Samsung Digital Camera Installer to start installation. Select the programs to install, and then follow the onscreen instructions.
-
Page 68: Transferring Files Using Intelli-Studio
Transferring files to your Windows computer Transferring files using Intelli-studio You can easily transfer files on your camera to your computer by using Intelli-studio. The battery will be charged while the camera is connected to a computer with the USB cable. Connect the camera to your computer with the USB cable. - Page 69 Transferring files to your Windows computer Using Intelli-studio The Intelli-studio allows you to play back and edit files. You can also upload files to websites, such as Flickr or YouTube. For details, select Help → Help in the program. • You cannot edit files directly on the camera. Transfer files to a folder on your computer before editing. • You cannot copy files in your computer to the camera.
-
Page 70: Transferring Files By Connecting The Camera As A Removable Disk
Transferring files to your Windows computer Icon Description Open menus Display files in the selected folder Change to the Photo edit mode Change to the Video edit mode Change to the Sharing mode (You can send files by email or upload files to websites, such as Flickr or YouTube.) Enlarge or reduce the thumbnails in the list Select a file type View files of the selected folder on your computer... -
Page 71: Disconnecting The Camera (For Windows Xp)
Transferring files to your Windows computer Turn on the camera. • The computer recognizes the camera automatically. If the camera fails to connect, a pop-up window will appear. Select Computer. On your computer, select My Computer → Removable Disk → DCIM → 100PHOTO. Select the files you want and drag or save them to your computer. -
Page 72: Transferring Files To Your Mac Computer
Transferring files to your Mac computer When you connect the camera to a Macintosh computer, the computer recognizes the camera automatically. You can transfer files directly from the camera to the computer without installing any programs. Mac OS 10.4 or later is supported. Connect your camera to a Macintosh computer with the USB cable. -
Page 73: Printing Photos With A Pictbridge Photo Printer
Printing photos with a PictBridge photo printer Print photos with a PictBridge-compatible printer by connecting your camera directly to the printer. In Shooting mode, press [ Select Settings → USB. Select Printer. With the printer on, connect your camera to the printer with the USB cable. -
Page 74: Settings
Settings Refer to options to configure your camera’s settings. Camera settings menu …………………… 74 Accessing the settings menu ………………… 74 Sound ………………………………………… 75 Display ……………………………………… 75 Settings ……………………………………… 76... -
Page 75: Camera Settings Menu
Camera settings menu Learn about various options to configure your camera's settings. Accessing the settings menu In Shooting or Playback mode, press [ Select a menu. Volume Mode Start Sound Shooting Shutter Sound Sound Beep Sound AF Sound Display Settings Exit Change Menu... -
Page 76: Sound
Camera settings menu Sound Item Description Adjust the volume of any sound. Volume (Off, Low, Medium*, High) Select the sound the camera emits when you turn Start Sound it on. (Off*, 1, 2, 3) Select the sound the camera emits when you Shutter Sound press the shutter button. -
Page 77: Settings
Camera settings menu Item Description If you perform no operations for 30 seconds, the camera automatically switches to Power save mode (press any button to deactivate the Power save mode). (Off*, On) Power Save If the Power save mode is deactivated, the display will dim to save battery life when you perform no operations for about 30 seconds. - Page 78 Camera settings menu Item Description Specify how to name files. • Reset: Set the file number to start from 0001 when inserting a new memory card, formatting a memory card, or deleting all files. • Series*: Set the file number to follow the previous file number when inserting a new memory card, formatting a memory card, or deleting all files.
- Page 79 Camera settings menu Item Description Select the function to use when you connect the camera to a computer or printer using a USB cable. • Auto*: Set your camera to select a USB mode automatically. • Computer: Connect your camera to a computer for transferring files.
-
Page 80: Appendixes
Appendixes Refer to error messages, specifications, and maintenance tips. Error messages …………………………… 80 Camera maintenance ……………………… 81 Cleaning your camera ……………………… 81 Using or storing the camera ………………… 82 About memory cards ………………………… 84 About the battery …………………………… 86 Before contacting a service center ………... -
Page 81: Error Messages
File names do not match the DCF standard. DCF Full Error Transfer the files on the memory card to your computer, and then format the card. (p. 76) Delete the damaged file or contact a Samsung File Error service center. Low Battery Insert a charged battery or recharge the battery. -
Page 82: Camera Maintenance
Camera maintenance Cleaning your camera Camera lens and display Use a blower brush to remove dust, and then wipe the lens gently with a soft cloth. If any dust remains, apply lens cleaning liquid to a piece of lens cleaning paper, and then wipe gently. Camera body Wipe gently with a soft, dry cloth. -
Page 83: Using Or Storing The Camera
Camera maintenance Using or storing the camera Inappropriate places to use or store the camera • Avoid exposing the camera to very cold or very hot temperatures. • Avoid using your camera in areas with extremly high humidity, or where the humidity changes drastically. • Avoid exposing the camera to direct sunlight and storing it in hot, poorly-ventilated areas, such as in a car during summer time. - Page 84 Camera maintenance Other cautions • Do not swing your camera by the strap. This may cause injury to yourself or others or damage to your camera. • Do not paint your camera, as paint can clog moving parts and prevent proper operation. • Turn off the camera while not in use.
-
Page 85: About Memory Cards
Camera maintenance About memory cards Supported memory cards Your camera supports SD (Secure Digital), or SDHC (Secure Digital High Capacity) memory cards. Terminal Write-protect switch Label (front) You can prevent files from being deleted by using the write- protect switch on the SD or SDHC card. Slide the switch down to lock or slide it up to unlock. - Page 86 Camera maintenance Cautions when using memory cards • Insert a memory card in the correct direction. Inserting a memory card in the wrong direction may damage your camera and memory card. • Do not use memory cards that have been formatted by other cameras or by a computer.
-
Page 87: About The Battery
Approximately Videos resolution and 24 FPS. 90 min • The figures above are based on Samsung’s standards. Your results may differ depending on your actual usage. • Several videos were recorded in succession to determine the total recording time. Appendixes mode, single shot, and zoom in or out. - Page 88 Camera maintenance Low battery message When the battery charge has fully discharged, the battery icon will turn red and the ‘Low Battery’ message will appear. Notes about using the battery • Avoid exposing batteries or memory cards to very cold or very hot temperatures (below 0º...
- Page 89 Camera maintenance • Using the flash or recording videos depletes the battery quickly. Charge the battery until the indicator light turns green. • If the indicator light blinks in orange or does not illuminate, reconnect the cable, or remove the battery and insert it again. • If you charge the battery when the cable is overheated or the temperature is too high, the indicator light may turn orange.
- Page 90 Camera maintenance Personal injury or death can occur if the battery is handled carelessly or improperly. For your safety, follow these instructions for proper battery handling: • The battery can ignite or explode if not handled properly. If you notice any deformities, cracks, or other abnormalities in the battery, immediately discontinue use of the battery and contact a service center.
-
Page 91: Troubleshooting
Before contacting a service center If you are having trouble with your camera, try these troubleshooting procedures before contacting a service center. If you have attempted the troubleshooting solution and are still having problems with your device, contact your local dealer or service center. Situation Suggested remedies • Make sure that the battery is inserted. - Page 92 Before contacting a service center Situation Suggested remedies The display or buttons Remove the battery and insert it again. do not work If you use your camera at low temperatures, it can cause the camera screen to malfunction or discolor. The camera screen works poorly For better performance of your camera...
- Page 93 • You cannot use Intelli-studio on Macintosh computers. • Depending on your computer's Intelli-studio is not specification and environments, the functioning properly program may not launch automatically. In this case, click Start → All Programs → Samsung → Intelli-studio→ Intelli- studio on your computer. Appendixes...
-
Page 94: Camera Specifications
1/2.3" (Approx. 7.78 mm) CCD Effective pixels Approx. 14.2 Mega-pixels Total pixels Approx. 14.58 Mega-pixels Lens Samsung Lens f = 4.9 ~ 24.5 mm Focal length (35 mm film equivalent: 27 - 135 mm) F No. F3.5 (W) ~ F5.9 (T) •... - Page 95 Camera specifications White Balance Auto WB, Daylight, Cloudy, Fluorescent_H, Fluorescent_L, Tungsten, Custom Date Imprinting Date&Time, Date, Off Shooting • Mode: Smart Auto (Portrait, Night Portrait, Backlight Portrait, Backlight, Landscape, White, Action, Tripod, Night, Macro, Macro Text, Blue Sky, Sunset Sky, Macro Color, Natural Green, Fireworks), Program, DIS, Photo Help Guide , Scene (Beauty Photos Shot, Night, Portrait, Landscape, Close Up, Sunset,...
- Page 96 3264 X 2448 2592 X 1944 1984 X 1488 1920 X 1080 1024 X 768 1,584 These figures are measured under Samsung’s standard conditions and may vary depending on shooting conditions and camera settings. Interface Digital output USB 2.0 connector...
-
Page 97: Glossary
Glossary ACB (Auto Contrast Balance) This feature automatically improves the contrast of your images when the subject is backlit or when there is a high contrast between your subject and the background. AEB (Auto Exposure Bracket) This feature automatically captures several images at different exposures to help you capture a properly-exposed image. - Page 98 Glossary EV (Exposure Value) All the combinations of the camera’s shutter speed and lens aperture that result in the same exposure. EV Compensation This feature allows you to quickly adjust the exposure value measured by the camera, in limited increments, to improve the exposure of your photos.
- Page 99 Glossary ISO sensitivity The sensitivity of the camera to light, based on the equivalent film speed used in a film camera. At higher ISO sensitivity settings, the camera uses a higher shutter speed, which can reduce blur caused by camera shake and low light. However, images with high sensitivity are more susceptible to noise.
- Page 100 Glossary Shutter speed Shutter speed refers to the amount of time it takes to open and close the shutter, and it is an important factor in the brightness of a photo, as it controls the amount of light which pass through the aperture before it reaches the image sensor.
- Page 101 This product and its electronic accessories should not be mixed with other commercial wastes for disposal. PlanetFirst represents Samsung Electronics’ commitment to the sustainable development and social responsibility through eco-driven business and management activities.
-
Page 102: Fcc Notice
Changes or modifications not expressly approved by the manufacturer responsible for compliance could void the user’s authority to operate the equipment. • Declaration of Conformity Trade Name : Samsung Electronics America, Inc. Model No. : Samsung PL20/PL21 Responsible Party : Samsung Electronics America, Inc. -
Page 103: Index
Index Blink detection 45 Burst Auto Exposure Bracket (AEB) in Playback mode 62 in Shooting mode 46 Continuous 49 Adjusting Motion capture 49 Brightness 62 Contrast in Playback mode 62 in Shooting mode 51 Camera shake 25 Saturation in Playback mode 62 Capturing an image from a in Shooting mode 51 video 59... - Page 104 Index Memory card Capacity 84 Icons 18 MENU button 14 Image adjust Metering ACB 62 Center-weighted 47 add noise 62 Multi 47 brightness 62 Spot 47 contrast 62 face retouch 62 MJPEG (Motion JPEG) 94 red-eye fix 62 Motion Timer 38 saturation 62 Movie mode 32 Imprint 77...
- Page 105 Index Scene 30 on TV 64 Smart Auto 28 Slide show 57 Slide show 57 Voice memo Playing 59 Smart Album 54 Recording 34 Smart Auto mode 28 Volume 75 Smile shot 44 Start image 60, 75 White Balance 47 Timer 37 Transferring files Zoom button 14...
- Page 106 Please refer to the warranty that came with your product or visit our website http://www.samsung.com/ for after-sales service or inquiries.
Need help?
Do you have a question about the PL20 and is the answer not in the manual?
Questions and answers