XZENT ARGO X-F275 User Manual
Car-specific infotainer
Hide thumbs
Also See for ARGO X-F275:
- Mounting instruction (9 pages) ,
- Mounting instruction (10 pages)
Table of Contents
Advertisement
Quick Links
Advertisement
Table of Contents

Subscribe to Our Youtube Channel
Related Manuals for XZENT ARGO X-F275


Summary of Contents for XZENT ARGO X-F275
- Page 1 U S E R M A N U A L X - F 2 7 5 Car-Specific Infotainer X-F275 ARGO Series...
-
Page 2: Table Of Contents
■ Before you replace a defective fuse try to find the cause for the short circuit. Pay attention to DEVICE SETTINGS the cables of the power supply! If the short circuit does not result from a failure of the power supply or wiring, you can replace the defective fuse with a new one (of identical value). If the DAB RADIO SOURCE shortcircuit persists, contact an authorized XZENT dealer. ■ When connecting to any other device, read the user‘s guide for compatibility and notes on FM RADIO SOURCE electrical connections. Do not try to connect incompatible products. ■ Be careful not to drain the car battery while using the unit when the car engine is turned off. USB/IPod/BT MUSIC (A/V) SOURCE 12-13 Because the unit consumes a considerable amount of energy and the battery will be charged only while the engine is running, it might happen that the battery will discharge to a point where BLUETOOTH PAIRING, CONNECTING, CALLING, MUSIC 14-15 it is not possible to start the engine anymore. ■ According to the law in different European countries, driving with monitors showing movies in NAVIGATION SOURCE the viewing range of the driver is not allowed, because the driver might get distracted from traffic. Please respect the traffic regulations of your country or you may face legal penalties APPLE CARPLAY SOURCE in case of accidents or even lose your insurance coverage. Pay attention to the playback volume inside your vehicle since you are required to notice exterior warning sounds like police sirens etc.. ANDROID LINK ■ Don‘t expose the unit to hard impacts. A mechanical or electrical malfunction of the unit could be the result. A/V-IN, HDMI SOURCE ■ Should any problems or questions occur during the installation, please consult your XZENT dealer/importer. TERMS OF WARRANTY 18-19 ADDITIONAL INFORMATION, TECHNICAL SPECIFICATION... -
Page 3: Device Support, Software Updates And Maintenance
DEVICE SUPPORT, SOFTWARE UPDATES AND FRONT PANEL MAINTENANCE Software updates and improvements are provided via USB updates which can be downloaded from our website www.xzent.com Also customer care, FAQs and other helpful information can be found there. ATTENTION: this device has specifi c USB ports with special functions (USB-1 / top port at device backside) and (USB-2 / bottom port at device backside). The extension cables are distinguishable thru text-label to ensure proper identifi cation. Software updates provided via XZENT MUST be installed on “USB-1” (USE FOR SW UPDATE). If the installation has been done by 3rd party without proper marking/identifi cation of the extension wire – do try the other port in case of update-failure. X-F275 USB1 Can be used for SW Updates HOME VOICE POWER USB2 NOT for software updates Operation buttons: VOL/POWER: Press and hold for standby mode (Screen OFF, Audio OFF). If powered on, press to mute. -
Page 4: Main Menu
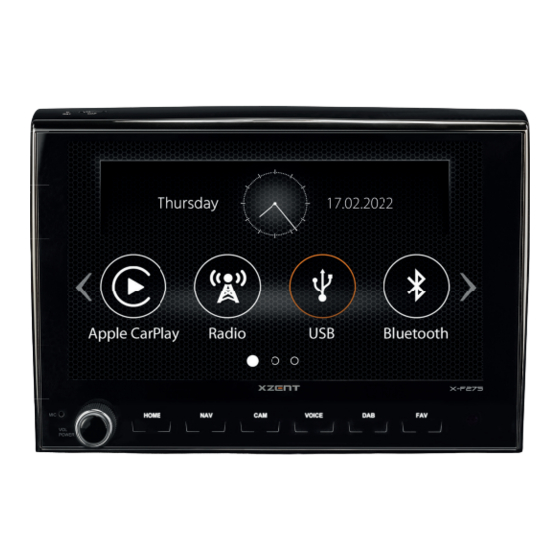
MAIN MENU STEERING WHEEL CONTROL (OE MODE, IR-STALK-INTERFACE) The XZENT device is preconfi gured to work with an IR-Stalk-Interface which is NOT included in the set. Alternativly an existing steering wheel control can be directly connected if a mini-ISO connector at the car side is present to the XZENT Analogue Key interface. Both the IR-mode and the analogue-Mode are preconfi gured to functionally mimic the standard SWC functions. For the IR-mode the functionality is set by code and cannot be changed while the analogue mode is also preconfi gured with the standard SWC function but allows you to change or reassign the functionality to your liking. The standard SWC functions are explained for <Mode 2>, for FIAT DUCATO III Series 8 as of 2021, or <Mode 1> for FIAT DUCATO III X290 as of 2014 hereafter. MODE 2, FIAT DUCATO SERIES 8 MAIN MENU operation buttons and display Time and date. Page indicator. Source Icon Press to open selected source. - Page 5 MODE 1, FIAT DUCATO III X290 AS OF 2014 SWC (re)Assignment process: The process is similar to both SWC modes and only differs by other standard and alternative buttons. The standard and alternative buttons function are explained at the beginning of this chapter for each mode. In case of using the existing mini-ISO connector at your compatible vehicle – you can re-assign the buttons of your SWC. Please note that this mode is NOT for the IR-stalk interface mode. Press the “Change” button to start re-assiging the functions to your liking. The system will clear all buttons from the steering wheel and marks the top left SWC button which shall be assigned fi rst. You need to assign all cleared buttons one by one from top left to bottom and then the right side from top to bottom. The current button which is to be assigned with a function will be hi-lighted for you. Example: To assign a function, select a function icon via touch from the middle (for example SRC / voice). After the desired function (in this example SRC / voice) is marked, press the corresponding SWC-Button (in this example top left). The system will now gray-out the SRC / voice button in the middle and put the SRC / voice function to the top left SWC button. Later you can trigger SRC / voice by pressing the top left SWC icon (instead of default MUTE). After the fi rst button is assigned, the system will hi-light the next button to be assigned by a still available (non-grayed-out) function from the middle. After all buttons on the SWC are defi ned – you can close the SWC assignment and use the new confi guration from now on. To restore back to default values press the “Default” button. The functions will then restore to standard values. Board/Trip-Computer: The SWC buttons for trip-, board computer and cruise control operation are directly assigned to the rela- ted vehicle functions, e.g. the function of these buttons on the steering wheel is completely independent of the device mounted in the vehicle. Note: The SWC related functions are only available if the device is connected with a compatible stalk-interface via IR in wire to a compatible vehicle model or via mini-ISO (Analog Key) if existing in the vehicle.
-
Page 6: Device Settings
DEVICE SETTINGS Balance and Fader can also be optically adjusted or LPF, Subwoofer level and Loudness can be adjusted. 4(d) Loudness: Press to ON/OFF loudness. 4(e) Subwoofer Power: Press to ON/OFF subwoofer power. 4(f) Subwoofer Gain: Press arrow key to change subwoofer gain if Subwoofer Power is set to ON. 4(g) Navi Mixer: Press switch to activate or deactivate mixing of navigation voice and background audio. 4(h) Startup volume: Press more key. Here you can change individually all available sources in regard of startup volume. You can choose to apply the last used volume, or set a fi x volume on startup. 5. TFT Here you can adjust settings in regard of the screen for example brightness mode or brightness values. 5(a) TFT brightness day: Press arrow keys to set value for day mode. 5(b) TFT brightness night: Press arrow keys to set value for night mode. 5(c) Dim mode: Press arrow keys to set value. Auto: the brightness is adjusted automatically with switching on the front headlights of the vehicle (Night). Day: the brightness is permanently at day value. Operation Buttons: Night: the brightness is permanently at night value. 5(d) Touchscreen Auto Standby: On set idle time, the screen will be powered Return Press to return to the home screen. off when not operated (audio will continue in background). 2. List area The shown list area is depending on the currently selected category. -
Page 7: Dab Radio Source
DAB RADIO SOURCE FM RADIO SOURCE You can enter the DAB source among other ways via the front panel DAB sensor key or via the 5. Preset This view shows the preset buttons that work like a quick select or favorite button. Home Screen Source Icon. You can also directly switch from the FM source to DAB source via the To save the current station to a preset button, press and hold it until the button is DAB key in lower right corner of the FM source. updated with the station information. With the DAB source you can enjoy the enriched digital radio services which are possible via the 6. FM Press the button to change directly to FM radio source. new DAB+ standard. In the lower section you can change the category which will update the main area of the source accordingly. Notes: Please remark that some features depend on the aired station or the reception quality. You can enter the FM source among other ways via the front panel via the Home Screen Source Icon. You can also directly switch from the DAB source to FM source via the FM key in lower right corner of the DAB source. -
Page 8: Usb/Ipod/Bt Music (A/V) Source
USB/IPOD/BT MUSIC (A/V) SOURCE The sources USB and iPod can be accessed among other ways thru their home screen icon and BT music with a connected phone via the Bluetooth source to play audio (BT, USB, iPod) or video (USB only). Playing fi les is similar for all sources and can be controlled via the mediaplayer UI. To play videos in USB mode you need change the standard fi lter in list view (4) to the video fi le type (B). At the list view mode (not available in Bluetooth music) you can browse your media fi les similar like a folder-fi le list. To open folders just simply tap on them to show their content which you also can directly tap to start playback. It will be shown with a play icon and also at the bottom line. To go back one level use the back (A) button or you can change to the video media type (only USB mode) by pressing (B) the fi lter icon. In this main view the mediaplayer controls are displayed. As usual you can use the pause/resume/play or skip buttons to play the next track. You can also activate the special functions like repeat and shuffl e. Additional notes on Video playback: The video playback is only possible if the handbrake is engaged. Operation buttons: The playback will be in full screen mode – to leave the full screen mode press simply the touch screen area of your device. - Page 9 Depending on the call status (initiate, ringing, dialling, active) you can hang-up, reject, accept/ pick-up a call (1), on active call you can switch to private mode (2) or to car loudspeakers, mute the are granted/accepted. Active or auto connected phones are shown in status area (A) with an active Bluetooth icon, battery and signal strength icon (if supported). XZENT microphone (3) or open the keypad for call options (4). (5) to return to navigation mode. In the lower section you can choose a different category which will update the main view area. Operation buttons Return Press to return to the home screen.
-
Page 10: Navigation Source
NAVIGATION SOURCE ANDROID LINK The Navigation source can be entered among other ways via the home screen icon or the NAV front 1. Tap to display the home screen of CarPlay. key sensor. 2. Tap to open XZENT main menu. Please insert the microSD card (not included in the set) to the NAV slot of the device (see Front View 3. Tap any of the APP icon to start the application. Chapter). Note: You can only have one active route guidance. If a route guidance is started with CarPlay, the For the Navigation source UI operation a quick start guide is provided, you can also download a navi- natvie navigation source is terminated in order to avoid the spoken messages of 2 systems for route gation manual (PDF) from our web site. guidance. The navigation source is no longer started automatically and must be started manually the next time it is used. Sat/DR Symbol: This symbol will show in DAB, FM, and other media sources and inform you on the positioning precision and shows different icons and colors. Gray SAT-icon if no GPS signal available, white SAT-icon if no position possible, green ANDROID LINK SAT-Icon if position is OK, green Gyro-Icon if the DR system is active. With AndroidLink you can connect your compatible Android Phone to the XZENT device and enjoy Navigation Software and map updates: compatible smartphone apps in your car. Make sure that you enabled the Android Link function in The navigation software and maps on your microSD card (not included in the set) is maintained and the system settings of your XZENT device. -
Page 11: Terms Of Warranty
■ damage caused by malicious code (“Software Viruses”) or by using software not supplied with the product or which was incorrectly installed; How will XZENT fulfil its Warranty? ■ use of third party vendor software programs for editing, modifying, adapting, or extending XZENT’s authorized software components as are run on the product; XZENT or its service partner will choose to either repair or replace the product or its defective parts covered ■ use of third-party vendor firmware/operating system software... - Page 12 Fiat Ducato III 250/251 2011 – 2014 Fiat Ducato III 250/251 (X290) ab 2014 Fiat Ducato III Serie 8* ab 2021 Citroën Jumper II 250/250D/250L ab 2006 Peugeot Boxer II 250/251 ab 2006 Opel Movano Typ C ab 2021 Electrical characteristics Power supply: +12 V DC against vehicle ground External protection against internal short-circuit: 15 A Mini-ANL fuse *N-XFDUC8 device mounting frame kit required Operating currents* ACC off idle status: <5.0 mA Audio / video playback (VOL 20): ~ 1.40 A GPS mode with active route guidance (VOL 20): ~ 1.55 A GPS mode with active route guidance (VOL 40): ~ 3.80 A * @ 13.8 V operating voltage with front and rear 4 ohm loudspeaker connected to device Hereby, ACR Brändli + Vögeli AG declares that the type of radio equipment X-F275 complies with the 2014/53/EU Directive. The full text of the EU Declaration of Conformity is available at the following Internet address: www.xzent.com (see link „Product Conformity Documents“ in the footer of the page). 24 10R-06 3698...
- Page 13 XZENT by ACR AG · Bohrturmweg 1 · Bad Zurzach · Switzerland www.xzent.com UK Authorized Representative: MARQUIS Surrey, Station Approach, Gomshall, Surrey, GU5 9NX, United Kingdom...
Need help?
Do you have a question about the ARGO X-F275 and is the answer not in the manual?
Questions and answers