Advertisement
Advertisement

Related Manuals for JAXJOX InteractiveStudio JJ15003


Summary of Contents for JAXJOX InteractiveStudio JJ15003
- Page 1 USER MANUAL JJ15003...
-
Page 2: Table Of Contents
WARNING: To reduce risk of injury, read all safety precautions and follow instructions in this manual before using any InteractiveStudio™ equipment. Improper use or maintenance can void product warranty. Keep this manual for future reference. Access to the latest user manual available at jaxjox.com/support. -
Page 3: Safety Warnings
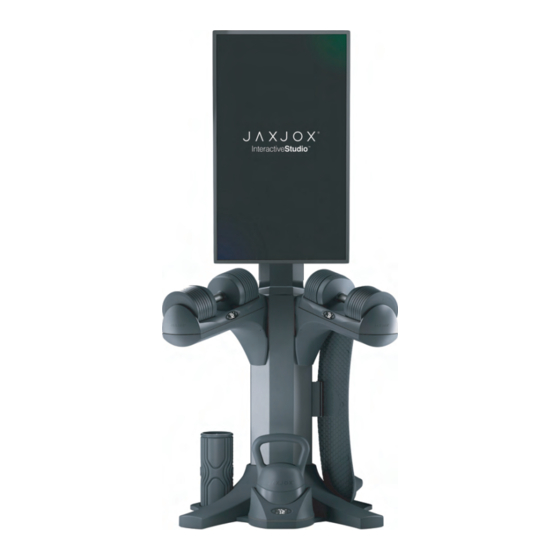
InteractiveStudio™, or your personal belongings or dwelling, while moving any part of or the whole unit. JAXJOX is also NOT RESPONSIBLE for any injury that may occur to you, or others, while moving any part of or the whole unit. - Page 4 4K Touchscreen TV TV Stand DumbbellConnect™ Water Bottle Holder Main Stand Push UpConnect™ Holder Push UpConnect™ Foam RollerConnect™ KettlebellConnect™ 2.0 SPECIFICATIONS Product Size: TOUCHSCREEN SPECIFICATIONS L 35.3 in * W 28 in * H 80.30 in 43" 4K Touchscreen WIFI, Bluetooth 4.2 TV on: Max 100w 32GB Memory Chargeable port: Max 5W...
- Page 5 SIDE VIEW...
- Page 6 SIDE VIEW...
- Page 7 BACK VIEW TV Power button InteractiveStudio power button and power jack.
-
Page 8: Setting Up Your Interactivestudio
1. Setting Up Your InteractiveStudio™ If any parts are missing, contact JAXJOX IMMEDIATELY by emailing us at: support@jaxjox.com Location Requirements. 1. Place the equipment on a solid, level surface. 2. Do not use extension cords or adaptors. The included power cord must be able to reach an outlet. - Page 9 2. Installing the DumbbellConnect™ Bases. 2.1: To install the left and right DumbbellConnect bases make sure the screens are facing inwards towards each other and connect the charging cable connectors to each other, pushing any excess cable into the stand. 2.2: Insert the left and right DumbellConnect™...
- Page 10 3. Installing the TV Stand. 3.1 Connect the cables of the TV stand to the main stand. Step 3.1 3.2 Insert the TV stand into the main stand. Step 3.2...
- Page 11 4 . Installing the TV on the TV Stand. 4.1 Hang the TV vertically on the hook of the gimbal and tighten the screws.Use caution during this step, not to damage the gimbal, as it is motorized and contains sensitive electronics.
-
Page 12: Power Supply Installation
5. Installing the Push UpConnect™ holder. 5.1 Put the Push UpConnect™ holder into the hole on the main stand in the bottom right hand side. Step 5.1 Push UpConnect™ Holder 6. Power Supply Installation. 6.1 After installation, check that all components are properly assembled and tightly secured. Plug the power cord into the power jack at the bottom of the base. - Page 13 7. Placing the Devices on the Stand. All devices will charge while properly seated on their respective bases. (1).Left DumbbellConnect™ (2).Right DumbbellConnect™ (3).Foam RollerConnect™ (4). Push UpConnect™ (5).KettlebellConnect™ 2.0 7.1 The Foam RollerConnect™ is seated at the bottom left hand corner with the screen facing up.
- Page 14 5 on the bottom and 1 on the top. Then place the shell over the weights with the JAXJOX logo facing forward or backwards. The KettlebellConnect 2.0™ will beep once anytime the shell is placed down properly onto the base.
- Page 15 7.4 Placing the DumbbellConnect™. 7.4.1 Place the weight plates on the dumbbell base slots with the edged side facing inwards, sliding and locking them into each other. There should be 14 weight plates on each base. Step 7.4.1 Step 7.4.1 7.4.2 Place the dumbbell handles on the bases, they should slide easily onto the weights.
- Page 16 .5 Rotating the TV. Rotation of the TV is done through the software. Please use the TV rotation button. DO NOT ATTEMPT TO PHYSICALLY ROTATE OR TURN THE TV SCREEN. Vertical Horizontal...
-
Page 17: Maintenance And Care
InteractiveStudio™ (hereafter referred to ® as the “Product”) for any reason, you must contact JAXJOX by email at support@jax- jox.com, within 30 days of delivery. Returned Product(s) must be in good physical condition (not broken or damaged). All product components originally included with your purchase must be included with your return. - Page 18 How to Obtain Warranty Service To be eligible for service under this Limited Warranty you must contact JAXJOX ® support@jaxjox.com. JAXJOX will require you to provide proof of purchase details ®...
-
Page 19: Notices
• Connect the equipment into an outlet on a circuit different from that to which the receiver is connected. • Consult the dealer or an experienced radio/TV technician for help. Responsible Party (Contact for FCC matters only): JAXJOX Inc. 8720 148th Ave NE Redmond, WA 98052 www.jaxjox.com/contact... - Page 20 CONTACT US: ® JAXJOX 8720 148th Ave NE Redmond, WA 98052 +1(425) 324-3017 support@jaxjox.com...
Need help?
Do you have a question about the InteractiveStudio JJ15003 and is the answer not in the manual?
Questions and answers
I can’t download the app to work with interactive studio