Advertisement
Quick Links
Advertisement

Related Manuals for Ripley MILLER VIS300C

Summary of Contents for Ripley MILLER VIS300C
- Page 1 VIS300C Standalone Fiber Inspection Kit User Guide...
- Page 2 Contents Introduction Important Safety information Hardware Overview VIS400 Overview Built in Power Meter Overview UPM100 Overview RP560 Overview Generic OPM Testing Offloading from a Power Meter Generic Scope Single Fiber Testing Generic Scope MPO Testing Color Code Creation Updateing the Software Report Settings Project Management Exporting Projects...
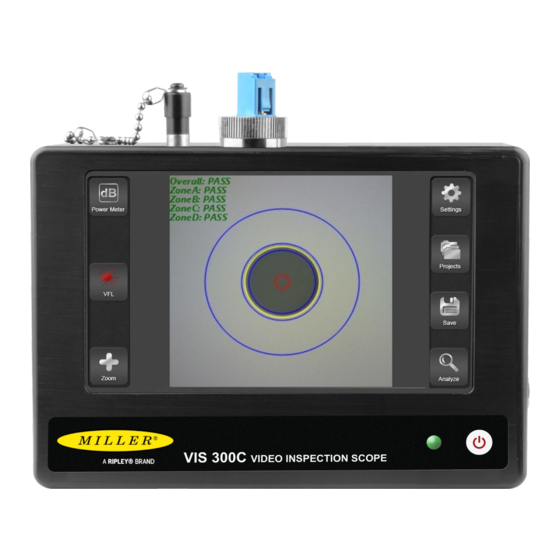
- Page 3 Introduction The VIS400C is an all-in-one fiber test solution for field and desktop applications. This guide will serve as a manual to outline the major features of the VIS300C and provide guidance in the use of those features to generate accurate, and complete reports. Analyzed Images from the VIS400 using the VIS300C Read and understand all of the instructions and safety information in this manual before operating this tool.
-
Page 4: Important Safety Information
Important Safety Information Read and understand all of the instructions and safety information in this manual before operating this tool. Laser Hazard Avoid eye exposure to open fiber connectors and interfaces when working with fiber systems. They may be connected to a live laser source. -
Page 5: Hardware Overview
Hardware Overview Variants The VIS300C has three different variants with different part numbers. These each target a different market and you should consider which unit meets your requirements. Variant One VIS300C The VIS300C Base model is an inspection-only device. This model is ideal for users who need a field- viewing device for fiber connectors or who need to inspect, grade, and save many fiber connector images very quickly. - Page 6 1). The VFL Port (Available on the VIS300C-PM-02-V and VIS300C-PM-04-V) provides the physicial interface for connecting fiber jumpers to the VIS300C for the purposes of fault detection and continuity testing. the 2.5mm universal interface allows for direct connection of fibers to the 635nm 1 mW red laser.
- Page 7 7).The battery Indicator LED will change colors to inform the user when the battery reaches certain Battery LED States Green 100% to 31% Battery Remaining Orange 30% to 11% Battery Remaining 10% to 0% Battery Remaining Powering the Unit on: With the VIS300C unit powered OFF, pressing the power button once will turn the unit ON.
- Page 8 Built in Power Meter Overview Introduction The VIS300C includes a built in Power meter that allows for loss testing of 850,1300,1310,1490,1550 ,1611,and 1625 nm wavelengths as well as 270Hz, 300 Hz, 1kHz, and 2kHz tone detection. Sicne this is built in to the unit going to the OPM page will by default use this power meter. If another power meter is connected the external power meter will be used instead.
- Page 9 Ripley Lasers are calibrated at -5 (or-8 with tone on) and LEDs are calibrated at -22 (or -25 with tone on). Next press the "Set Reference" button in the software and verify that the power meter now reads within .05 of 0 and is in dB mode.
- Page 10 Generic Scope Single Fiber Testing First connect to your scope as per the device specific instructions above, and navigate to the Home page. 1).Pressing the "OPM" button will navigate you to the OPM Page. 2).Pressing the "Settings" button will open the Settings Popup which allows you to conenct to wifi, change IEC Specs, check for updates etc.
- Page 11 Single Fiber Save Page 1).Here the image being saved will be displayed. 2).Here you can enter what you want the image to be named. tehre is a 64 character limit to names and not all symbols are usable. In general you should only use a-z, 0-1, spaces, and basic symbols). 3).This is an optional comment entry.
- Page 12 Generic Scope MPO Testing First connect to your scope as per the device specific instructions above, and navigate to the Home page. Make sure you have an MPO IEC Spec selected, this can be changed by pressing the gear in the top left then clicking Inspection Settings.
- Page 13 Multi Fiber Save Page 1).Here you can see all cores available and which one is currently being saved. 2).Here you can enter what you want the image to be named. there is a 64 character limit to names and not all symbols are usable. In general you should only use a-z, 0-1, spaces, and basic symbols). 3).This is an optional comment entry.
- Page 14 Color Code Creation First go the the OPM Page, Then the OPM Settings Page, and press the Edit button in the bottom right. Next either select an existing color code you want to edit or the create button in the bottom left.
-
Page 15: Updating The Software
Updating The Software First from the home page press "Settings" then Wifi Settings, and verify Wifi is both on and connected. Next return to the home page press "Settings" then "About". From here you need to plug in the Barrell jack charger and press "Check for updates" from there you just need to click accept and wait for the download to finish. - Page 16 The RP460 comes with a 2 year warranty for any manufacturer defects or damage due to reasonable use. To start the RMA process simply email or call technical support! Contact Support ontact us with any questions pertaining to this or any other Ripley product. Call Us: Email Us: (603) 524-8350 tech.support@odm.ripley-tools.com...
Need help?
Do you have a question about the MILLER VIS300C and is the answer not in the manual?
Questions and answers