Table of Contents
Advertisement
Quick Links
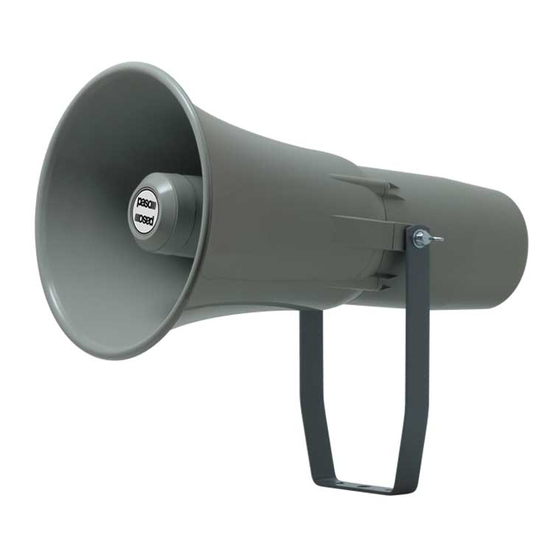
Diffusori a tromba esponenziali
Questi diffusori sono realizzati in polipropilene stabilizzato UV e sono
dotati di una staffa orientabile per il fissaggio a muro. É possibile montare
a scelta una tra le unità UT35, UT35-T, UT60* e UT60-T.
* solo per mod. TR3-B .
Montaggio del diffusore con unità UT35-T/UT60-T
1. Posizionare la guarnizione in dotazione all'unità dinamica sul filetto
della campana.
2. Avvitare l'unità sulla campana.
3. Far passare il cavo uscente dal retro dell'unità nel foro presente sul
cappellotto.
4. Inserire il cappellotto sull'unità fino a toccare la campana.
5. Fissare la campana al cappellotto con le viti e le rondelle fornite in
dotazione, serrandole a fondo nelle predisposizioni.
6. Montare la staffa di sostegno utilizzando viti e rondelle in dotazione.
Montaggio del diffusore con unità UT35/UT60
1. Posizionare la guarnizione sul filetto della campana.
2. Avvitare l'unità dinamica sulla campana.
3. Collegare le terminazioni dei cavi e ruotare i perni per fissarli.
4. Far passare i cavi precedentemente collegati all'unità nel foro
presente sul cappellotto.
5. Procedere con il fissaggio del cappellotto e della staffa (vedi figura).
Exponential horn speakers
These speaker units are made of UV stabilized polypropylene and have
a positionable bracket for wall mounting. It is possible to mount any of
the following units: UT35, UT35-T, UT60* or UT60-T.
* for model TR3-B only.
Mounting the speaker with the UT35-T/UT60-T unit
1. Position the gasket supplied with the dynamic unit on the thread of
the bell.
2. Screw the unit to the bell.
3. Thread the cable coming out of the back of the unit through the hole
of the cap.
4. Insert the cap onto the unit until it comes into contact with the bell.
5. Secure the bell to the cap with the screws and washers included in the
supply, screwing them down tightly in the positions provided.
6. Mount the supporting bracket, using the screws and washers supplied.
Mounting the speaker with the UT35/UT60 unit
1. Position the gasket on the thread of the bell.
2. Screw the dynamic unit onto the bell.
3. Connect the cable ends and turn the pins to secure them in place.
4. Thread the cable previously connected to the unit through the hole
of the cap.
5. Secure the cap and bracket (see figure).
TR1-B, TR2-B, TR3-B
Fig. 1
Fig. 2
1
Advertisement
Table of Contents

Related Manuals for Paso TR1-B


Summary of Contents for Paso TR1-B
- Page 1 TR1-B, TR2-B, TR3-B Diffusori a tromba esponenziali Exponential horn speakers Questi diffusori sono realizzati in polipropilene stabilizzato UV e sono These speaker units are made of UV stabilized polypropylene and have dotati di una staffa orientabile per il fissaggio a muro. É possibile montare a positionable bracket for wall mounting.
- Page 2 TR1-B, TR2-B, TR3-B Connessioni Connections Una volta assemblato il diffusore, collegare le terminazioni del cavo/i Once the speaker unit has been assembled, connect the ends of the uscente/i dal cappellotto alla linea di distribuzione, riferendosi all'apposita cable(s) coming out of the cap to the distribution line, referring to the tabella apposta sul retro dell’unità...
- Page 3 TR1-B, TR2-B, TR3-B • TR2-B • Polare verticale - Vertical plot Risposta in frequenza • Frequency response Polare orizzontale - Horizontal plot • TR3-B • Polare verticale - Vertical plot Risposta in frequenza • Frequency response Polare orizzontale - Horizontal plot...
- Page 4 Il prodotto, risultato difettoso, dovrà essere inviato alla Paso franco di spese di the product is found to be faulty, it must be sent to Paso free of charges for shipment spedizione e ritorno. Questa garanzia non ne comprende altre, esplicite od implicite, e and return.
Need help?
Do you have a question about the TR1-B and is the answer not in the manual?
Questions and answers