
Related Manuals for Costway HW54796


Summary of Contents for Costway HW54796
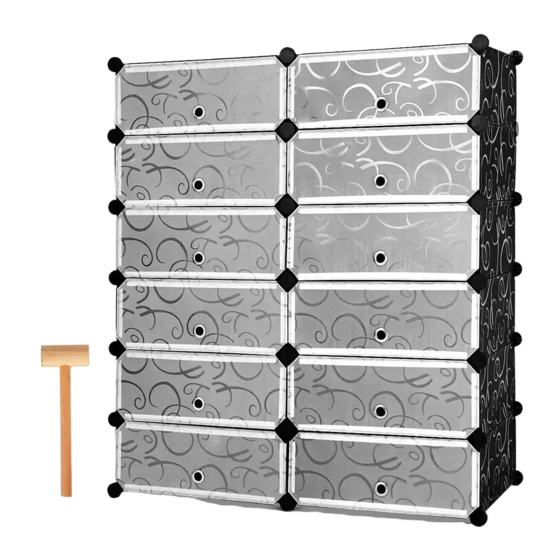
- Page 1 Scan QR code for assembly instructions USER’S MANUAL PLASTIC CUBE STORAGE HW54796 THIS INSTRUCTION BOOKLET CONTAINS IMPORTANT SAFETY INFORMATION. PLEASE READ AND KEEP FOR FUTURE REFERENCE.
- Page 2 Before You Start Before You Start Please read all instructions carefully. Please read all instructions carefully. Retain instructions for future reference. Retain instructions for future reference. Separate and count all parts and hardware. Separate and count all parts and hardware. Read through each step carefully and follow the proper order.
- Page 3 We are very appreciated that you purchased our products. We are very appreciated that you purchased our products. Please strictly obey to the caution items during using. Please strictly obey to the caution items during using. It is our willingness if you can use it properly. It is our willingness if you can use it properly.
- Page 4 PARTS LIST PARTS LIST Part image Part image Quantity Quantity 17.7”×13.8” 17.7”×13.8” 13.8”×6.7” 13.8”×6.7” 17.7”×6.7” 17.7”×6.7” 17.7”×6.7” 17.7”×6.7” 44(2 spare) 44(2 spare)...
- Page 5 ASSEMBLY STEPS ASSEMBLY STEPS × 1 × 1 × 4 × 4 Please pay attention Please pay attention to the connectors to the connectors mounting direction. mounting direction. the end of the connector hole. the end of the connector hole. STEP 1 STEP 1 Please install from left to right.
- Page 6 ASSEMBLY STEPS ASSEMBLY STEPS × 3 × 3 × 2 × 2 STEP 3 STEP 3 × 2 × 2 × 3 × 3 Please pay attention to the connectors' mounting direction as Please pay attention to the connectors' mounting direction as the enlarged picture shows.
- Page 7 ASSEMBLY STEPS ASSEMBLY STEPS × 3 × 3 STEP 5 STEP 5 To tighten the connections between the every part, please To tighten the connections between the every part, please shelf corner to the end of the connector hole. shelf corner to the end of the connector hole. STEP 6 STEP 6...
- Page 8 ASSEMBLY STEPS ASSEMBLY STEPS × 2 × 2 × 3 × 3 STEP 7 STEP 7 × 2 × 2 × 3 × 3 STEP 8 STEP 8...
- Page 9 ASSEMBLY STEPS ASSEMBLY STEPS × 3 × 3 STEP 9 STEP 9 STEP 10 STEP 10...
- Page 10 ASSEMBLY STEPS ASSEMBLY STEPS × 8 × 8 × 12 × 12 × 8 × 8 × 24 × 24 in place. in place. STEP 11 STEP 11...
- Page 11 ASSEMBLY STEPS ASSEMBLY STEPS × 1 × 1 STEP 12 STEP 12...
- Page 12 ASSEMBLY STEPS ASSEMBLY STEPS × 11 × 11 Please complete the assembly and ensure the stability before use. Please complete the assembly and ensure the stability before use. STEP 13 STEP 13...
- Page 14 Contact our friendly customer service department for help first. Replacements for missing or damaged parts will be shipped ASAP ! US office: Fontana UK office: Ipswich AU office: Truganina DE office: Hamburg FR office: Saint Vigor d'Ymonville Contact Us! US:cs.us@costway.com Do NOT return this item. way.com AU:cs.au@costway.com...
Need help?
Do you have a question about the HW54796 and is the answer not in the manual?
Questions and answers