Table of Contents
Advertisement
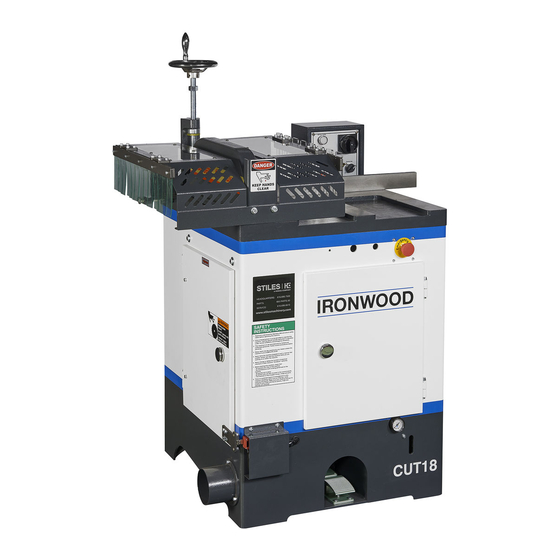
Ironwood CUT 18
User Manual
general information.
features.
technical specifi cations. safety considerations.
delivery and installation. inspection.
receiving the machine. assembly.
safety.
connect to power.
operation and adjustments.
dust exhaust outlet.
cutting the workpiece.
adjust air pressure.
maintenance.
adjust v-belt tension.
troubleshooting.
electrical diagram.
Advertisement
Table of Contents

Related Manuals for Stiles Ironwood CUT 18

Summary of Contents for Stiles Ironwood CUT 18
- Page 1 Ironwood CUT 18 User Manual general information. features. technical specifi cations. safety considerations. delivery and installation. inspection. receiving the machine. assembly. safety. connect to power. operation and adjustments. dust exhaust outlet. cutting the workpiece. adjust air pressure. maintenance. adjust v-belt tension.
-
Page 2: Table Of Contents
Troubleshooting ..............20 9.1 Air Circuit Diagram 9.2 Electrical Diagram PLEASE REVIEW AND OBSERVE ALL SAFETY INFORMATION / DIRECTIVES BEFORE INSTALLING, OPERATING, OR PERFORMING MAINTENANCE ON THIS MACHINERY. Ironwood CUT 18 | User Manual... -
Page 3: General Information
1.1 Thank You! 1.3 Features Thank you for your purchase of the Ironwood CUT 18 cut-off saw. • A convenient foot pedal, or dual push buttons (depending on At Stiles Machinery, our goal is to ensure that you are fully satisfied saw configuration) controls the pneumatic operation of the with your purchase. -
Page 4: Technical Specifications
Net weight 771 lbs. (350 kgs) Gross weight 903 lbs. (410 kgs) ⁄ " x 31 ⁄ " x 53 ⁄ " Packing dimensions (L x W x H) (900mm x 800mm x 1,350 mm) Ironwood CUT 18 | User Manual... -
Page 5: Safety Considerations
Safety instructions for operating the CUT 18 NOTE: Dust extraction equipment must be connected and turned on before starting all machine operations. LABEL NO. 1 LABEL NO. 2 LABEL NO. 3 LABEL NO. 4 Ironwood CUT 18 | User Manual... -
Page 6: Facility Preparation
2.0 Facility Preparation Prior to uncrating your machine confirm that your location can 2.3 Power accommodate the Ironwood CUT 18. Follow these guidelines: WaRninG 2.1 Floor A licensed electrician must connect the CUT 18 to the building power source. • The floor must be flat and level. -
Page 7: Delivery And Installation
Remove and save all paperwork attached to the outside of damage on the bill of lading, take pictures of potential damage, and the crate. contact Stiles Machinery immediately at 616.698.7500 and ask to Remove the crating, starting with the top, then remove the four speak with the traffic department. -
Page 8: Inspection
Lift the machine from the pallet by one of 2 methods: Paint (2-color set) a. Team lift User manual b. Slide machine onto forks of fork lift Carefully slide the machine into final position. Ironwood CUT 18 | User Manual... -
Page 9: Level
Saw Blade Flanges If blade is not pre-mounted, remove saw blade flanges and clean well to remove all rust-preventative oils. When cleaning, make sure no dust or debris is left on the saw blade flanges. Ironwood CUT 18 | User Manual... -
Page 10: Assembly
1". Specific tooling requirements depend upon application. Please Saw blade Flange contact Stiles Machinery at 616.698.7500 for assistance with your tooling needs. Attach the saw blade and flange onto the arbor. Use only saw blades with maximum safe operating speeds of Make certain the saw blade teeth point toward the blade’s... -
Page 11: Dust Exhaust Outlet
• inside-back on the table side of the guard assembly • outfeed side of the machine Adjust the acrylic fingers on the safety guard to the height of your workpiece, leaving ⁄ " – ⁄ " clearance. Ironwood CUT 18 | User Manual... -
Page 12: Connect To Power
Note: Before operating, the phasing will be tested to ensure sandblade is turning the correction direction. If not, L1 and L2 should be switched to change phasing. Proper wiring inside the terminal strip box. Ironwood CUT 18 | User Manual... -
Page 13: Safety
Like all power equipment, there is danger associated with the personal injury or damage to your machine. Regularly maintain Ironwood CUT 18. Use caution and follow all safety instructions. your tools and accessories. The saw blade should be sharpened Take every precaution to protect yourself, others around you, and and cleaned for safe, optimal performance. -
Page 14: Operation And Adjustments
After the cut, the saw blade lowers under the table. • Starts the saw blade motor. The hold-down clamp rises to release the workpiece. Power Lamp • Illuminates when the power switch is in the ON position. Ironwood CUT 18 | User Manual... -
Page 15: Adjust Hold-Down Clamp
If you feel resistance while turning the handle, turn the Guard Air switch to the left, or OFF position, until the handle turns easily. Tighten the lock nut to set the height. Quick air connector Adjustment knob Clamp - raise/lower Pressure gauge Ironwood CUT 18 | User Manual... -
Page 16: Adjust Fence Squareness To Saw Blade
Do not allow the combination square to touch the blade teeth. If the fence is not square to the saw blade, loosen the two lock screws located on the back side of the back fence. Lock screws Ironwood CUT 18 | User Manual... -
Page 17: Cutting The Workpiece
Stand to the right of the workpiece when feeding it through the saw Never remove the cut-off piece until the cutting cycle is complete. to avoid potential injury from kickback and loose chips. Roller extensions Ironwood CUT 18 | User Manual... -
Page 18: Maintenance
Make certain the saw blade teeth point toward its running direction. Tighten the saw blade securely using the supplied T-wrench. Ensure the blade access door is completely closed and locked and the door safety switch is on. Ironwood CUT 18 | User Manual... -
Page 19: Adjust V-Belt Tension
Move the motor towards the arbor until the belts can be mounted on the pulleys. Once belts are mounted, adjust belt tension (see section 8.4, steps 4-6). The V-belt specification is MF-1330. Stiles Part Number: 73-185-50000. Note: It is recommended to change all 3 belts at the same Lock screws time to avoid affecting accuracy of the parallel between the motor pulley and the spindle pulley. -
Page 20: Troubleshooting
2. Motor is damaged. 2. Check and repair motor. 3. Arbor is locked up or damaged. 3. Check arbor spindle for free rotation. If you cannot resolve your issue, contact Stiles technical support at 616.698.6615. Ironwood CUT 18 | User Manual... -
Page 21: Air Circuit Diagram
9.1 Air Circuit Diagram With Foot Pedal Control Ironwood CUT 18 | User Manual... - Page 22 9.1 Air Circuit Diagram With Dual Push Button Controls Ironwood CUT 18 | User Manual...
-
Page 23: Electrical Diagram
9.2 Electrical Diagram Ironwood CUT 18 | User Manual... - Page 25 PART LIST CUT18L Q’TY Q’TY DESCRIPTION DESCRIPTION 18L-01 Cabinet 18L-18 CE Safety Switch 18L-01-1 Circular Plate 18L-18-1 Fixed Plate 18L-02 Emergency Stop 18L-19 Stud Bolt 18L-03 Dust Port 18L-20 Support Frame 18L-04 Side Door 18L-21 Split Pin 18L-05 Door Lock 18L-22 Coupling Pin 18L-23 Support Angle Steel 18L-06 Lock Handle...
- Page 27 PART LIST CUT18L Q’TY Q’TY DESCRIPTION DESCRIPTION 18L-34 Danger Label 18L-56 C-ring 18L-35 18L-57 Bearing 6205zz Safety Guard 18L-36 Adjusting Hand Wheel 18L-58 Bracket 18L-37 Drop Handle 18L-59 Shaft 18L-38 Lock Nut 18L-60 Suspension Bracket 18L-39 Rubber Ring 18L-61 SawBlade Screw 18L-40 Adjustable Seat 18L-62 Flange Washer 18L-41 Guide Screw...
- Page 28 SAFETY GUARD DESCRIPTION Q’TY 18L-77 GUARD 18L-78 ACRYLIC PLATE 18L-79 FIXING PALLET (INFEED) 18L-80 SAFETY PLATE 18L-81 BRACKET 18L-82 FIXING PALLET (OUTSIDE) 18L-83 FIXING PALLET (INSIDE) 18L-84 PLASTIC STRIP...
- Page 29 Stiles Machinery Inc. 3965 44th St. SE Version A Grand Rapids, MI 49512 September 2013 p. 616.698.7500 f. 616.698.9411 © 2013 Stiles Machinery Inc. www.stilesmachinery.com...
Need help?
Do you have a question about the Ironwood CUT 18 and is the answer not in the manual?
Questions and answers