Advertisement
Quick Links
Advertisement

Subscribe to Our Youtube Channel
Related Manuals for Marantz professional PMD660


Summary of Contents for Marantz professional PMD660
- Page 1 Model PMD660 User Guide Portable Solid State Recorder ...
- Page 2 WARNINGS CAUTION Do not expose the equipment to rain or moisture. RISK OF ELECTRIC SHOCK Do not remove the cover from the equipment. DO NOT OPEN Do not insert anything into the equipment through the ventilation holes. CAUTION: TO REDUCE THE RISK OF ELECTRIC SHOCK, Do not handle the mains lead with wet hands.
- Page 3 IMPORTANT SAFETY 11. Only use attachments/accessories specified by the manufacturer. INSTRUCTIONS 12. Use only with the cart, stand, tripod, bracket, or table specified by the manufacturer, or sold with the apparatus. When a cart is used, READ BEFORE OPERATING EQUIPMENT use caution when moving the cart/apparatus combination to avoid This product was designed and manufactured to meet strict quality and injury from tip-over.
- Page 4 NOTE TO CATV SYSTEM INSTALLER: This reminder is provided to call the CATV (Cable-TV) system installer's attention to Article 820-40 of the NEC, which provides guidelines for proper grounding and, in particular, specifies that the cable ground shall be connected to the grounding system of the building, as close to the point of cable entry as practical.
- Page 5 CE marking (only EU version) English This product is in conformity with the EMC directive and low-voltage directive. Français Cet appareil est conforme á la directive EMC et á la de directive sur les basses tensions. Deutsch Dieses Gerät entspricht den EMC-Richtlinien und den Richtlinien für Niederspannungsgeräte. Nederlands Dit apparaat voldoet aan de EMC-richtlijnene en de richtlijnen voor apparatuur met laag voltage.
- Page 6 This Class B digital apparatus complies with Canadian ICES-003. Cet appareil numérique de la Classe B est conforme á la norme NMB-003 du Canada. SI DICHIARA CHE L'APPARECCHIO SINTO-AMPLIFACATORE SR-39 RISPONDE ALLE PRESCRIZIONI DELL'ART. 2 COMMA 1 DEL D.M. 28 AGOSTO 1995 N°...
- Page 7 Table of Contents Package contents ........ 3 Recording Format parameters ......21 Recording time chart ......... 21 Introduction .......... 4 Recording Level Control ........22 Features .............. 4 Microphone Attenuator ........22 Pre Record ............22 Preparation ........... 6 Silent Skip (Automatic Pause Recording) ..22 Installing the carry strap ........
- Page 8 Virtual Track and Copy Segment ..29 Additional Functions ......38 Virtual Track ............29 Battery ............... 38 Copy Segment ...........29 Auto power off ........... 38 Virtual Track Edit Mode ........29 Beep Alarm ............38 Key lock ............. 39 Creating a Virtual Track .....30 Set Date and Time ..........
- Page 9 Package contents • Carry strap • PMD660 • Security screws (2) ISO 3x10 (3mm x 10mm long) For CF card door. • Plastic pin and retainer • 64MB CF card (US only) (spare - for Memory compartment door) (shipped formatted and installed) •...
- Page 10 • Stereo (2 channels) and mono (1 channel) audio recording and playback. • Automatic recording The PMD660 can be set to stop recording when there is • Audio inputs may be from : silence (Silent Skip) and automatically start when sound •...
- Page 11 • A new track can be started during recording by beginning of each track. pressing the REC button (if the "Manual Trk" preset is turned On). • There are three ways to power the PMD660 ; • Included AC adapter. • EDL marks* • AA Alkaline batteries (4 hours).
- Page 12 1. Remove the battery compartment. Installing the carry strap 1. Put the carry strap through the shaft of PMD660. 2. Insert the new batteries (AA type) with correct +/ -polarity. 2. Put the carry strap through the stopper of PMD660.
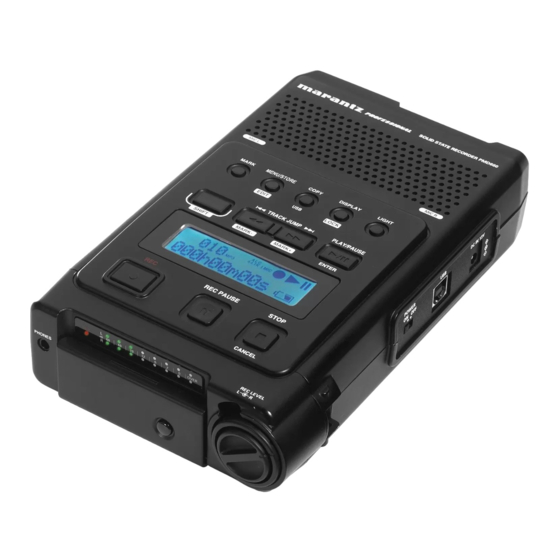
- Page 13 Controls and Connections 1. Speaker When "Output" in the preset menu is set to "SP/HP" or "SP/HP+LINE", the played back audio signal is output Top side the internal speaker. Headphones plugged into the PHONES jack mute the internal speaker. HP/SPK VOL controls the built-in Speaker and Headphone volume.
- Page 14 • USB Push and hold the USB button while you turn on the PMD660's POWER switch. The CF card in the PMD660 appears as an external drive on a connected computer. It may also be removed for data transfer. See page 36, How to connect via the USB port.
- Page 15 7. LIGHT button 9. TRACK JUMP / MARK- button Push the LIGHT button to momentarily turn the Display • TRACK JUMP light on. During playback, push to jump to the previous track. Push and hold for one second to switch the Display light If pushed while playing, the first track jumps to the last on.
- Page 16 10. TRACK JUMP / MARK+ button • TRACK JUMP During playback, push to jump to the next track. If pushed while playing, the last track jumps to the first track on the CF card. • • During playback, push and hold the button to "fast forward"...
- Page 17 Push and hold the SHIFT button while you push other buttons (white labels) to activate alternate functions. 12. Display Labels, icons and alphanumeric messages on the display communicate the status of PMD660. 13. REC button From Stop, push to start recording. From Record - pause, push to resume recording.
- Page 18 Front side 16. Level meter The louder the sound input to the recorder on the Left/Right channel, the more LED lights are displayed. When the "Meter Mode" of preset menu is "Peak Only", only a peak level is displayed. (page 52) 17.
- Page 19 Plug the supplied AC adapter in this jack. The power supplied is 2.0A at 5V DC. The PMD660 automatically switches to adapter power if it was running on battery power. If AC power is interrupted by a power outage or unplugging the adapter, the PMD660 automatically switches to battery power.
- Page 20 Rear side 26. LINE IN/OUT jack Plug external line level audio devices in this jack. a. LINE IN Plug stereo audio cable in this jack to record from the output of an external unit. b. LINE OUT 26-a Plug stereo audio cable in this jack to connect to the 26-b input of an amplifier or other external unit..
Need help?
Do you have a question about the PMD660 and is the answer not in the manual?
Questions and answers