
Related Manuals for Cabletech DVB-T2


Summary of Contents for Cabletech DVB-T2
- Page 1 DVB-T2 HD tuner Bedienungsanleitung User’s manual Instrukcja obsługi Manual de utilizare...
- Page 2 SICHERHEITSANLEITUNGEN Lesen Sie diese Bedienungsanleitung vor Inbetriebnahme sorgfältig durch, und bewahren diese auf zum späteren Nachschlagen. Der Hersteller übernimmt keine Haftung für Schäden, verursacht durch unsachgemäße Bedienung und Benutzung des Gerätes. • Bevor Sie das Gerät an die Netzsteckdose anschließen, vergewissern Sie sich, dass die auf dem Gerät angegebene Spannung mit der Spannung in der Netzsteckdose übereinstimmt.
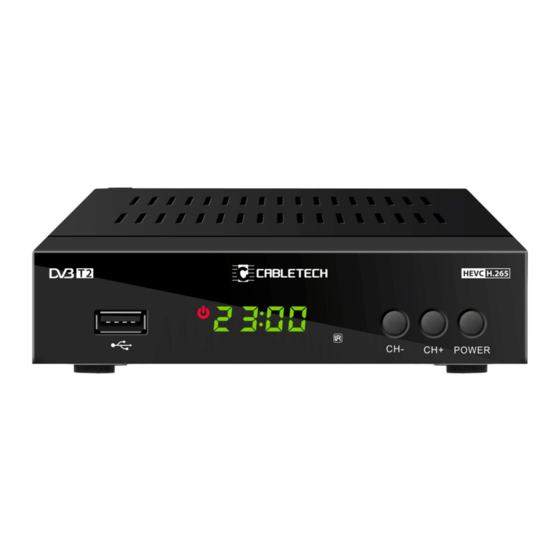
- Page 3 PRODUKTBESCHREIBUNG FERNBEDIENUNG 1. Netztaste 1. Taste Ein/Aus 2. Vorheriger Sender 2. Taste Wiedergabe/Pause 3. Nächster Sender 3. Taste Stopp 4. Display 4. Taste Nächster Titel 5. USB Steckplatz 5. Taste Vorheriger Titel 6. Antenneneingang 6. Taste Aufnahme 7. HDMI Ausgang 7.
-
Page 4: Batterien Einlegen
Programmierung der TV Steuertasten BATTERIEN EINLEGEN 1. Batteriefach öffnen. 1. Stellen Sie die Tuner-Fernbedienung und die TV-Fernbedienung in einem Abstand 2. Zwei “AA” Batterien einlegen. Achten Sie auf die korrekte von etwa 4 cm zueinander. Polarität. 2. Halten Sie die Taste SET gedrückt, bis die rote LED stärker leuchtet. 3. -
Page 5: Technische Daten
Land, Antennenleistung und FTA-Option (nur Suche nach freien Sendern). TECHNISCHE DATEN Zeit HAUPTMERKMALE LED-Anzeige Dieses Menü ermöglicht die Einstellung von Datum und Uhrzeit, Schlaf-Timer und Voll kompatibel mit DVB-T2/DVB-T/DVB-C automatischem Ein-/Ausschalten. Automatische/manuelle Suche Medienwiedergabe und PVR über USB 2.0 Steckplatz Timer: 7 Tage EPG... -
Page 6: Safety Instructions
Interner Speicher: 32 Mb SAFETY INSTRUCTIONS RAM: 512 MB Eingangsimpedanz: 75 Ohm Read this instruction manual and keep it for future reference. Producer does not take Eingangsfrequenz: (VHF) 177,5~226,5 MHz; (UHF) 474~858 MHz responsibility for damages caused by inappropriate handling and use of the product. Videoauflösung: 1920 x 1080 px Videoformat: Auto, 16:9, 4:3 LB, 4:3 PS •... -
Page 7: Product Description
PRODUCT DESCRIPTION REMOTE 1. Power button 1. Power button 2. Previous channel 2. Play/pause button 3. Next channel 3. Stop 4. Display 4. Next track button 5. USB port 5. Previous track button 6. Antenna input 6. Record button 7. HDMI output 7. -
Page 8: Battery Installation
Programming TV control buttons BATTERY INSTALLATION 1. Place the tuner remote and the TV remote towards each other, at around 4 cm 1. Open the battery compartment. distance. 2. Place two AA batteries, according to polarity. 2. Press and hold the SET button, until the red LED glows stronger. 3. -
Page 9: Specification
MAIN FEATURES This menu allows for searching and saving channels. Select mode, country, antenna LED display power, and FTA option (searching for free channels only). Fully compliant with DVB-T2/DVB-T/DVB-C Automatic/manual scan Time Media playback and PVR by USB 2.0 port 7 days EPG This menu allows for setting the date and time, sleep timer and automatic turn on/off. - Page 10 Video decoding: MPEG-2, MPEG-4, H.264, H.265 KWESTIE BEZPIECZEŃSTWA Supported formats: H.264, HEVC, MP3, MP4, MKV, JPEG, AVI Audio decoding: MPEG-1 Layer I/II, MPEG-2 layer I/II, AAC Przed użyciem należy dokładnie zapoznać się z treścią instrukcji obsługi oraz File system: FAT16, FAT32, NTFS zachować...
-
Page 11: Opis Urządzenia
OPIS URZĄDZENIA PILOT 1. Przycisk zasilania 1. Przycisk zasilania 2. Poprzedni kanał 2. Odtwarzanie/pauza 3. Następny kanał 3. Stop 4. Wyświetlacz 4. Następny utwór 5. Port USB 5. Poprzedni utwór 6. Wejście antenowe 6. Przycisk nagrywania 7. Wyjście HDMI 7. Włączenie napisów 8. -
Page 12: Instalacja Baterii
Programowanie przycisków do kontroli telewizora INSTALACJA BATERII 1. Umieścić pilot tunera i pilot telewizora diodami do siebie, w odległości około 4 cm. 1. Należy otworzyć gniazdo baterii. 2. Nacisnąć i przytrzymać przycisk SET, aż czerwona dioda zacznie świecić mocniej. 2. Umieścić dwie baterie AAA, zgodnie z polaryzacją. 3. - Page 13 SPECYFIKACJA Czas GŁÓWNE FUNKCJE Wyświetlacz LED Menu pozwala na ustawianie daty i czasu, uśpienia oraz automatycznego włączania i W pełni kompatybilny z DVB-T2/DVB-T/DVB-C wyłączania urządzenia. Automatyczne/ręczne wyszukiwanie kanałów Odtwarzanie multimediów oraz PVR przez port USB 7-dniowy przewodnik po programach (EPG)
-
Page 14: Instrucțiuni Privind Siguranța
Zakres częstotliwości: (VHF) 177,5~226,5 MHz; (UHF) 474~858 MHz INSTRUCȚIUNI PRIVIND SIGURANȚA Rozdzielczość wideo: 1920 x 1080 px Format wideo: Auto, 16:9, 4:3 LB, 4:3 PS Citiți acest manual de instrucțiuni și păstrați-l pentru consultări ulterioare. Producătorul Dekoder wideo: MPEG-2, MPEG-4, H.264, H.265 nu își asumă... -
Page 15: Descrierea Produsului
DESCRIEREA PRODUSULUI TELECOMANDĂ 1. Buton de alimentare 1. Buton Pornit/Oprit 2. Canalul anterior 2. Buton Redare/Pauză 3. Următorul canal 3. Buton de oprire 4. Afișaj 4. Butonul piesa următoare 5. Port USB 5. Butonul piesa anterioară 6. Intrare antenă 6. Butonul de înregistrare 7. -
Page 16: Instalarea Bateriilor
Programarea butoanelor de control TV INSTALAREA BATERIILOR 1. Deschideți compartimentul pentru baterii. 1. Așezați telecomanda tunerului și telecomanda TV una spre cealaltă, la o distanță de 2. Introduceți două baterii tip AA, respectând polaritatea aproximativ 4 cm. corectă. 2. Apăsați și mențineți apăsat butonul SET, până când LED-ul roșu luminează mai 3. - Page 17 CARACTERISTICI PRINCIPALE antenei și opțiunea FTA (doar căutare gratuită de canale). Afisaj cu LED Compatibil cu DVB-T2/DVB-T/DVB-C Scanare automata /manuala Redare media și PVR prin port USB 2.0 Acest meniu vă permite să setați data și ora, cronometrul de repaus și pornirea/oprirea EPG 7 zile automată.
- Page 18 Decodare audio: MPEG-1 Layer I/II, MPEG-2 layer I/II, AAC Fisier sistem: FAT16, FAT32, NTFS INTRĂRI/IEȘIRI SCART HDMI USB 2.0 IEC conector pentru ANT-in ALIMENTARE Tensiune de intrare: 100-240 V~; 50/60 Hz Telecomanda: 2 baterii AAA Consum putere: Max. 7,5 W Consum de putere în modul standby: Max.
- Page 19 www.rebelelectro.com...
Need help?
Do you have a question about the DVB-T2 and is the answer not in the manual?
Questions and answers