Table of Contents
Advertisement
Quick Links
Advertisement
Table of Contents

Subscribe to Our Youtube Channel
Related Manuals for ureach PV Series

Summary of Contents for ureach PV Series
- Page 1 PV Series M.2 SSD (NVMe/SATA) Duplicator and Sanitizer User Manual v A.03...
-
Page 2: Table Of Contents
Index Table v A.03 Product Disclaimer ......................... 3 Warranty..........................3 Piracy Statement ........................3 Before You Start ........................4 Notice Symbols ........................4 Functions Table ........................5 Product Overview ........................8 Functions ..........................11 1. Copy .......................... 11 2. Compare ........................12 3. -
Page 3: Product Disclaimer
Product Disclaimer U-Reach is not accountable for any incidental or consequential damages, including, but not limited to property harm, loss of time or data from use of any U-Reach products or any other damages attributable to product malfunction or failure of including without limitation, those attributed to reliance of the materials provided, costs of product replacement, loss of use, data or profits, delays or business interruptions, any principle of legal responsibility arising from or in reference to the use, overall performance, delays in... -
Page 4: Before You Start
Before You Start Important Notice ⚫ Carefully read the entire manual before operating. ⚫ Make sure the source device is correct and functioning. ⚫ Equal capacity of source and target is recommended for guaranteed data consistency. ⚫ Using the Copy +Compare function provides the most flawless duplication. ⚫... -
Page 5: Functions Table
Functions Table Functions Descriptions Copies data from source device to targets. (There are four copy modes 1. Copy in function "6.2 Copy Area") 2. Compare Verifies the targets to the source device to ensure copy accuracy. 3. Copy+Compare Automatically launches compare function after copy is completed. 4.1 Quick Erase Erases device(s)’... - Page 6 6.1 Start-up Menu Sets default function to display after equipment initialization. 6.2.1 System and Files Copies data and skips empty space. Only supports standard formats. 6.2.2 All Partitions Copies or skips HPA, DCO, unknown partitions, 6.2 Copy Area modified formats, etc. defined by settings. 6.2.3 Whole HDD Copies all source data, bit-by-bit.
- Page 7 6.6.5.2 Do Lock Key Only down/up buttons are disabled. Reboot system for setting to be in effect. 6.6.6 Stop Motor Time Sets device power down buffer time when tasks are completed. 6.6.7 Boot Password Sets password for bootup. 6.6.8 Delete Disk Signature After Copy Do not copy the disk signature onto target devices.
-
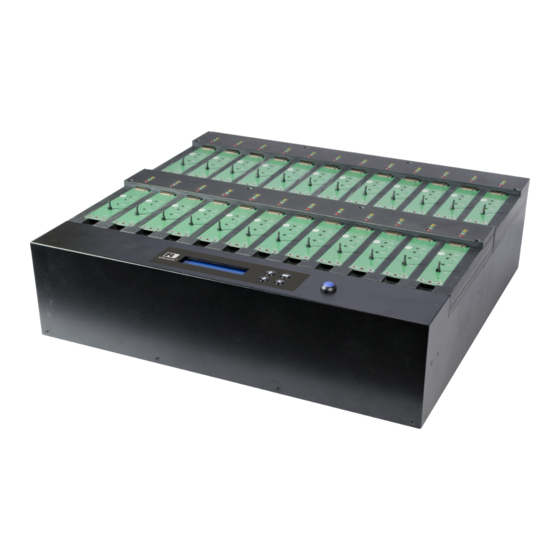
Page 8: Product Overview
Product Overview ➢ PV400E and PV800 Front View Source Port Control Buttons LCD Display Back View SD Slot for FW Update Power Switch 12V Power Adapter... - Page 9 ➢ PV1200 and PV2400 Front View Source Port OK Buttons Control Buttons LCD Display Back View Power Switch Power Input...
- Page 10 LED Status Yellow: Powered Green: Pass Red: Fail LCD Configuration Number of Target Device Confirm/OK Total Size Forward Function Backward The slowest Cancel/Back Device Time elapsed and Copied processed size copy progress...
-
Page 11: Functions
Functions 1. Copy Step 1: Prepare source and target devices. Recommendation: Target device(s)’ capacity must be equal to or larger than Note the source device capacity. Step 2: Connect source and target devices. Step 3: Proceed to copy. Scroll to select "1. Copy", then press "OK" to start the duplication process. The number of working/connected targets will be displayed on LCD. -
Page 12: Compare
2. Compare Scroll to select "2. Compare", then press "OK" to start the verification process. The number of working/connected targets will be displayed on the LCD. Press Note "OK" to start. 3. Copy+Compare Sequentially automates from Function 1, Copy to Function 2, then Compare. Scroll to select "3. - Page 13 4.4 DoD EraseComp This function will erase all data per DoD 5220.22-M Standards, then compare erasure of the connected device(s). Scroll to select "4.4 DoD EraseComp", then press "OK" to start the erasing and verifying process. 4.5 Secure Erase This function erases the non-loadable areas complying with NIST 800-88 Standards. Scroll to select "4.3 Secure Erase ", then press "OK"...
- Page 14 Note Ensure that the SSD does not have any bad sectors. The firmware update process may take longer than 5 minutes. Please do not disrupt power or process during BIOS update. If interrupted, the system will Caution become useless. When the update completes, a message will display on the LCD and ask to turn off the machine for 5 seconds.
-
Page 15: Setup
6. Setup This menu will reveal submenus related to copy area, skip bad sector, and setting language. Scroll to select "6. Utility”, then press "OK" to view the submenus. 6.1 Start-up Menu This function allows user to select the default function to display after equipment initialization. - Page 16 - 6.6.1 Unknown Format - 6.6.4 Wait HDD Time - 6.6.6 Stop Motor Time Using appropriate copy modes can greatly reduce operation time and increase efficiency. There are four copy modes with different copy methods. ❶System and Files Copies data and skips empty space. Only supports standard formats. Scroll to select "6.2 Copy Area >...
- Page 17 ❸Whole Device Copies all source data, bit-by-bit. Scroll to select "6.2 Copy Area > Whole Device”, then press "OK" to save the copy method. Copies the whole source device, irrespective of content, format, partition, or empty space. This mode does not analyze the data. [Copy Area] Whole Device ➍Percentage (%)
- Page 18 [Copy Area] Percentage (%) 6.3 Copy GPT Backup Area Disabling this function allows the duplicator to copy from big capacity device to small capacity device(s). Note The partition size of the source HDD must be smaller than target capacity. GPT Index Partition Disabling function “6.3 Copy GPT Backup Area”...
- Page 19 recommended to set “Skip Bad Sectors” at "0.” Bad sectors can be set as unlimited or at a value from 0 to 65,535. [Skip Bad Sectors] 1000 Caution The “Copy+Compare” function is advised for enhanced copy accuracy. 6.5 Language Select English, Japanese, Spanish. Scroll to select "6.5 Language”, then press "OK.”...
- Page 20 6.6.3 Erase Pattern Scroll to select "6.6.3 Erase Pattern”, then press "OK”. Then scroll through to select one of two settings. ❶ One Byte Random character written per byte. Scroll to select "6.6.3 Erase Pattern >> One Byte”, then press "OK” to save this setting. ❷...
- Page 21 6.6.8 Delete Disk Signature After Copy Set at “Yes” means do not copy the disk signature part. This function is for Windows only. Windows will only recognize one device if you connect two or more with the same disk signature. “Compare”...
-
Page 22: How-To Plug-In M.2 Ssd
How-to plug-in M.2 SSD Step 1: Align M.2 SSD to connecting port. Step 2: Insert M.2 SSD at an angle to connecting port. Step 3: Pull back the rubber standoff. Step 4: Place M.2 SSD securely all the way down and release the rubber standoff. -
Page 23: Maintenance Guide
Maintenance Guide 5 Steps to replace M.2 socket(s) Step 1: Turn off power. For your safety, please turn off the power before inspecting or replacing the Caution socket. Step 2: Remove the faceplate screws. Please use extreme caution while using a screwdriver to remove the screws as Caution it can easily slip and damage the surrounding area. - Page 24 Step 3: Remove the cover plate. Step 4: Replace the socket(s). Step 5: Replace and secure the cover plate. *Specifications subject to change without notice.
Need help?
Do you have a question about the PV Series and is the answer not in the manual?
Questions and answers