Advertisement
Available languages
Available languages
B088XR9TJW
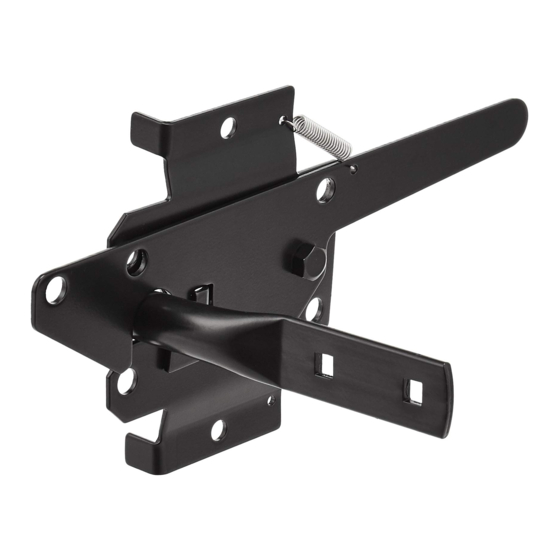
Gate Latch - Flush-Mounted, 6-Inch, Black
Cerrojo para Puertas - Montaje al Ras,
6 Pulgadas (15.2 cm), Negro
Clenche de Grille - Encastrée, 6 Po, Noir
ゲートラッチ - フラッシング取付、6 インチ、黒
This product contains small items that could be a choking hazard if swallowed. Keep these items away from young children.
CAUTION
• Make sure these instructions are read and completely understood before attempting installation.
If you are unsure of any part of this installation, please contact a professional installer for assistance.
RH
LH
1/8" (3 mm)
Determine Configuration
Determine if you need a left or right hand configuration. The latch assembly comes preconfigured for
right hand installations. For right hand configurations skip to step 1 on page 02.
Changing to Left Hand Configuration
Step 1: Remove bolt "counterclockwise" with 17/32 in. (13mm) wrench.
Step 2: Remove spring from mounting plate. Rotate latch.
Step 3: Flip entire assembly. Reinstall bolt and tighten "clockwise". Reattach spring.
A (1x)
B (1x)
C (4x)
01
Advertisement
Table of Contents

Related Manuals for AmazonBasics B088XR9TJW


Summary of Contents for AmazonBasics B088XR9TJW
- Page 1 B088XR9TJW Gate Latch - Flush-Mounted, 6-Inch, Black Cerrojo para Puertas - Montaje al Ras, 6 Pulgadas (15.2 cm), Negro Clenche de Grille - Encastrée, 6 Po, Noir ゲートラッチ - フラッシング取付、6 インチ、黒 1/8" (3 mm) A (1x) B (1x) C (4x) This product contains small items that could be a choking hazard if swallowed. Keep these items away from young children.
- Page 2 Installing Latch Assembly Step 1: Using a pencil, mark the two holes on the inside edge of the fence post for the mounting plate. Step 2: Drill 2 pilot holes using a power drill and a 1/8" (3mm) drill bit. Step 3: To install the latch assembly, tighten the 2 lag bolts "clockwise"...
- Page 3 Feedback and Help To obtain a copy of the warranty for this product: Love it? Hate it? Let us know with a customer review. amazon.com/review/review-your-purchases# amazon.com/AmazonBasics/Warranty amazon.com/gp/help/customer/contact-us +1-866-216-1072 Veuillez vous référer aux schémas en page 01 Consulte los diagramas de la página 01.
- Page 4 のパイロット穴を空けます。 ステップ 3: キーパーバーを取り付けるには、 17/32 インチ (13 mm) レンチで 「時計回りに」 回転させて、2 本のラッチボル トを締め付けます。電動ドリルに 17/32 インチ (13 mm) ソケットを使用することもできます。締めすぎないように してください。 ラッチテスト ステップ 1: レバーを持ち上げ、キーバーバーが自由に動かせるかを 確認します。ゲートを閉じ、キーパーバーがそろい、ラ ッチ捜査が簡単にできるかを確認します。 保証について 保証について この製品の保証書のコピーを入手するには: この製品の保証書のコピーを入手するには: amazon.jp/AmazonBasics/Warranty amazon.jp/AmazonBasics/Warranty +81 (0) 120-899-276 +81 (0) 120-899-276 フ ィードバック とサポート フ ィードバック とサポート 気に入っていただけま したか?お気に召しませんでしたか? カスタ 気に入っていただけま したか?お気に召しませんでしたか? カスタ マーレビューでお知らせく ださい。 マーレビューでお知らせく ださい。 amazon.jp/review/review-your-purchases# amazon.jp/review/review-your-purchases# amazon.jp/gp/help/customer/contact-us amazon.jp/gp/help/customer/contact-us...
Need help?
Do you have a question about the B088XR9TJW and is the answer not in the manual?
Questions and answers