Table of Contents
Advertisement
Quick Links
Advertisement
Table of Contents

Related Manuals for HOSCH A1

Summary of Contents for HOSCH A1
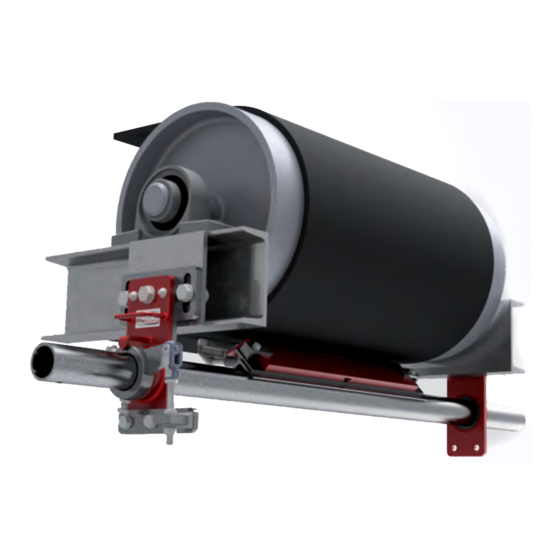
- Page 1 HOSCH SPRUNG BLADE SCRAPER TYPE A1 Installation and Operation Manual...
-
Page 2: Intended Use
4. Periodic maintenance according to the manufacturer’s instructions Intended use The HOSCH Sprung Blade Scraper Type A1 cleans conveyor belts from adhering bulk material before it enters the conveyor line. The scraper Type A1 is installed on the lower belt behind the discharge pulley. General operating conditions... - Page 3 Do not attempt to make any modifications or alterations to the device regarding the configuration, installation, operation and maintenance without written approval from HOSCH. Unauthorised modifi- cations or alterations to the device could lead to serious damage to property and personnel.
-
Page 4: List Of Tools
C Assembly carrier Design The HOSCH Sprung Blade Scraper Type A1 is used as a main scraper. The modules are designed in a single row with 15° inclination, they are overlapping and spring-loaded. The modules consist of a blade and a tensioning element. -
Page 5: Determine The Installation Position
(minimum space requirement = 300 mm). 2. Cut out the installation hatch 1. Measure and mark the installation hatch relative to the point PC. 2. Cut out the hatch. 5 / 20 Installation and Operation Manual Type A1... - Page 6 1. Determine the position of the mountings from the assem- bly carrier centre point PC. 2. The mountings should preferably be installed at solid unbendable conveyor frame parts, e.g. beams. 4. Install the mountings Install the mountings on both sides. 6 / 20 Installation and Operation Manual Type A1...
- Page 7 1. Push the module (1) into the C-shaped mounting plate of the assembly carrier (2) and push it to the right up to the stop (3). 2. Fasten the modules with the clamp screw (4) and secure with the counter nut. Installation and Operation Manual Type A1 7 / 20...
- Page 8 2. Slide the assembly carrier over the C-hook (3) into the rear assembly carrier locking device. 3. Push the assembly carrier locking device onto the assembly carrier tube and fasten it again with the fastening screw. 8 / 20 Installation and Operation Manual Type A1...
- Page 9 2. Align the assembly carrier parallel to the belt and centre 3. Adjust the threaded rod of the tensioning unit to a projection of approx. 15 mm and tighten the clamp screws (1) of the tension lever (2). 9 / 20 Installation and Operation Manual Type A1...
- Page 10 2. Lock the position with the counter nut (2). Note: If the belt is lifted significantly during the tensioning process, use the adjusting nut to pre-tension the scraper further, or provide a counter-pressure roller. 10 / 20 Installation and Operation Manual Type A1...
- Page 11 30 min. Make sure that there are no persons in the dangerous areas of the conveyor. Pay attention to the rules on how to restart the conveyor belt safely. 11 / 20 Installation and Operation Manual Type A1...
-
Page 12: Maintenance
Loosen the adjusting nut (1) of the tensioning unit until the cleaning tips are no longer in contact with the belt. Do not change the position of the counter nut (2). 12 / 20 Installation and Operation Manual Type A1... - Page 13 Remove the fastening screw (1) of the assembly carrier locking device with tensioning unit (2). Pull the assembly carrier locking device together with the assembly carrier off the guide bolts (3). The assembly carrier is now held by the C-hook (4) of the mounting. 13 / 20 Installation and Operation Manual Type A1...
- Page 14 For very short assembly carriers, the lever arm can be extended by inserting a tube into the assembly carrier. As an option, HOSCH offers an insertable assembly carrier extension as an installation aid. 14 / 20 Installation and Operation Manual Type A1...
- Page 15 Insert the adapter (1) for the extension tube (2) into the assembly carrier tube and clamp it with the screw (3). Insert the extension tube into the adapter and snap it into place. The assembly carrier can now be guided more easily during removal. 15 / 20 Installation and Operation Manual Type A1...
- Page 16 The installation is done in reverse order. Note: When inserting the assembly carrier into the conveyor system, make sure that the cleaning blades are aligned parallel to the assembly carrier and do not turn out of position. 16 / 20 Installation and Operation Manual Type A1...
- Page 17 Turn the adjusting nut (1) of the tensioning unit until the counter nut (2) comes into contact. If the position of the counter nut has not been changed, the scraper is back in its original working position. 17 / 20 Installation and Operation Manual Type A1...
-
Page 18: First Inspection
Maintenance Under normal operating conditions carry out an inspection every 8 to 12 weeks. If necessary carry out any maintenance work required. Please contact HOSCH for all questions about maintenance intervals and required maintenance steps. Maintenance steps 1. Clean all scraper components. -
Page 19: Technical Alterations
Upon request, the HOSCH service department can coordinate the required inspection and service work. HOSCH service staff are available world-wide to carry out the work. In addition, HOSCH offer customer training seminars on the selection, installation, inspection and service of its conveyor belt cleaning and tracking systems. - Page 20 HOSCH Fördertechnik Recklinghausen GmbH reserves the right to make changes without notice to both this document and to its products described within this document. Nothing in this publication represents any contractual or other commitment on the part of HOSCH Fördertechnik Recklinghausen GmbH and should not be taken as such.
Need help?
Do you have a question about the A1 and is the answer not in the manual?
Questions and answers