Advertisement
Quick Links
Advertisement

Related Manuals for Armor DINGO

Summary of Contents for Armor DINGO
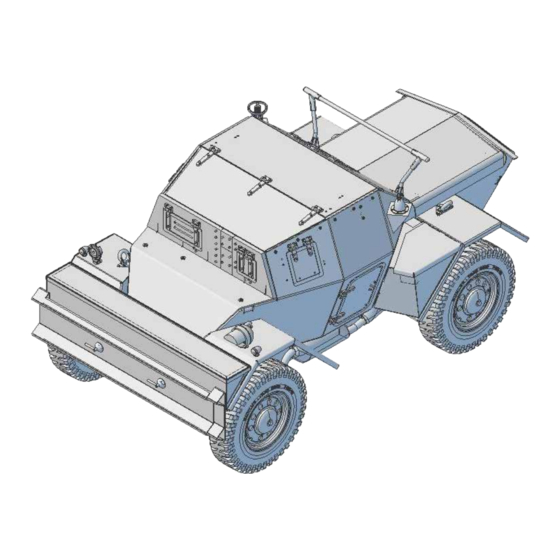
- Page 1 DINGO DAIMLER SCOUT CAR Mk.II Manual...
- Page 2 Congratulations with your purchase of the Westfront Armor Daimler Dingo MkII kit. This is a 1/6 metal model kit for the experienced modeller. We assume you have knowledge of / can perform small tasks like drilling, filing, sanding and bending small metal parts.
- Page 3 About the material used The parts use in this kit are mainly made of iron, steel, auminium, white metal and brass. Many of the iron parts are coated to prevent rust and to make applying the paint easier. Metric system We’re a dutch company so parts, srews, nuts &...
- Page 4 M3x16mm Notice: Align gears and fasten. Tip: For the alumium parts use sandpaper to take the sharp edges of and to roughen the surface for better painting. DINGO WesTfrONT ArMOr SupporT@WESTFroNTArMor.NL THE NETHErLANDS DAIMLER SCOUT CAR Mk.II...
- Page 6 M3x25mm Notice: Align gears and fasten. Tip: For the alumium parts use sandpaper to take the sharp edges of and to roughen the surface for better painting. DINGO WesTfrONT ArMOr SupporT@WESTFroNTArMor.NL THE NETHErLANDS DAIMLER SCOUT CAR Mk.II...
- Page 8 Do not over tighten bolts . Check movement gearbox. Tip: For the alumium parts use sandpaper to take the sharp edges of and to roughen the surface for better painting. DINGO WesTfrONT ArMOr SupporT@WESTFroNTArMor.NL THE NETHErLANDS DAIMLER SCOUT CAR Mk.II...
- Page 10 Tip: For the alumium parts use sandpaper to take the sharp edges of and to roughen the surface for better painting. DINGO WesTfrONT ArMOr SupporT@WESTFroNTArMor.NL THE NETHErLANDS DAIMLER SCOUT CAR Mk.II...
- Page 12 M4x19mm suspension housing spring big spring small upper spring block bolt upper spring block M4x10mm Tip: Use loctite, especially for all the moving parts. DINGO WesTfrONT ArMOr SupporT@WESTFroNTArMor.NL THE NETHErLANDS DAIMLER SCOUT CAR Mk.II...
- Page 14 M4x19mm suspension housing spring big spring small upper spring block bolt upper spring block M4x10mm Tip: Use loctite, especially for all the moving parts. DINGO WesTfrONT ArMOr SupporT@WESTFroNTArMor.NL THE NETHErLANDS DAIMLER SCOUT CAR Mk.II...
- Page 16 M4x19mm suspension housing spring big spring small upper spring block bolt upper spring block M4x10mm Tip: Use loctite, especially for all the moving parts. DINGO WesTfrONT ArMOr SupporT@WESTFroNTArMor.NL THE NETHErLANDS DAIMLER SCOUT CAR Mk.II...
- Page 18 M4x19mm suspension housing spring big spring small upper spring block bolt upper spring block M4x10mm Tip: Use loctite, especially for all the moving parts. DINGO WesTfrONT ArMOr SupporT@WESTFroNTArMor.NL THE NETHErLANDS DAIMLER SCOUT CAR Mk.II...
- Page 20 - inner hex bolt M3x12mm (2x) - inner hex bolt M3x20mm (1x) - nut M3 (3x) Look on the inside: How to fabricate the drive shafts and steering rod assembly DINGO WesTfrONT ArMOr SupporT@WESTFroNTArMor.NL THE NETHErLANDS DAIMLER SCOUT CAR Mk.II...
- Page 21 4x drive shaft assembly connect to axle thick connect to long (nr in pack 01 stub axle + pack 02) connect steering rod assembly...
- Page 22 M3x16 Tire mounting tool (not shown in drawing) Look inside for mounting tyre on rim. Tip: clean up wheel cover and make fit in rim before assembling of the wheelset. DINGO WesTfrONT ArMOr SupporT@WESTFroNTArMor.NL THE NETHErLANDS DAIMLER SCOUT CAR Mk.II...
- Page 23 Rim + mounting tool + tire Place mounting tool on front of the rim Place the tire on the mounting tool and push it over the rim.
- Page 24 How to fabricate the hinges with the supplied hinge tool and drill and fabrication of the lock bolt. Do not tighten hing bolts. In a later stage (pack 12) there will be hinge levers added. DINGO WesTfrONT ArMOr SupporT@WESTFroNTArMor.NL THE NETHErLANDS...
- Page 25 Use the 1,6 mm drill to open clogged holes in hatches and hinges. place hinge parts in hinge tool. use drill 1,2 mm to drill a hole through both use file to make the hinge parts. Clean the drill repeatedly while drilling hinge parts fit.
- Page 26 M1,6 (for mounting on hull) Look on the inside: How to fabricate the levers. Tip: After fabrication of the levers and hatches, glue/loctite nuts and bolts for fixation. DINGO WesTfrONT ArMOr SupporT@WESTFroNTArMor.NL THE NETHErLANDS DAIMLER SCOUT CAR Mk.II...
- Page 27 Tip: Draw scratch markings for bending (black lines in drawing). redrill small holes with 1,6mm drill before cutting parts out of the set. Bend small parts 90˚ as shown in drawing. use (Gorilla) glue to fi xate M2 nuts when levers are fabricated, check movement in levers.
- Page 28 For bending with pliers use the markings on roofrail parts. outside view Drill 3mm holes in the toolbox for mounting to body and fender, after mounting, glue strip in place. DINGO WesTfrONT ArMOr SupporT@WESTFroNTArMor.NL THE NETHErLANDS DAIMLER SCOUT CAR Mk.II...
- Page 29 roof rail front inside view use a file to flatten this edge for better fitting of the mid section (pack 15). outside view roof rail rear Glue strip in place...
- Page 30 Notice: For bending with pliers use the markings on roofrail parts. outside view Drill 3mm holes in the toolbox for mounting to body and fender, after mounting, glue strip in place. DINGO WesTfrONT ArMOr SupporT@WESTFroNTArMor.NL THE NETHErLANDS DAIMLER SCOUT CAR Mk.II...
- Page 31 inside view roof rail front use a file to flatten this edge for better fitting of the mid section (pack 15). Glue strip in place roof rail rear outside view Sand the rear fender side of the middle tool box down to make it fit between the rear and front fender.
- Page 32 Do NoT TIGHTEN THESE 6 BoLTS, THE THrEAD IN THE CHASSIS MAYBE DAMAGED BY THIS! Decide now if and where to make a hole/opening for wiring/connector speedcontroler which can be mounted behind the petrol tank ?!?. DINGO WesTfrONT ArMOr SupporT@WESTFroNTArMor.NL THE NETHErLANDS...
- Page 33 use a file to flatten this edge for better fitting of the mid section. (on adapter tube the other side also). for fitting rear side hull on chassis, inner hex bolt M4x25mm, spacer ring M4. Decide now if and where to make a hole/opening for wiring/connector speedcontroler which...
- Page 34 Look for bigger drawing on the inside. Tip: Use the build radiator grill for fitment of the bonnet (to bend the bonnet into shape) before mounting into hull. DINGO WesTfrONT ArMOr SupporT@WESTFroNTArMor.NL THE NETHErLANDS DAIMLER SCOUT CAR Mk.II...
- Page 35 Tip: countersink first m3 nuts for tight fitment...
- Page 36 (pack 18) for exact fitting bren hatches. For the alumium parts use sandpaper to take the sharp edges of and to roughen the surface for better painting. DINGO WesTfrONT ArMOr SupporT@WESTFroNTArMor.NL THE NETHErLANDS DAIMLER SCOUT CAR Mk.II...
- Page 37 Bolt lock Drill hole to make bolt fit and use glue for fixing bolt. Check movement hinge. use a file to make hatches use file to open part fit in front armour plates. for fitting bolt lock...
- Page 38 1x inner hex bolt countersunk head M3x8mm (fit steering (pack 28)) 4x nut M3 (for mounting into hull not shown in drawing) 2x inner hex bolt countersunk head M2x5mm (for mounting to roof rail) Look for bigger drawing on the inside. DINGO WesTfrONT ArMOr SupporT@WESTFroNTArMor.NL THE NETHErLANDS...
- Page 39 After dry fitting into hull, draw position of drill hole for fixing roof rail to front armour plate. Drill hole 1,6mm to tap M2 thread.
- Page 40 1x rear plate top 4x inner hex bolt countersunk head M3x8mm (for mounting into hull) 2x nut M3 (for mounting into hull not shown in drawing) Look for bigger drawing on the inside. DINGO WesTfrONT ArMOr SupporT@WESTFroNTArMor.NL THE NETHErLANDS DAIMLER SCOUT CAR Mk.II...
- Page 42 Tip: Always dry fit the parts before mounting and use loctite on moving parts, bolts and nuts. Front plate 1x front plate 4x inner hex bolt countersunk head M3x8mm (for mounting on chassis) DINGO WesTfrONT ArMOr SupporT@WESTFroNTArMor.NL THE NETHErLANDS DAIMLER SCOUT CAR Mk.II...
- Page 44 4x nut M3 (for mounting/aligning stabilization rod) 18x inner hex bolt countersunk head M2x5mm 18x nut M2 2x inner hex bolt countersunk head M2x8mm Look on the inside: How to fabricate the roof mechanism. DINGO WesTfrONT ArMOr SupporT@WESTFroNTArMor.NL THE NETHErLANDS DAIMLER SCOUT CAR Mk.II...
- Page 45 use (4x) M2 bolts and nuts for fitting roof Mid section hull fitment Tip: mechanism to mid section hull Draw scratch markings for bending (thick black lines in drawing). redrill small holes with 2mm drill before cutting parts out of the set. Redrill holes with 3mm drill Bend small parts 90˚...
- Page 46 3x hinge long (two parts composed with hinge tool see pack 11) 12x brass round head bolts M1,6x10mm 12x brass nut (not shown in drawing) M1,6 Look for bigger drawing on the inside. DINGO WesTfrONT ArMOr SupporT@WESTFroNTArMor.NL THE NETHErLANDS DAIMLER SCOUT CAR Mk.II...
- Page 48 Tip: Always dry fit the parts before mounting and use loctite on moving parts, bolts and nuts. Bonnet 1x bonnet 6x earth magnets (not shown in drawing) Look for bigger drawing on the inside. DINGO WesTfrONT ArMOr SupporT@WESTFroNTArMor.NL THE NETHErLANDS DAIMLER SCOUT CAR Mk.II...
- Page 49 Place magnets (on both sides)
- Page 50 1x toolbox 2x M3x8 hex bolt + M3 nut (not shown in drawing) 3x hinges to be made from 2 parts each (not shown in drawing) Look for bigger drawing on the inside. DINGO WesTfrONT ArMOr SupporT@WESTFroNTArMor.NL THE NETHErLANDS DAIMLER SCOUT CAR Mk.II...
- Page 51 Holes inside toolbox for M3 hex bolt. Drill holes in fenders for mounting...
- Page 52 Tip: Always dry fit the parts before mounting and use loctite on moving parts, bolts and nuts. Ramps 2x ramp 2x M3x6 hex bolt (not shown in drawing) 2x mounting levers Look for bigger drawing on the inside. DINGO WesTfrONT ArMOr SupporT@WESTFroNTArMor.NL THE NETHErLANDS DAIMLER SCOUT CAR Mk.II...
- Page 53 Glue mounting levers onto M3x8 hex bolt...
- Page 54 2x curved rod 1x long rod TIP: Fit the bracket in roof bracket mount (pack 26) and glue the bracket after adjusting and testing fitment of opened roof (picture inside). DINGO WesTfrONT ArMOr SupporT@WESTFroNTArMor.NL THE NETHErLANDS DAIMLER SCOUT CAR Mk.II...
- Page 55 TIP: Fit the bracket in roof bracket mount (pack 26) and glue the bracket after adjusting and testing fitment of opened roof.
- Page 56 1x bearing 13x5 mm 2x M3x12 inner hex bolt countersunk head 1x M4x10 inner hex bolt countersunk head (fit in no.15) 1x turn axle observers seat Look for bigger drawing on the inside. DINGO WesTfrONT ArMOr SupporT@WESTFroNTArMor.NL THE NETHErLANDS DAIMLER SCOUT CAR Mk.II...
- Page 57 Notice: Fit bearing uNDEr groundplate observers seat and fit turn axle from ABoVE groundplate observers seat.
- Page 58 1x steering wheel 3x M3 nut 1x M3 cap nut 1x steering rod (M3x80mm) 1x steering pipe (65mm) 2x spacer ring M3 1x mounting blok Look for bigger picture on the inside. DINGO WesTfrONT ArMOr SupporT@WESTFroNTArMor.NL THE NETHErLANDS DAIMLER SCOUT CAR Mk.II...
- Page 60 1x seat bottom 1x M3 rod 76mm 15x M3 square nut Hexbolt 8x Hexbolt M3x6 1x Lever set (not shown) 30x spacer ring M3 Look for pictures on the inside. DINGO WesTfrONT ArMOr SupporT@WESTFroNTArMor.NL THE NETHErLANDS DAIMLER SCOUT CAR Mk.II...
- Page 61 Glue all these square nuts on the (8x) M3 bolts, check movement/height seat. Set parts (2x square nut, 2x spacer ring M3, small lever) in correct position/align and glue on rod. Set parts (2x square nut, 2x spacer ring M3, small lever, big lever) in correct position/ glue square nut on rod align and glue on rod.
- Page 62 1x right aerial (base) 1x right aerial (ring) 4x right aerial (backet) 1x left aerial (base) 1x left aerial (lock) Look for bigger drawing on the inside. left aerial DINGO WesTfrONT ArMOr SupporT@WESTFroNTArMor.NL THE NETHErLANDS DAIMLER SCOUT CAR Mk.II...
- Page 64 1x headlight (base) 1x headlight (ring) 1x headlight (cap) 1x headlight (black out cover) 2x M3x8 bolt (1x M3 nut) 2x side lamps Look for bigger drawing on the inside. DINGO WesTfrONT ArMOr SupporT@WESTFroNTArMor.NL THE NETHErLANDS DAIMLER SCOUT CAR Mk.II...
- Page 65 Drill hole ø 2,5mm and use a M3 tap to make thread. Make parts fit. Drill a hole through both parts and glue a small nail in place. Check movement of the black out cover.
- Page 66 1x connecting pipe 1x end pipe Look for picture on the inside. Tip: Place a rubber tube in the exhaust for the use of a ‘smoker’ in a later stage. DINGO WesTfrONT ArMOr SupporT@WESTFroNTArMor.NL THE NETHErLANDS DAIMLER SCOUT CAR Mk.II...
- Page 67 M4 nut for locking bolt and for increasing distance between chassis beam and exhaust. Glue M4 bolts in part and part . After fitting and adjusting on chassis, glue everything together. If you want to fit a ‘smoker’ in a later stage, fit a rubber tube before glueing together.
- Page 68 Electrical parts 1x speedcontroller UFR-1230 1x sound module ESS ONE 1x servo (pack 09) 1x servo extension cable (not in picture) 1x rECEIVEr (NoT INCLuDED) Look for drawing/instructions inside. DINGO WesTfrONT ArMOr SupporT@WESTFroNTArMor.NL THE NETHErLANDS DAIMLER SCOUT CAR Mk.II...
- Page 69 The electronics are easy to connect RC Receiver Tip: please read the manuals/instructions that CH 04 Custom Sound accompany the electronics. Custom sound Engine Sound The UFR-1230 and the ESS ONE are 12volt. ESS ONE We advise to include a on/off switch. However, 12V BATTERY CH 02 we didn’t include one, you can decide.
- Page 70 PACK 33 Hull Electrical parts Suggestions for positioning uFr Speedcontroller: Crew compartiment - flat against the metal wall (For extra cooling). Make / use a strip to fasten it against the wall. The back of the petroltank (part of the resin upgrade pack) is designed to leave room for the speedcontroller and is a great way to hide it.
- Page 72 Skid plates 1x front skid plate 1x middle skid plate 1x rear skid plate 12x inner hex bolt countersunk head M3x8 Look for bigger drawing on the inside. DINGO WesTfrONT ArMOr SupporT@WESTFroNTArMor.NL THE NETHErLANDS DAIMLER SCOUT CAR Mk.II...
Need help?
Do you have a question about the DINGO and is the answer not in the manual?
Questions and answers