Advertisement
Available languages
Available languages
Quick Links
U L
®
C
CM
US
LISTED
Selkirk DIRECT-TEMP Direct Vent system is designed for use only
with direct vent gas fired appliances certified for use with DIRECT-
TEMP, in accordance with applicable ANSI and/or CSA gas
appliance standards.
DIRECT-TEMP is listed by UL and Warnock
Hersey/ITS for use in Direct Vent Gas Appliance Systems.
CAUTION - Do not begin installing this product until you have
thoroughly read the appliance and vent system installation
instructions. Failure to comply with these instructions may lead
to hazardous conditions. Never substitute any part of the
DIRECT-TEMP Direct Vent system with components of other
systems or with any field fabricated parts. Do not modify any
part of this system unless specifically directed to do so in these
instructions.
Follow
recommendations for flue gas or intake restrictions.
Local Building or Fire Officials about restrictions and
installation inspection in your area.
GENERAL USE:
Use DIRECT-TEMP only on Direct Vent gas appliances
certified for use with DIRECT-TEMP Direct Vent system.
Installing DIRECT-TEMP:
There are two basic types of termination options for Direct Vent
Systems. Vertical Terminations (Fig 1a), and Horizontal
Terminations (Figs 1b and 1c).
Reference
the
Appliance
instructions to determine the type and limitations applicable to
the appliance being installed.
Clearance to Combustibles:
Maintain proper minimum airspace clearances to combustibles
as specified by the Appliance Manufacturer's instructions. Do
not place anything including any type of insulation in this
required air space.
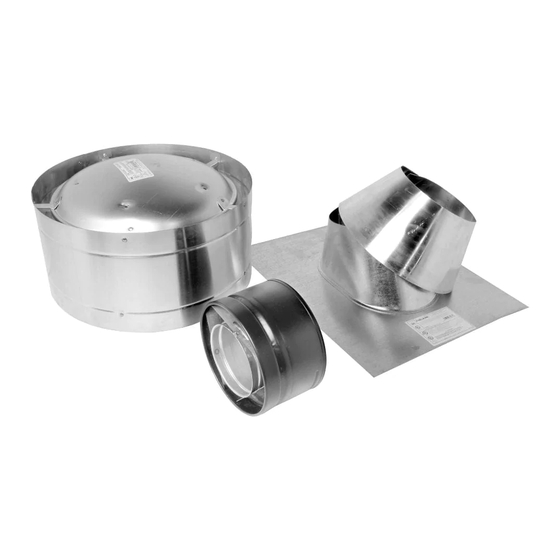
Appliance Adapter:
The Appliance Adapter (AA) adapts DIRECT-TEMP to most direct
vent appliances incorporating outlet collars configured to receive
most common 4" (ID) by 6-5/8" (OD) or 5" (ID) by 8" (OD) "Twist
Lock" style, direct-vent systems.
The adapter incorporates two indentations on the outer wall of the
inlet end, which are designed to "Twist Lock" into place upon
attachment to the appliance outlet. Align the adapter indentations
with the entry slots of the appliance outlet and slide together. Turn
the adapter clockwise approximately one-quarter turn to lock in
place. The outlet end of the adapter is standard DIRECT-TEMP
construction.
For connection of Direct-Temp to units with 4"x7" flue outlets, the
following methods have been approved:
-Install the Universal/Napoleon Appliance Adapter 4DT-AAN.
-Connect a standard Direct-Temp pipe length (do not use an
adjustable length in this application) a minimum of 1-1/2" over the
flue outlet. The outside of the Direct-Temp Length will fit inside the
flue outlet. Secure with a minimum of two #8x1/4" sheet metal
screws and seal with hi-temp silicone.
For units factory equipped with appliance adapters from other
brands of Direct Vent systems, it is permissible to simply slide a
length of DT pipe over the appliance adapter.
minimum of two #8x1/4" sheet metal screws and seal with hi-temp
silicone.
CAUTION: WEAR GLOVES WHILE
HANDLING SHEET METAL PARTS TO
AVOID PERSONAL INJURY. SHARP
EDGES OR PROJECTIONS CAN CUT YOU.
the
appliance
manufacturers
Manufacturer's
installation
Secure with a
SELKIRK DIRECT VENT
Failure to follow the installation instructions could cause
FIRE, CARBON MONOXIDE POISONING, OR DEATH. If you
are unsure of installation requirements, call the Phone
Number listed on the instructions or sizing handbook.
To install:
1) Determine whether the length of pipe fits the appliance outlet by
attempting to engage the parts.
proceed to step 2. If obstructions, interference or loose fit is noted,
contact the appliance manufacturer or Selkirk with the dimensions of the
appliance outlet.
2) Slide the length of pipe over the appliance outlet a minimum of
Contact
1 1/2" and screw to the appliance outlet collar using a minimum of
two #8 X 1/4" sheet metal screws.
Model DT
Ceiling Support(CS)
Diameter
Firestop (FS)
4"
8-3/4" x 8-3/4"
5"
10-1/8" x 10-1/8"
Use of Sealant:
It is not required to apply or use sealant on the inner liner of
DIRECT-TEMP. For outer wall joint sealing considerations
follow appliance manufacturer recommendations.
Inlet End
To Termination
Joint Connection:
The pipe and elbows are assembled by inserting the outlet
(male) end of a length of pipe or elbow into the inlet (female) end
of an adjacent length of pipe or elbow. Make sure the outlet end
is fully seated within the inlet end of the adjoining section and
the gasket, located on the inner liner of the inlet section is fully
enclosed by the inner liner of the outlet of the
adjoining section. Push in the Lock Tab such that it becomes
seated within the inward groove of the adjoining section. This
locks the joint in place (see Figure 2).
Supporting DIRECT-TEMP: Vertical Support
Vertical Installations can be supported by two methods.
Ceiling Support
Plate
1
DIRECT-TEMP
SYSTEM
! WARNING
If the parts engage smoothly,
Framing Dimensions Table 1
Cathedral Ceiling
Support (CCS)
10-5/8" x 10-5/8"
14-1/2" x 14-1/2"
Gasket
Lock Tab
FIG. 2 JOINT CONNECTION
Trim Plate
FIG. 3 CEILING SUPPORT
®
Wall Thimble (WT)
8-3/4" x 8-3/4"
10-1/8" x 10-1/8"
Outlet End
To Appliance
Ceiling Support
Collar
Advertisement

Subscribe to Our Youtube Channel
Related Manuals for Selkirk DIRECT-TEMP


Summary of Contents for Selkirk DIRECT-TEMP
- Page 1 -Install the Universal/Napoleon Appliance Adapter 4DT-AAN. -Connect a standard Direct-Temp pipe length (do not use an adjustable length in this application) a minimum of 1-1/2” over the flue outlet. The outside of the Direct-Temp Length will fit inside the Ceiling Support Ceiling Support flue outlet.
- Page 2 Vertical Termination Horizontal Termination (HC or AHT) - OR - (VT) (VC) Wall Thimble (WT) (Optional) Storm Collar (SC) Pipe Length Trim Plate (TP) (Required if Wall Roof Flashing (AF) Thimble is not used) Appliance Adapter (AA) Attic Insulation Shield (AIS) Ceiling Support (SC) Trim Plate (TP) FIG 1b...
- Page 3 Supporting DIRECT-TEMP: Horizontal Support The Wall Thimble also acts as a firestop. At other locations, a Horizontal runs of Direct-Temp should be supported every 4 ft. Firestop Spacer (FS) should be installed. In the attic the This can be done with the use of plumbers strapping or the firestop should be placed on top of the joist framing to prevent Offset Support.
-
Page 4: Horizontal Installation
Inside Corner Detail Fixed Fixed Operable Closed Closed Operable 1 2 3 4 5 6 1 2 3 4 5 6 1 2 3 4 5 6 = VENT TERMINAL = AIR SUPPLY INLET = AREA WHERE TERMINAL IS NOT PERMITTED 1 2 3 4 5 6 1 2 3 4 5 6 1 2 3 4 5 6... - Page 5 7) If a Wall Thimble is used, push the pipe (which is connected However, there may be some manufacturers that require it. Contact to the appliance) carefully until the DIRECT-TEMP pipe appliance manufacturer for information if uncertain. When installed becomes fully engaged with the Horizontal Termination, a...
- Page 6 See FIG. 14. Ceiling Support Plate Ceiling Support Collar NOTE: Whenever DIRECT-TEMP penetrates through a ceiling, a floor or a wall, it must be firestopped. 12) Using a level, make sure the system is perfectly vertical. Trim Plate 13) Slide the Flashing, suitable for the roof pitch, down over the pipe protruding through the roof.
-
Page 7: Règles Générales
Installation du modèle DIRECT-TEMP: Il n’est pas requis d’utiliser ou d’appliquer un scellant de Il y a deux options de capuchon pour le modèle DIRECT-TEMP. Le typesilicone sur le conduit interne du modèle DIRECT-TEMP. Pour sceller le conduit externe suivez les recommendations du capuchon vertical (schéma 1a), et le capuchon horizontal... - Page 8 Capuchon verticale Capuchon horizontal (HC ou AHT) - OU - (VT) (VC) Bague murale (WT) (option) Collet de solin (SC) Longueur de tuyau Plaque décorative (TP) (requis si bague Solin (AF) murale n’est utilisée) Adaptateur d’appareil (AA) Pare-feu pour le grenier (AIS) Support de plafond (CS) Plaque décorative (TP)
- Page 9 5DT-R4 approprié. (Réducteur) Coupe-feu Le système DIRECT-TEMP doit être recouvert d’un coupe-deu lorsqu’il traverse un plancher(s), plafond(s) ou mur(s). Le seul endroit ou un Schéma 7a coupe-feu n’est pas nécessaire est au niveau du toit. Les deux supports Réducteur...
-
Page 10: Installation Horizontale
Positionnez l’appareil au gaz à Assurez-vous que la ligne centrale du tuyau aligne avec le centre de l’endroit désiré et vérifiez le passage du conduit DIRECT-TEMP. l’ouverture sauf indication contraire par le fabricant de l’appareil. - Page 11 7) Si un coupe-feu est utilisé, poussez prudament le tuyau (déjà au État-Unis, c’est une option. Cependant il pourrait que le attaché à l’appareil) jusqu’à ce que le tuyau DIRECT-TEMP manufacturier de l’appareil requiert l’installation d’un coupe-feu. devienne complètement engagé avec le capuchon horizontal, d’un Contactez le manufacturier pour des informations si vous avez des minimum de 1-5/8po.
- Page 12 (voir schéma 14). N.B. Chaque fois que le système DIRECT-TEMP traverse un plafond, un plancher ou un mur, un coupe-feu doit être utilisé. Plaque de support de plafond 12) Utilisez un niveau assurer que le système est parfaitement à...
Need help?
Do you have a question about the DIRECT-TEMP and is the answer not in the manual?
Questions and answers