
Related Manuals for OCULUS Easyfield C


Summary of Contents for OCULUS Easyfield C
- Page 1 ® ® OCULUS Easyfield C/Easyfield INSTRUCTION MANUAL Examination of the Central Visual Field...
- Page 2 Our service team will gladly assist you. OCULUS Optikgeräte GmbH OCULUS is certified according to DIN EN ISO 13485 and thus has established a high standard of quality for development, manufacture, quality assurance and service for our entire product line.
-
Page 3: Table Of Contents
Table of contents Scope of Delivery.........................1 Software Version ......................2 Reference numbers on the device ..................3 Structure of the Documentation ....................4 Safety instructions........................5 In this handbook......................5 4.1.1 Used pictograms....................5 Safety Instructions for Use ..................6 Intended Use..........................12 Device Description ........................13 Operation of the Easyfield®.................. - Page 4 12 Working with the Patient Data Management system ...........35 12.1 Rename Patient Data....................35 12.2 Exporting Patient Data....................35 12.3 Importing Patient Data ....................36 12.4 Data Backup ........................38 12.4.1 Backup Data....................38 12.4.2 Reconstructing Data..................39 12.4.3 Automatic Backup..................39 13 Cleaning, disinfection and maintenance ................40 13.1 Cleaning..........................40 13.2 Disinfection........................41 13.3 Maintenance .........................42...
-
Page 5: Scope Of Delivery
1 Scope of Delivery Scope of Delivery Product and accessories Order number Version: OCULUS Easyfield® C perimeter 15000 (with chin support) 15005 OCULUS-Easyfield® S perimeter Data medium with software 15110/15120 Dust cover Easyfield® C 1500011001 Dust cover Easyfield® S... -
Page 6: Software Version
1 Scope of Delivery Software Version This User Manual describes the following versions of the Easyfield®- Software together with patient data management: Easyfield®-Software: from Version 3.19 Patient Data Management Version 6.08 The software version for patient data management is displayed on the "settings"... -
Page 7: Reference Numbers On The Device
2 Reference numbers on the device Reference numbers on the device Company logo Power adapter with OCULUS no. Company address Safety symbol Date of manufacturing Protection class protection UDI-Nummer Type B unit Matrix for device identification Disposal in household trash is prohibited CE Conformité... -
Page 8: Structure Of The Documentation
3 Structure of the Documentation Structure of the Documentation A folder containing a set of documentation is supplied with your Easyfield® perimeter: Quick Guide: In this document a checklist of the measurement procedure is supplied. The document is intended to help you familiarize with the equipment. -
Page 9: Safety Instructions
4 Safety instructions Safety instructions This chapter contains a summary of the most important safety-related information. In this handbook Carefully read through the Instruction Manual. Keep the Instruction Manual, the Quick Guide and the User Guide in good condition near the unit. ... -
Page 10: Safety Instructions For Use
4 Safety instructions > This symbol denotes menu paths and screen shots. Example: Call up a new patient: Easyfield® > Examination > New Patient That is: Open the Easyfield® program. In the menu list, select the ”Examination“ menu item. ... - Page 11 If you detect damage to the connection, you should let our service department or authorized dealer repair the damage. Use only the OCULUS USB FS MED isolator (no. 01 56920 00 010) for a USB connection. Instruction Manual Easyfield® (GA/15000/XXXX/EN 1219 Rev01)
- Page 12 4 Safety instructions Patient environment information Patient environment is the area where patients can come into contact with any part of a medical electrical equipment (ME equipment) or with another person being in contact with the ME equipment. In the patient environment, use devices that conform to IEC 60601-1.
- Page 13 4 Safety instructions Instructions for operation Before first use: Let OCULUS or an authorized dealer train you in the operation of the Easyfield®. Never operate a damaged Easyfield®. Only operate the Easyfield® using original accessory parts supplied by us, and when the device is in technically correct working order.
- Page 14 If you are using a new computer for the Easyfield®, you must have the electrical safety checked. Call OCULUS Service for this purpose. Electromagnetic Compatibility (EMC/Cables) Risk of personal injury or damage to property due to electromagnetic in-...
- Page 15 4 Safety instructions Precautions for access control of the computer Secure the computer with a password (for example at Windows start up). Choose a complex password: A good password should be at least eight characters long and are not in the dictionary. In addition to letters, it should also include numbers and special characters.
-
Page 16: Intended Use
5 Intended Use Intended Use The Easyfield® is intended for the use described in this Instruction Manual. It is designed for testing the visual field of the human eye. The Easyfield® offers pre programmed combinations for often needed examination routines. For example: Screening 24-2, SPARK Quick, Macula. -
Page 17: Device Description
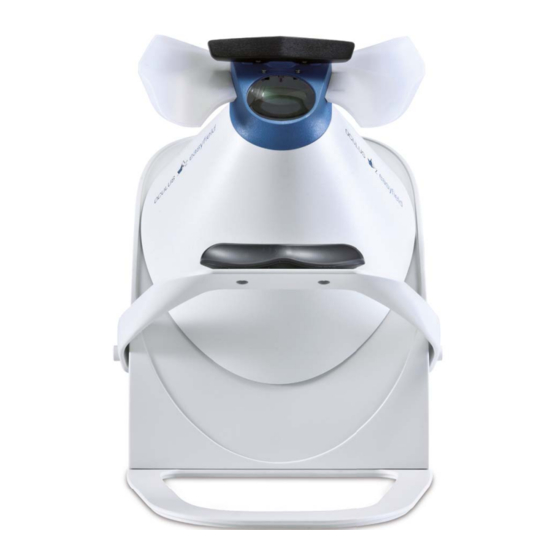
6 Device Description Device Description Forehead rest Stand support* Eye shield Power On/Off switch Perimeter cone with mounts for correction lens holder Port for external power supply Chin rest* USB port for connection with netbook/PC/laptop Chin rest adjustment knob* Port for connection with hand-held button Fig. -
Page 18: Operation Of The Easyfield
This program compares existing exams and provides support in a progression analysis. Note Misuse of data OCULUS Optikgeräte GmbH can not be held liable in any form for further use of the data recorded by a Easyfield® and for the evaluations it has calculated. 14 / 60... - Page 19 6 Device Description Applied parts 1 Chin rest (Easyfield® C only) 2 Hand-held button 3 Forehead rest Fig. 6-2: Applied parts Instruction Manual Easyfield® (GA/15000/XXXX/EN 1219 Rev01) 15 / 60...
-
Page 20: Preliminary Steps
Before you use the device for the first time, the Easyfield® must be installed and connected by our service personnel or by an OCULUS- authorized specialist. Install the software If you are working with a PC or laptop, you must install the Easyfield®... - Page 21 7 Preliminary steps Warning Electrical safety hazard due to wrong power cord Only use a power cord which meets the requirements of the standards IEC 60227-1, Type 53, min. 0,75 m² and IEC 60320-1. Caution Electrical safety hazard Do not use the Easyfield®...
- Page 22 7 Preliminary steps Connect the hand-held button (1). Connect the netbook (2). Connect the USB cabe with the USB FS MED isolator. Connect the isolator with the computer. Port for hand-held button Port for external power supply USB port for connection with netbook/PC/laptop Fig.
-
Page 23: Setup Tasks For Initial Start-Up
8 Daily operation Setup tasks for Initial Start-Up When you connect the Easyfield® with a PC for the first time, you will have to perform several set up steps. To avoid communications problems, deactivate the power saver mode of the USB units of the operating system. ... -
Page 24: Patient Data Management
9 Patient Data Management Patient Data Management Use the Patient Data Management to input and manipulate patient data. Additional functions of the Patient Data Management system are found sec. 12, page 35 and in the User Guide. Starting Patient Data Management After you have switched on the PC, it first loads the operating system. -
Page 25: Enter A New Patient
9 Patient Data Management 9.1.1 Enter a new patient Press the [New] button to enter a new patient into the Patient Data Management system. Enter the patient's last name, first name and date of birth completely in the patient data (8). Fig. -
Page 26: Starting The Easyfield® Program
9 Patient Data Management Extended patient search: [Extended] checkbox Click on the checkbox [Extended]. The screen displays additional search parameters which reference previous examinations, for example. Proceed as for the input of a patient name. Fig. 9-4: Extended search Starting the Easyfield®... -
Page 27: The Easyfield® Program
10 The Easyfield® program 10 The Easyfield® program You can get to the menu list from any screen of the Easyfield® program. Fig. 10-1: Menu list with function buttons The meaning and function of the individual symbols are found in the User Guide. -
Page 28: Measurement Procedure
11 Measurement Procedure 11 Measurement Procedure Caution Risk of incorrect measurement due to incorrect use Before first use: Let OCULUS or an authorized dealer train you in the operation of the Easyfield®. 11.1 Preparing the Examination 11.1.1 Selecting the Examination program ... - Page 29 11 Measurement Procedure Click in the "Correction" field. The following screen appears: Fig. 11-1: Input of the known refraction values If you know the patient's refraction values: Enter the values into the fields in the „trial Lens Rx“ group box. ...
-
Page 30: Inserting The Corrective Lens
11 Measurement Procedure 11.1.3 Inserting the Corrective Lens Place the required trial lens with the previously determined corrective power into the lens holder included in the delivery. Fasten the lens holder to the perimeter cone of the Easyfield® perimeter using the available mounts. -
Page 31: Positioning The Patient
11 Measurement Procedure 11.1.5 Positioning the patient Do not touch the patient and the Easyfield® simultaneously. 1 Chin rest 3 Moving cone 2 Forehead rest 4 Adjusting knobs on the chin rest Fig. 11-4: Positioning aids (Easyfield® C) Easyfield®... - Page 32 11 Measurement Procedure Make sure that the distance between the eye and the corrective lens, or the eye and the perimeter is no greater than 1 cm. Fig. 11-5: Distance between eye and corrective lens Ask the patient to lean rest his forehead against the forehead rest (2) so that the fixation marks (four red dots) in the center of the perimeter bowl are clearly visible with the eye that is to be examined.
-
Page 33: Positioning Of The Pupil
11 Measurement Procedure 11.1.6 Positioning of the pupil Ask the patient to fixate on the middle of the four red points. The pupil is correctly positioned when it is displayed in the red square. Note If necessary, adjust the camera image settings in the Easyfield® program settings so that the movements of the eye are displayed in the convenient way (mirrored or not mirrored). - Page 34 11 Measurement Procedure The following dialog appears so that you can check the data that you have entered: Fig. 11-8: Display of the general data Recommendation: Activate the checkbox [Show peripheral positioning lights]. This function helps the self-positioning of the patient. The lighting LEDs form a luminous ring, if this ring is uniformly perceived, the positioning is correct.
-
Page 35: Interrupting The Examination
11 Measurement Procedure 11.3 Interrupting the Examination If you would like to interrupt the examination: the cursor must be located in the main frame of the Easyfield® program window. Main frame of the Easyfield® program window Fig. 11-10: Easyfield® program window ... -
Page 36: Ending The Examination
11 Measurement Procedure 11.4 Ending the Examination At the end of an examination, the following dialog box appears: Fig. 11-12: Save the examination results Now decide how you want to proceed, based on the examination results. Tell the patient that the examination has been stopped and that the patient can relax. -
Page 37: Performing A Re-Examination
11 Measurement Procedure 11.5 Performing a re-examination If you want to check peculiar test points, you can conduct a re- examination. Proceed as follows: Press the [Re-Examination] button. Three additional buttons appear at the bottom right of the displayed examination results. - Page 38 11 Measurement Procedure Press the [Add grid] button to add a predefined grid of test points. In this case, an additional dialog appears in which you can select the test point grid: Fig. 11-14: Selection of the grid that is to be added for re-examination purposes ...
-
Page 39: Working With The Patient Data Management System
12 Working with the Patient Data Management system 12 Working with the Patient Data Management system This section describes how to work with the Patient Data Management system Rename it, sec. 12.1, page 35 Export it, sec. 12.2, page 35 ... -
Page 40: Importing Patient Data
12 Working with the Patient Data Management system The default options for import and export of data are configured in the "Settings" field, see also the User Guide. Depending on the settings, you may not have to perform all of the follow- ing steps (e.g. - Page 41 12 Working with the Patient Data Management system Press the [Import] button. The following dialog will be displayed: 1 Select the source of the data 4 [Import] button 2 [...] button to select a folder 5 Patient list 3 Examinations list Fig.
-
Page 42: Data Backup
12 Working with the Patient Data Management system 12.4 Data Backup You should make a backup copy of patient and examination data at regular intervals. In case of loss of data, you can reconstruct the data from a previously created backup with the help of this function. Since data backup takes several minutes, depending on the scope of the database and the data to be backed up, a backup should be carried out when the PC and the device will not be needed. -
Page 43: Reconstructing Data
12 Working with the Patient Data Management system The Patient Data Management system internally tags all saved data records. If you select the option "Changed and new data only", only the data records that were not saved during a previous backup will be backed up. ... -
Page 44: Cleaning, Disinfection And Maintenance
13 Cleaning, disinfection and maintenance 13 Cleaning, disinfection and maintenance This section describes how to clean and disinfect the Easyfield®. Sterilization is not required. Heed the product descriptions and instruction manuals of products and equipment you use to care for, clean, and disinfect the unit and/or its accessories. -
Page 45: Disinfection
13 Cleaning, disinfection and maintenance Cleaning Switch off the Easyfield®, sec. 8.2, page Disconnect the power plug. When cleaning, use a damp cloth and make sure that no liquid enters the Easyfield®. Clean the plastic surfaces with the appropriate cleaner. ... -
Page 46: Maintenance
If an error occurs that you cannot correct: Identify a damaged Easyfield® as being out of service. Report the damage to OCULUS Service department or to your authorized dealer. Only use an undamaged Easyfield®. 42 / 60... -
Page 47: Troubleshooting
14 Troubleshooting 14 Troubleshooting Caution Personal injury or equipment damage due to improper troubleshooting. If an error occurs which you are unable to correct by following the instructions below, label the device as "out of order" and contact our service department or an authorized dealer. -
Page 48: Transport And Storage
15 Transport and storage 15 Transport and storage The Easyfield®must be properly dismounted and packed before being transported or stored. 15.1 Disassembly and packing Select Patient > New Patient / End. Exit the Patient Data Management system. Power down the PC/laptop. -
Page 49: Disposal
16 Disposal After transport and/or storage Wait approx. 3-4 hours after transport before putting the Easyfield® into initial operation. Extreme temperature changes from cold areas to warm rooms can cause condensation on the optical components. Note Risk of equipment damage due to incorrect shipment or from improper storage ... -
Page 50: Terms Of Warranty And Servicing
apply as per the date of purchase. 17.2 Assumption of liability for functions and damage OCULUS will only be liable for the safety, reliability and utility of the Easyfield® if you have followed the instructions below: Use the unit in conformance with the Instruction Manual and the included User Guide. -
Page 51: Manufacturer's Address And Service Department
17.3 Manufacturer’s address and service department: Our service department or authorized representatives will provide you with additional information. Address of the manufacturer and service department: Germany: OCULUS Optikgeräte GmbH Münchholzhäuser Straße 29 35582 Wetzlar GERMANY Tel.: +49 641 2005-0 Fax: +49 641 2005-295 E-mail: export@oculus.de... -
Page 52: Technical Data
18 Technical Data 18 Technical Data Measuring equipment Weight Easyfield® S 4.6 kg (10.2 lb Easyfield® C (mit Kinnstütze) 7.4 kg (16.3 lbs) Dimensions (W x D x H) Easyfield® S 274 x 370 — 470 x 314 — 429 mm (10.8 x 14.6 —... - Page 53 18 Technical Data Power adapter Power adapter GSM40B12-P1J (05150805) Mains connection 80 – 264 V AC 1 — 0,5 A Frequency 47 – 63 Hz 46 W Max. power consumption DC output 12 V 3,34 A 40 W max. Fuses integrated over current shut-off Classification per DIN EN ISO 60601 - 1 (VDE 0750) Type of protection against electrical shock...
- Page 54 18 Technical Data Transport requirements Ambient temperature -40°C to +70°C Relative humidity, including condensation 10% to 95% Air pressure 500 hPa to1060 hPa Computer Use a computer which is in conformity with the DIN EN 60950 standard. Recommended Windows 7 Pro, Intel® Core™ i5, 4 GB memory; 500 GB HDD , Intel®...
-
Page 55: Annex
EMC, and must be installed and operated according to the EMC-Instructions contained in the accompanying paperwork. No special measures need be observed in respect of OCULUS devices and systems. Portable and mobile RF-communications devices can interfere with electrically operated medical devices. -
Page 56: Guidance And Manufacturer's Declaration - Electromagnetic Emmisssions And Immunity For The Easyfield
Guidance and manufacturer´s declaration electromagentic emmissions IEC 60601-1-2, 5.2.2.1, table 1 The OCULUS Easyfield® is intended for operation in the electromagnetic environment specified below. The user of the Easyfield® should ensure that it is being used in such an environment. - Page 57 19 Annex Guidance and manufacturer´s declaration electromagentic immunity, IEC 60601-1-2, 5.2.2.1, table 2 Immunity test IEC 60601 Compliance level Electromagnetic environment - test level guidlines Electrostatic discharge ± 6 kV contact ± 6 kV contact Floors should be made of wood (ESD) ±...
- Page 58 19 Annex Guidance and manufacturer´s declaration electromagentic immunity, IEC 60601-1-2, 5.2.2.2, table 4 Immunity test IEC 60601 Compliance level Electromagnetic environment - Guidelines test level Portable and mobile RF communications equip- ment should be used no closer to any part of Easyfield®, including cables, than the recom- mended separation distance calculated from the equation applicable to the frequency of the...
- Page 59 19 Annex Recommended separation distances between portable and mobile RF communications equipment and the Easyfield®, IEC 60601-1-2, 5.2.2.2, table 6 The Easyfield® in intended for us e in an electromagnetic environment in which radiated RF disturbances are controlled. The customer or the user of the Easyfield® can help prevent electromagnetic interference by main- taining a minimum distance between portable and mobile RF communications equipment (transmitters ) and the Easyfield®...
-
Page 60: Description Of The Connection
19 Annex 19.3 Description of the Connection Easyfield® Hand held button USB Isolator Power supply adapter (05150805) Computer/PC/Laptop Mains connection 56 / 60 Instruction Manual Easyfield® (GA/15000/XXXX/EN 1219 Rev01) -
Page 61: Data Sheet Gsm40B12-P1J (05150805)
19 Annex 19.4 Data Sheet GSM40B12-P1J (05150805) Instruction Manual Easyfield® (GA/15000/XXXX/EN 1219 Rev01) 57 / 60... - Page 62 19 Annex 58 / 60 Instruction Manual Easyfield® (GA/15000/XXXX/EN 1219 Rev01)
- Page 63 19 Annex Instruction Manual Easyfield® (GA/15000/XXXX/EN 1219 Rev01) 59 / 60...
- Page 64 Manufacturer and Service Address Headquarters: OCULUS Optikgeräte GmbH Münchholzhäuser Straße 29 • 35582 Wetzlar • GERMANY Tel. +49 641 2005-0 • Fax +49 641 2005-295 E-Mail: export@oculus.de • www.oculus.de USA: OCULUS, Inc. 17721 59th Avenue NE • Arlington • WA 98223 Tel.
Need help?
Do you have a question about the Easyfield C and is the answer not in the manual?
Questions and answers
the software is showing as being OFFLINE. what does that mean