Table of Contents
Advertisement
Quick Links
1. Read all instructions.
2. Use heat press only for its intended use.
3. To reduce the risk of electric shock, do not immerse the heat press in water or other liquids.
4. Never pull cord to disconnect from outlet, instead grasp plug and pull to disconnect.
5. Do not allow cord to touch hot surfaces, allow heat press to cool completely before storing.
6. Do not operate heat press with a damaged cord or if the equipment has been dropped or
damaged.To reduce the risk of electric shock, do not disassemble or attempt to repair the
heat press. Take it to a qualified service person for examination and repair. Incorrect
assembly or repair could increase the risk of fire, electric shock, or injury to persons when the
equipment is used.
7. This appliance is not intended for use by persons (including children) with reduced physical,
sensory or mental capabilities, or lack of experience and knowledge, unless they have been
given supervision or instruction concerning use of the appliance by a person responsible for
their safety.
8. Close supervision is necessary for any heat press being used by or near children. Do not
leave equipment unattended while connected.
9. Burns can occur when touching hot metal parts.
10. To reduce the likelihood of circuit overload, do not operate other high voltage equipment on
the same circuit.
11. If an extension cord is necessary, then a 20 amperage rated cord should be used. Cords
rated for less amperage may overheat. Care should be taken to arrange the cord so that it
cannot be pulled or tripped over.
Operation Manual
(GS-206M)
Safety Instructions
When using your heat press,
basic precautions should always be followed,
including the following:
1
Advertisement
Table of Contents

Related Manuals for USCutter GS-206M


Summary of Contents for USCutter GS-206M
-
Page 1: Safety Instructions
Operation Manual (GS-206M) Safety Instructions When using your heat press, basic precautions should always be followed, including the following: 1. Read all instructions. 2. Use heat press only for its intended use. 3. To reduce the risk of electric shock, do not immerse the heat press in water or other liquids. -
Page 2: Table Of Contents
Table Of Contents Safety Instructions………………………..1 Technical Parameters…………………… Machine View…………………………….. Control Panel Guide……………………... Operating Instructions…………………… 1 5 - 1 1 ⚫ Connecting the System…………………………………………...……5 ⚫ Turning the System On…………………………………….………..6 ⚫ Adjusting the Temperature………………………………………..6-7 ⚫ Adjusting the Time………………………………………………..…..7 ⚫ Printing and Pressing………………………………………………..8-9 ⚫... -
Page 3: Technical Parameters
Technical Parameters Model: GS-206M Heater Size: W226mm*H138mm for 11oz/15oz mug Power(120volt) 4*300W/4*120W 16.1 Amps(max) Power(240volt) 4*300W/4*120W 8.1Amps(max) Temperature Range: Max.220℃/430℉ Time Range: 0~999S Machine Size: 65.2×33.9×26cm Packing Size: 73×43×37cm Packing Weight: 23kg Maximum Paper Printing Size: 11oz mug: 206*95mm(L*W) 15oz mug: 206*105mm(L*W) Suggest Temp&Time Setting:... -
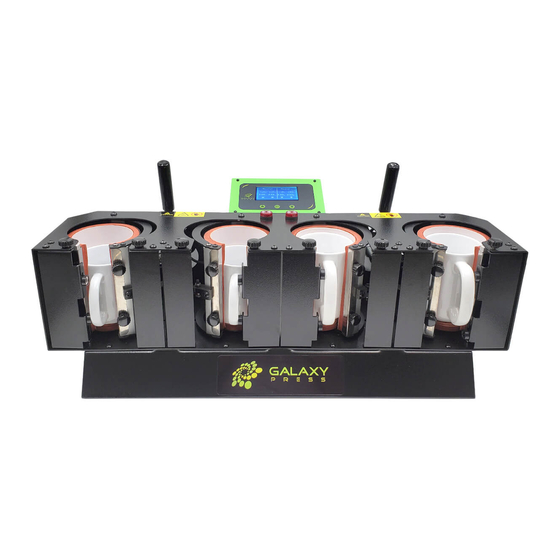
Page 4: Machine View
Machine View... -
Page 5: Control Panel Guide
⚫ VOLTAGE 120 Volt – GS-206M requires a full 20 amp grounded circuit for 120 volt operation. 240 Volt – GS-206M requires a full 10 amp grounded circuit for 240 volt operation. ⚫ EXTENSION CORDS If used, should be as short as possible and not less than 12 gauge.Heavy duty cords are recommended. -
Page 6: Turning The System On
NOTE: If the supply cord is damaged, it must be replaced by the manufacturer, its service agent or a similarly qualified person in order to avoid hazard. 2.Turn On the System ⚫ Switch on the system. (fig.2.1) 3.Adjusting the Temperature 3.1 Press the Mode Select button located in the center of the Control Panel (fig.3.1).Press (+) and (-) button to... -
Page 7: Adjusting The Time
Remark: 1. heater 1/2 represent no.1 and no.2 heater, can only be set temperature at once time together, because left air cylinder close the heater 1/2 together. Heater 1/2 can set “start temp” and “finish temp”. 2. heater 3/4 represent no.3 and no.4 heater, can only be set temperature at once time together, because right air cylinder close the heater 3/4 together. -
Page 8: Printing And Pressing
5.Printing And Pressing 5.2 for 11oz mug,use front plate for position, 5.1 Once heater reaches start For 15oz mug,use two magnetic washer for temperature,put mugs inside of mug heater position which can help handle in middle during printing process. 5.3 Adjust suitable pressure by turning 5.3 Once printing process is over, buzzer pressure knob.Then close handle to start will alarm and open the handle then take... -
Page 9: How To Change Heater
6.How to Change Heater Plug off the 4 phase plug Take off the heater. Then do the opposite operation can change a new heater onto the machine 7.Sub Menu Introduction In the time setting page, there is sub menu button, move the cursor to the button, press “set”... -
Page 10: Sub Menu Setting
7.2 Temperature calibration setting. Customer can make calibration on each heater once the heater’s temperature is not correct.(fig.7.2).Once finish setting,go to next page. 7.3 Fahrenheit and Celsius setting. (fig.7.3).Once finish setting,go to next page. 7.4 Auto-sleep setting. Customer can set auto-sleep time. Once time is reached,machine will auto close without any operation (fig.7.4).Once finish setting,go to next page. - Page 11 7.5 Brightness setting.Customer can reduce or increase brightness of the screen. (fig.7.5).Once finish setting,go to next page. 7.6 Counter Collection.Here customer can see how many mugs have been printer by each heater. This setting can not be changed.. (fig.7.6).Once finish setting,go back to the main interface.
-
Page 12: Exploded Views And Parts List
Exploded Views GS-206M contains 4 main parts: 1. Machine base assemble 2. Control box assemble 3. Heating elements assemble 4. Pressure system assemble... - Page 13 1. Machine Base Assemble: Parts list: Name Machine base J.03.05.0396 Ball head screw M3x6 J.03.06.0104 Switch power supply J.03.04.0011 Socket J.03.04.0077 Countersunk screw M3x8 J.03.06.0077 On-off switch J.03.04.0079 Circuit breaker 10A J.02.04.0138 Circuit breaker 18A J.02.04.0139 Terminal block J.03.04.0078 Ball head screw M6x8 J.03.06.0117 Rubber foot J.03.03.0037...
- Page 14 2. Control Box Assemble Parts List: Name J.03.05.0597 Top Cover J.03.04.0002 4-phase plug J.03.06.0165 Ball headed bolt M5-12 J.03.04.0166 Circuit board GSK-07 J.03.06.0117 Ball headed bolt M4*10 J.03.01.0025 Sticker J.03.05.0403 Circuit board cover J.03.06.0104 Round head bolt M3x6...
- Page 15 3.Heating Element Assemble:...
- Page 16 3.1.Heater Cover Assemble: Parts List: Name/Chinese J.03.06.0102 Round head bolt M6x16 J.03.04.0184 Beeper J.03.05.0594 Heater cover J.03.06.0032 Handle Screw J.03.05.0448 Supporting pillar J.03.05.0404 Heater fix board-1 J.03.05.0405 Heater fix board -2 J.03.05.0412 Bottom heater base J.03.05.0399 Door type cover-left J.03.05.0401 Door type cofer-middle J.03.05.0400 Door type cover-right...
- Page 17 3.2. Heater Shaft Assemble: Parts List: Name J.03.06.0117 Ball headed bolt M4*10 J.03.05.0409 Arc supporting plate J.03.05.0410 Supporting board-1 J.03.05.0411 Supporting board -2 J.03.05.0407 connector-2 J.03.06.0103 Ball headed bolt M5*10 J.03.06.0142 Shoulder screw M5-6*12 J.03.05.0408 Connecting sheet...
- Page 18 4. Pressure System Assemble: Parts List Name J.03.06.0005 Clamp J.02.04.0148 Magnet switch J.03.03.0003 Ball Shape Handle J.03.06.0213 Screw M10-100 J.03.06.0127 Nut M10 J.03.05.0595 Connecting sheet J.03.06.0140 Ball headed bolt M5*8 J.03.05.0596 Connecting set J.03.06.0144 Cup head screw M10-20 J.03.05.0615 Connecting sheet...
-
Page 19: Electrical Schematic
Electrical Schematic...
Need help?
Do you have a question about the GS-206M and is the answer not in the manual?
Questions and answers