Olympus Camedia C-370 ZOOM Basic Manual
Olympus digital camera basic manual
Hide thumbs
Also See for Camedia C-370 ZOOM:
- User manual addendum (2 pages) ,
- Quick start manual (2 pages) ,
- Reference manual (144 pages)
Table of Contents
Advertisement
Available languages
Available languages
Advertisement
Chapters
Table of Contents

Subscribe to Our Youtube Channel
Related Manuals for Olympus Camedia C-370 ZOOM


Summary of Contents for Olympus Camedia C-370 ZOOM
- Page 1 DIGITAL CAMERA APPAREIL PHOTO NUMÉRIQUE DIGITALKAMERA CÁMARA DIGITAL D-535 ZOOM C-370 ZOOM X-450 BASIC MANUAL MANUEL DE BASE EINFACHE ANLEITUNG MANUAL BÁSICO ENGLISH ...2 FRANÇAIS ...40 DEUTSCH ...78 ESPAÑOL ...116...
-
Page 2: Table Of Contents
CONTENTS GETTING STARTED ......4 MENU FUNCTIONS ......18 SHOOTING. -
Page 3: For Customers In Canada
Reference Manual on the CD-ROM. For customers in North and South America For customers in USA Declaration of Conformity Model Number : D-535 ZOOM/C-370 ZOOM/X-450 Trade Name : OLYMPUS Responsible Party Address : Two Corporate Center Drive, PO Box 9058, Melville, New York 11747-9058 U.S.A. -
Page 4: Getting Started
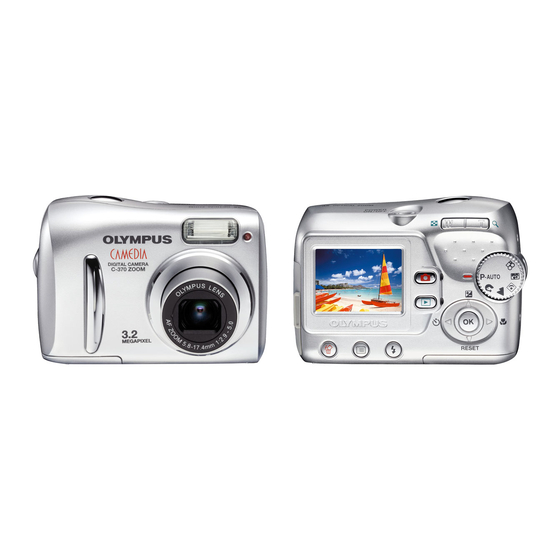
GETTING STARTED NAMES OF PARTS Shutter button Lens Extends automatically when the power switch is pressed. Battery compartment/ card cover Lock button 4 En Power switch Flash Self-timer lamp VIDEO OUT jack Connector cover USB connector Tripod socket DC-IN jack... - Page 5 Erase button Menu button ( Flash mode button ( Arrow pad Buttons on the arrow pad have their respective functions. They are also used as direction buttons. be pressed. Self-timer button ( Reset button Monitor Shooting button ( Orange lamp Green lamp Playback button ( Zoom button...
-
Page 6: Monitor Indications
MONITOR INDICATIONS Shooting mode Still picture 1 Battery check 2 Green lamp 3 Flash standby Camera movement warning/ Flash charge 4 Shooting mode 5 Macro mode 6 Flash mode 7 Self-timer 8 Exposure compensation 9 Record mode 10 Resolution 11 AF target mark 12 Current memory * 13 Number of storable still pictures Remaining recording time... -
Page 7: Playback Mode
Playback mode Still picture Items 1 Battery check 2 Current memory * 3 Print reservation, Number of prints 4 File number 5 Protect 6 Record mode 7 Resolution 8 Exposure compensation 9 Date and time Number of frames Elapsed time/Total recording time (movie) 11 Movie * The [IN] indicator is displayed when you are storing pictures in the camera’s internal memory. -
Page 8: Battery Check
Battery check If the remaining battery power is low, the battery check indication on the monitor changes as follows while the camera is turned on. Lit (Green) (The indicator turns off after a while) Remaining power level: high. 8 En Blinks (Red) The green lamp and the orange lamp on the camera blink. -
Page 9: Attaching The Strap
ATTACHING THE STRAP Thread the short end of the strap through the strap eyelet. Thread the long end of the strap through the loop that has already gone through the eyelet. Pull the strap tight, making sure that it is securely fastened and does not come loose. - Page 10 Holding the lock button, slide the battery compartment/card cover in the direction of then lift it in the direction of • Use the ball of your finger to slide the cover. Do not use your fingernail as this could result in injury. •...
-
Page 11: About The Internal Memory And The Card
ABOUT THE INTERNAL MEMORY AND THE CARD Images taken are stored in the internal memory. You can also use an optional xD-Picture Card (referred to as “card” in this manual) to store images. The card has greater capacity than the internal memory, and so, is able to store more images. - Page 12 INSERTING A CARD (OPTIONAL) An optional card (xD-Picture Card) is available for this camera. Make sure the camera is turned off. • The monitor is off. • The green lamp and the orange lamp on the camera are off. • The lens is not extended. Holding the lock button, slide the battery compartment/card cover in the direction of...
- Page 13 Removing the card Push the card all the way in to unlock it, and let it return slowly. • The card is ejected a short way and then stops. Note Releasing your finger quickly after pushing the card all the way in may cause it to eject forcefully out of the slot.
- Page 14 TURNING THE POWER ON/OFF Power on: Press the power switch. The lens extends and the subject is displayed on the monitor. The orange lamp lights. The camera is ready for shooting (shooting mode). Power off: Press the power switch. The camera turns off. (The monitor also turns off.) The orange lamp goes out.
-
Page 15: Switching Between The Shooting Mode And The Playback Mode
Switching between the shooting mode and the playback mode Shooting button ( Switching to the shooting mode (Shooting mode) • The object is displayed on the monitor. • The orange lamp lights. Shutter button Playback button ( Switching to the playback mode (Playback mode) Press the Press the... -
Page 16: Selecting A Language
SELECTING A LANGUAGE Press the power switch. • The camera turns on in the shooting mode. • The lens extends and the monitor turns on. • The orange lamp lights. Press • The menu screen is displayed. Press • The selected item is displayed in yellow. Press Press to select a language, and press... - Page 17 Press to set the year, and press month setting. • To move back to the previous setting, press • The first two digits of the year are fixed. Repeat this procedure until the date and time are completely set. • The camera only displays the time in 24-hour time system (“2 p.m.” would be “14:00”).
-
Page 18: Menu Functions
MENU FUNCTIONS HOW TO USE THE MENUS When you turn on the camera and press monitor. From this menu, you can configure various settings of the camera. Press to display the menu. Menu button ( About the menu screen Indicates there is an additional page to follow. - Page 19 MENUS Shooting mode Sets the image quality and resolution. Copies images stored in the internal memory to the BACKUP card. This setting is not available when the card is not inserted. Sets the date and time. Selects a language for on-screen display. Sets the time period that the camera automatically SLEEP enters to the sleep mode.
-
Page 20: Playback Mode
Playback mode BACKUP MEMORY SETUP (CARD SETUP) SLEEP VIDEO OUT 20 En Runs through all saved pictures one after another. Select a single slide show with [ continuous slide show. Copies images stored in the internal memory to the card. This setting is not available when the card is not inserted. -
Page 21: Shooting
SHOOTING MODE This camera allows you to take still pictures and record movies. To take still pictures, use the mode dial to select one of the shooting modes. Each mode already has the optimal settings for its purpose and conditions. You can change the mode with the camera turned on. -
Page 22: Self Portrait
SELF PORTRAIT Enables you to take a picture of yourself while holding the camera. Point the lens at yourself and the focus will be locked on you. The camera automatically sets the optimal shooting conditions. The zoom is fixed in the wide position and cannot be changed. MOVIE Lets you record movies. -
Page 23: Taking Still Pictures
TAKING STILL PICTURES You can take still pictures simply by pressing the shutter button as you look at the monitor. The recorded picture will be stored on the card if you have inserted one, or in the internal memory if you have not inserted a card. Press the power switch. -
Page 24: If Correct Focus Cannot Be Obtained (Focus Lock)
IF CORRECT FOCUS CANNOT BE OBTAINED (FOCUS LOCK) When the subject to be focused is not on the AF target mark (not positioned in the center of the composition), you can use the following steps to obtain the correct focus on the subject. This operation is referred to as "focus lock". Press the power switch. -
Page 25: Recording Movies
RECORDING MOVIES You can record movies with this camera. You can playback the recorded movies with this camera. Sound can not be recorded. The focus and zoom are locked. If the distance to the subject changes, focus may be compromised. Press the power switch. -
Page 26: Zooming In On A Subject
ZOOMING IN ON A SUBJECT Telephoto and wide-angle shooting are possible at 3x magnification (the optical zoom limit, equivalent to 38 mm – 114 mm on a 35 mm camera). By combining the optical zoom with the digital zoom, zoom magnification can be increased to a maximum of approximately 12x. -
Page 27: Using The Flash
USING THE FLASH Press the power switch. • The camera turns on in the shooting mode. • The lens extends and the monitor turns on. • The orange lamp lights. Press flash mode button ( • Flash setting screen is displayed. Press to select the flash mode, and press •... -
Page 28: Macro Mode Shooting
MACRO MODE SHOOTING Macro shooting ( Super macro shooting ( Press the power switch. • The camera turns on in the shooting mode. • The lens extends and the monitor turns on. • The orange lamp lights. Press • The setting screen for the macro shooting is displayed. Press to select macro mode, and press •... -
Page 29: En Using The Self-Timer
USING THE SELF-TIMER This function is useful for taking pictures where you want to be included in the photograph. Fix the camera securely on a tripod or set it on a level surface for self-timer shooting. Press the power switch. •... -
Page 30: Varying The Image Brightness (Exposure Compensation)
VARYING THE IMAGE BRIGHTNESS (EXPOSURE COMPENSATION) This function allows you to make fine changes to the automatic exposure setting. You can adjust the exposure in the range of ±2.0 in 1/3EV steps. When the setting is changed, you can check the result on the monitor. Press the power switch. -
Page 31: Playback
VIEWING STILL PICTURES When the card is inserted, the images stored on the card are displayed. To display the images stored in the internal memory, remove the card. Press the power switch to turn the camera on, and press • Playback mode is set. •... -
Page 32: Close-Up Playback
CLOSE-UP PLAYBACK Pictures displayed on the monitor can be enlarged in steps up to 4 times the original size. Press the power switch to turn the camera on, and press • Playback mode is set. • The green lamp on the camera lights. Use the arrow pad to select the still picture you want to enlarge. -
Page 33: Viewing Movies
VIEWING MOVIES Press the power switch to turn the camera on, and press • Playback mode is set. • The green lamp on the camera lights. Use the arrow pad to display the picture with Press • The movie is played back. When the playback ends, the display automatically returns to the playback mode. -
Page 34: Erasing Pictures
ERASING PICTURES This function enables the camera to erase the recorded pictures. The “single- frame erase” function erases only the current frame on the screen. The “all- frame erase” function erases all frames stored in the internal memory or on the card. -
Page 35: Print Reservation/Direct Print
PRINT RESERVATION/DIRECT PRINT WITH PRINT RESERVATION (DPOF) DPOF is short for Digital Print Order Format. DPOF is the format used to record automatic print information from digital cameras. Only the images stored on the card can be reserved to print. Insert the card recording the images into the camera before making print reservation. -
Page 36: Downloading Pictures To A Computer
DOWNLOADING PICTURES TO A COMPUTER For editing, and managing image files using with personal computer, install the OLYMPUS Master software on the CD-ROM supplied with the camera. After install the OLYMPUS Master software, connect the camera to the personal computer with USB cable for downloading the images taken by the camera. -
Page 37: Error Codes
ERROR CODES Monitor Possible cause indication The card is not inserted, or it cannot be recognized. NO CARD There is a problem with the card. CARD ERROR Writing to the card is prohibited. WRITE PROTECT There is no empty space in the internal memory, so it MEMORY FULL cannot record new data. -
Page 38: Specifications
Approx. 68 frames (SQ2 : 640 x 480) : 3,200,000 pixels : 1/2.7" CCD solid-state image pickup, 3,340,000 pixels (gross) : Olympus lens 5.8 mm to 17.4 mm, f2.9 to 5.0 (equivalent to 38 mm to 114 mm lens on 35 mm camera) : Center-weighted metering : 1 to 1/2000 sec. - Page 39 Operating environment Temperature : 0°C to 40°C (32°F to 104°F) (operation) Humidity : 30% to 90% (operation) Power supply : 2 AA (R6) alkaline batteries or NiMH batteries. Dimensions : 87.5 mm (W) x 62.5 mm (H) x 38.5 mm (D) Weight : 140 g (0.3 lb) (without batteries and/or card) SPECIFICATIONS ARE SUBJECT TO CHANGE WITHOUT ANY NOTICE...
- Page 40 TABLE DES MATIÈRES GUIDE RAPIDE DE DÉMARRAGE ....42 FONCTIONS DU MENU ......56 PRISE DE VUES .
-
Page 41: Pour Les Utilisateurs En Europe
“Design Rule for Camera File System/DCF” stipulées par l’association JEITA (Japan Electronics and Information Technology Industries Association). : D-535 ZOOM/C-370 ZOOM/X-450 : OLYMPUS : Two Corporate Center Drive, PO Box 9058, Melville, New York 11747-9058 U.S.A. -
Page 42: Guide Rapide De Démarrage
GUIDE RAPIDE DE DÉMARRAGE NOMENCLATURE DES PIÈCES Déclencheur Objectif Se déploie lorsque vous appuyez sur l’interrupteur d’alimentation. Couvercle de la carte/ de la batterie Touche de verrouillage 42 Fr Interrupteur d’alimentation Flash Voyant du retardateur Prise VIDEO OUT Couvercle de connecteur Connecteur USB Embase filetée de trépied... - Page 43 Touche d’effacement Touche menu ( Touche mode flash ( Touches fléchées Les boutons sur les touches fléchées ont leurs fonctions respectives. Elles sont aussi utilisées comme touches de mise au point automatique. indiquent quelle touche pressée. Touche du retardateur ( Touche de remise à...
- Page 44 INDICATIONS CONCERNANT L’ÉCRAN ACL Mode prise de vue Vue fixe Éléments 1 Contrôle des piles 2 Voyant vert 3 Flash en attente Avertissement de bougé/Chargement du flash 4 Mode prise de vue 5 Mode gros plan 6 Mode de flash 7 Retardateur 8 Compensation d’exposition 9 Mode d’enregistrement...
-
Page 45: Mode Affichage
Mode affichage Vue fixe Éléments 1 Contrôle des piles 2 Mémoire utilisée * 3 Réservation d’impression, Nombre de copies 4 Numéro de fichier 5 Protection 6 Mode d’enregistrement 7 Résolution 8 Compensation d’exposition 9 Date et heure 10 Nombre de photos Temps écoulé/Durée d’enregistrement totale (vidéo) 11 Vidéo... - Page 46 Contrôle des piles Si les piles sont faibles, le voyant de contrôle sur l’écran prend l’aspect indiqué ci-dessous tant que l’alimentation de l’appareil photo est en marche. Allumé (Vert) (Le voyant s’éteint après quelques instants.) Énergie restante : élevée. 46 Fr Clignote (Rouge) Les voyants vert et orange de l’appareil photo clignotent.
-
Page 47: Fixation De La Courroie
FIXATION DE LA COURROIE Passez la courroie dans l’œillet de courroie. Passez le reste de la courroie dans la boucle qui est déjà passée par l’œillet. Tirez fermement sur la courroie, puis vérifiez qu’elle est solidement attachée et qu’elle ne peut pas se détacher. - Page 48 En maintenant la touche de verrouillage, faites glisser le couvercle de la carte/de la batterie vers vers • Faites glisser le couvercle avec le bout du doigt. N’utilisez pas votre ongle, vous risqueriez de vous blesser. • Lorsque la base de l’appareil photo est tournée vers le haut, ouvrez le couvercle de la carte/de la batterie comme indiqué...
- Page 49 A PROPOS DE LA MÉMOIRE INTERNE ET DE LA CARTE Les photos prises sont enregistrées dans la mémoire interne. Vous pouvez aussi utiliser une carte xD-Picture Card (appelée “carte” dans ce manuel) pour enregistrer des photos. La carte a une capacité supérieure à...
- Page 50 INSERTION D’UNE CARTE (EN OPTION) Une carte optionelle (xD-Picture Card) est disponible pour cet appareil photo. Assurez-vous que l’appareil photo est éteint. • L’écran ACL est éteint. • Les voyants vert et orange sur l’appareil photo sont éteints. • L’objectif n’est pas sorti. En maintenant la touche de verrouillage, faites glisser le couvercle de la carte/de la...
- Page 51 • Si la carte n’est pas entièrement insérée, les données ne pourront pas y être enregistrées. Retrait de la carte Poussez la carte à fond pour la déverrouiller puis laissez-la sortir lentement. • La carte est éjectée sur une courte distance puis s’arrête.
- Page 52 MISE EN MARCHE/ARRÊT Mise sous tension: Appuyez sur l’interrupteur d’alimentation. Mise hors-tension: Appuyez sur l’interrupteur d’alimentation. CONSEILS • Pour économiser l’énergie des piles, l’appareil passe automatiquement en mode veille (état d’attente) au bout de 30 secondes d’inactivité. L’écran ACL s’éteint automatiquement. Appuyez sur le déclencheur, durée après laquelle l’appareil photo entre automatiquement en mode veille.
- Page 53 Bascule entre le mode prise de vues et le mode affichage Touche de prise de vues ( Passe au mode prise de vues (Mode prise de vue) • L’objet est affiché sur l’écran ACL. • Le voyant orange s’allume. Déclencheur Touche d’affichage ( Passe au mode affichage (Mode affichage)
- Page 54 SÉLECTION DE LA LANGUE Appuyez sur l’interrupteur d’alimentation. • L’appareil photo passe en mode prise de vue. • L’objectif se déploie et l’écran ACL s’allume. • Le voyant orange s’allume. Appuyez sur • L’écran du menu s’affiche. Appuyez sur sélectionner [ •...
- Page 55 Appuyez sur date suivants : Y-M-D (Année/Mois/Jour), M-D-Y (Mois/Jour/ Année), D-M-Y (Jour/Mois/Année). Puis appuyez sur • Passez au réglage de l’année. • Les étapes suivantes montrent la procédure utilisée lorsque le format de date est Y-M-D. Appuyez sur pour passer au réglage du mois. •...
-
Page 56: Fonctions Du Menu
FONCTIONS DU MENU COMMENT UTILISER LES MENUS Lorsque vous mettez l’appareil photo sous tension et que vous appuyez sur , le menu s’affiche à l’écran ACL. A partir de ce menu, vous pouvez configurer divers réglages de l’appareil photo. Appuyez sur Touche menu ( A propos de l’écran du menu Indique qu’il y a... - Page 57 MENUS Mode prise de vue Règle la qualité et résolution. Copie les images stockées dans la mémoire interne BACKUP sur la carte. Ce réglage n’est pas disponible lorsque [SAUVEGARDER] la carte n’est pas introduite. Règle la date et l’heure. Sélection de la langue des messages affichés. SLEEP Règle la période après laquelle l’appareil photo entre [VEILLE]...
- Page 58 Mode affichage BACKUP [SAUVEGARDER] MEMORY SETUP [CONF MEMOIRE] (CARD SETUP [CONFIG CARTE]) SLEEP [VEILLE] VIDEO OUT [SORTIE VIDEO] [ ] : Lorsque le français est sélectionné. 58 Fr Affiche toutes les images enregistrées l’une après l’autre. Sélectionnez un simple diaporama avec ] ou, [ ] pour un diaporama continu.
-
Page 59: Prise De Vues
PRISE DE VUES MODE PRISE DE VUE Cet appareil photo vous permet de faire des prises de vues fixes et d’enregistrer des vidéos. Pour prendre des vues fixes, utilisez la molette mode pour sélectionner l’un des modes de prise de vues. Chaque mode possède déjà ses réglages optimaux en fonction de ses objectifs et conditions. -
Page 60: Auto Portrait
SCÈNE NUIT Permet de faire des photos le soir ou la nuit. L’appareil photo ralentit la vitesse d’obturation par rapport à une prise de vue normale. Si vous utilisez un autre mode pour prendre une photo dans la rue, la nuit, le manque de luminosité... -
Page 61: Prise De Vue Fixe
PRISE DE VUE FIXE Vous pouvez prendre des vues fixes en appuyant simplement sur le déclencheur tout en regardant l’écran ACL. Il vous suffit d’appuyer sur le déclencheur et l’image enregistrée sera stockée sur la carte si vous en avez inséré une, ou dans la mémoire interne si vous n’avez pas inséré... -
Page 62: Si Une Mise Au Point Satisfaisante Est Impossible (Mémorisation De La Mise Au Point)
SI UNE MISE AU POINT SATISFAISANTE EST IMPOSSIBLE (MÉMORISATION DE LA MISE AU POINT) Lorsqu’une mise au point satisfaisante ne peut pas être obtenue sur le sujet que vous souhaitez photographier, vous pouvez effectuer la mise au point sur quelque chose d’autre, qui se trouve plus ou moins à la même distance (mémorisation de la mise au point) ;... -
Page 63: Enregistrement De Vidéos
ENREGISTREMENT DE VIDÉOS Vous pouvez enregistrer des vidéos avec cet appareil photo. Vous pouvez lire les vidéos avec cet appareil. Le son ne peut pas être enregistré. La mise au point et le zoom sont verrouillés. La mise au point risque de ne plus être correcte si la distance par rapport au sujet change. -
Page 64: Zoom Avant Sur Un Sujet
ZOOM AVANT SUR UN SUJET La prise de vues au téléobjectif et au grand angle est possible en agrandissant jusqu’à 3x (limite du zoom optique, équivalent à 38 mm - 114 mm sur un appareil photo de 35 mm). La combinaison du zoom optique et du zoom numérique permet d’atteindre un facteur de grossissement maximal d’environ 12x. -
Page 65: Utilisation Du Flash
UTILISATION DU FLASH Appuyez sur l’interrupteur d’alimentation. • L’appareil photo passe en mode prise de vue. • L’objectif se déploie et l’écran ACL s’allume. • Le voyant orange s’allume. Appuyez sur la touche mode flash ( • L’écran de réglage du flash s’affiche. Appuyez sur puis appuyez sur •... -
Page 66: Prise De Vues En Mode Gros Plan
PRISE DE VUES EN MODE GROS PLAN Prise de vue en gros plan ( Prise de vue en super gros plan ( Appuyez sur l’interrupteur d’alimentation. • L’appareil photo passe en mode prise de vue. • L’objectif se déploie et l’écran ACL s’allume. •... -
Page 67: Utilisation Du Retardateur
UTILISATION DU RETARDATEUR Cette fonction est utile lorsque la personne qui prend la photo veut également y figurer. Pour la prise de vues avec retardateur, fixez solidement l’appareil photo sur un trépied ou posez-le sur une surface horizontale. Appuyez sur l’interrupteur d’alimentation. •... -
Page 68: Variation De La Luminosité De La Photo (Compensation D'exposition)
VARIATION DE LA LUMINOSITÉ DE LA PHOTO (COMPENSATION D’EXPOSITION) Cette fonction vous permet de régler l’exposition automatique avec précision. Vous pouvez ajuster l’exposition dans une fourchette de ±2,0 par paliers de 1/3EV. Après avoir modifié un paramètre, vous pouvez vérifier le résultat sur l’écran ACL. -
Page 69: Affichage
AFFICHAGE D’IMAGES FIXES Lorsque la carte est introduite, les photos qui y sont stockées s’affichent. Pour afficher les photos enregistrées dans la mémoire interne, ôtez la carte. Appuyez sur l’interrupteur d’alimentation pour allumer l’appareil photo, puis appuyez sur • Le mode affichage est réglé. •... -
Page 70: Affichage En Gros Plan
AFFICHAGE EN GROS PLAN Les photos affichées sur l’écran ACL peuvent être agrandies par pas jusqu’à 4 fois leur taille originale. Appuyez sur l’interrupteur d’alimentation pour allumer l’appareil photo, puis appuyez sur • Le mode affichage est réglé. • Le voyant vert de l’appareil photo s’allume. Utilisez les touches fléchées pour sélectionner la vue fixe que vous souhaitez agrandir. -
Page 71: Lecture De Vidéos
LECTURE DE VIDÉOS Appuyez sur l’interrupteur d’alimentation pour allumer l’appareil photo, puis appuyez sur • Le mode affichage est réglé. • Le voyant vert de l’appareil photo s’allume. Utilisez les touches fléchées pour sélectionner une image comportant le symbole Appuyez sur •... -
Page 72: Effacement Des Photos
EFFACEMENT DES PHOTOS Cette fonction permet à l’appareil photo d’effacer les photos enregistrées. La fonction “saule photo efface” efface seulement la photo actuellement à l’écran. La fonction “toutes les photos efface” efface toutes les photos enregistrées dans la mémoire interne ou sur la carte. •... -
Page 73: Réservation D'impression/Impression Directe
RÉSERVATION D’IMPRESSION/IMPRESSION DIRECTE AVEC RÉSERVATION D’IMPRESSION (DPOF) DPOF est l’abréviation de l’anglais “Digital Print Order Format” (Format de commande de tirage numérique). Il s’agit d’un format utilisé pour enregistrer automatiquement les informations d’impression à partir des appareils photo numériques. Seules les photos enregistrées sur la cartes peuvent être réservées pour impression. Introduisez la carte comportant les photos dans l’appareil photo avant de faire une réservation d’impression. -
Page 74: Transfert Des Photos Vers Un Ordinateur
TRANSFERT DES PHOTOS VERS UN ORDINATEUR Pour modifier et gérer des fichiers images à l’aide d’un ordinateur personnel, installez le logiciel OLYMPUS Master qui se trouve sur le CD-ROM fourni avec l’appareil photo. Après avoir installé le logiciel OLYMPUS Master, connectez l’appareil photo à... -
Page 75: Codes D'erreur
CODES D’ERREUR Indication de Cause possible l’écran ACL [PAS DE CARTE] Aucune carte n’a été insérée ou NO CARD vous avez inséré une carte qui n’est pas reconnue. [ERR CARTE] Il y a un problème avec la carte. CARD ERROR [ECRIT PROTEGE] Il est impossible d’écrire sur la WRITE... -
Page 76: Fiche Technique
: 3.200.000 pixels : Capteur CCD à semi-conducteurs de 1/2,7" à 3.340.000 pixels (brut) : Objectif Olympus 5,8 mm à 17,4 mm, f2,9 à 5,0 (équivalent à un objectif de 38 mm à 114 mm sur un appareil photo de 35 mm) : Système de mesure pondérée centrale... - Page 77 Conditions de fonctionnement Température : 0°C à 40°C (fonctionnement) Humidité : 30% à 90% (fonctionnement) Alimentation : 2 piles AA (R6) alcalines ou 2 piles AA (R6) Dimensions : 87,5 mm (L) x 62,5 mm (H) x 38,5 mm (P) Poids : 140 g (sans pile ni carte) CARACTÉRISTIQUES MODIFIABLES SANS PRÉAVIS NI OBLIGATIONS...
- Page 78 INHALT ERSTE SCHRITTE ......80 MENÜFUNKTIONEN ......94 AUFNAHMEFUNKTIONEN .
- Page 79 • Die Bilddatenverwaltung dieser Kamera unterstützt die DCF-Norm „Design Rule for Camera File System“ der JEITA (Japan Electronics and Information Technology Industries Association). : D-535 ZOOM/C-370 ZOOM/X-450 : OLYMPUS : Two Corporate Center Drive, PO Box 9058, Melville, New York 11747-9058, U.S.A...
-
Page 80: Erste Schritte
ERSTE SCHRITTE BESCHREIBUNG DER TEILE Auslöser Objektiv Wird automatisch ausgeschoben, wenn Sie den Hauptschalter drücken. Batterie-/ Kartenfachdeckel Sperrtaste 80 De Hauptschalter Blitz Selbstauslöser-LED VIDEO OUT-Buchse Buchsenabdeckung USB-Anschluss Stativgewinde Gleichspannungs- eingang (DC-IN) - Page 81 Löschtaste Menü-Taste ( Blitzmodustaste ( Pfeiltasten Die Pfeiltasten haben verschiedene Funktionen. Sie können u.a. auch als Richtungstasten verwendet werden. che Taste gedrückt werden muss, um eine bestimmte Funktion zu wählen. Selbstauslöser-Taste ( Reset-Taste LCD-Monitor Aufnahmetaste ( Orange LED Grüne LED Wiedergabetaste ( Programmwählscheibe Pfeiltasten...
- Page 82 LCD-MONITOR-ANZEIGEN Aufnahmemodus Einzelbild Funktionen 1 Batterieladezustand 2 Grüne LED 3 Blitzbereitschaft Verwacklungs-Warnanzeige/Blitzaufladung 4 Aufnahmemodus 5 Nahaufnahmemodus 6 Blitzmodus 7 Selbstauslöser 8 Belichtungskorrektur 9 Speichermodus 10 Bildauflösung 11 AF-Markierung 12 Aktueller Speicher * 13 Anzahl der speicherbaren Einzelbilder Aufnahmerestzeit * Die Anzeige [IN] leuchtet, wenn Sie Bilder im internen Speicher der Kamera ablegen.
- Page 83 Wiedergabemodus Einzelbild Funktionen 1 Batterieladezustand 2 Aktueller Speicher * 3 Druckvorauswahl, Anzahl der Ausdrucke 4 Dateinummer 5 Schreibschutz 6 Speichermodus 7 Bildauflösung 8 Belichtungskorrektur 9 Datum und Zeit 10 Bildanzahl Laufzeit/Gesamtaufnahmezeit (Movie) 11 Movie * Die Anzeige [IN] leuchtet, wenn Sie Bilder im internen Speicher der Kamera ablegen.
- Page 84 Batterieladezustand Ist die verbleibende Batterieleistung gering, verändert sich die Batteriezustandsanzeige wie folgt, während die Kamera eingeschaltet ist. Leuchtet (grün) (Die Anzeige erlischt nach wenigen Augenblicken) Verbleibende Batterieleistung: hoch. 84 De Blinkt (rot) Verbleibende Batterieleistung: niedrig. Neue Batterien vorbereiten. Die grüne und die orange LED an der Kamera blinken.
-
Page 85: Anbringen Des Trageriemens
ANBRINGEN DES TRAGERIEMENS Führen Sie das kurze Ende des Trageriemens durch die Öse. Den Trageriemen durch die Schlaufe führen, die bereits durch die Öse gefädelt wurde. Ziehen Sie den Riemen straff und achten Sie darauf, dass er sicher befestigt ist und sich nicht lösen kann. - Page 86 Während Sie die Sperrtaste halten, schieben Sie den Batterie-/Kartenfachdeckel in Richtung dann in Richtung • Zum Bewegen des Batteriefachdeckels die Fingerkuppe verwenden. Verwenden Sie nicht Ihren Fingernagel, da es dadurch zu Verletzungen kommen kann. • Halten Sie die Kamera mit dem Boden nach oben, und öffnen Sie die Batterie- /Kartenfachdeckel, wie in der Abbildung gezeigt.
- Page 87 ÜBER DEN INTERNEN SPEICHER UND DIE KARTE Aufgenommene Bilder werden in den internen Speicher übernommen. Sie können jedoch auch eine zusätzliche xD-Picture Card (in dieser Anleitung als „Karte“ bezeichnet) verwenden, um Bilder zu speichern. Eine Karte hat eine höhere Speicherkapazität als der interne Speicher und ist so in der Lage, weitaus mehr Bilder zu speichern.
- Page 88 EINLEGEN EINER KARTE (OPTIONAL) Für diese Kamera ist eine zusätzliche Karte (xD-Picture Card) erhältlich. Vergewissern Sie sich, dass die Kamera ausgeschaltet ist. • Der LCD-Monitor ist ausgeschaltet. • Die grüne und die orange LED an der Kamera sind aus. • Das Objektiv darf nicht ausgefahren sein.
- Page 89 Die Karte entfernen Drücken Sie die Karte zum Entriegeln vorsichtig nach innen und lassen Sie diese anschließend langsam herausgleiten. • Die Karte wird dabei ein kleines Stück aus dem Einschubfach ausgeschoben und bleibt danach stehen. Hinweis Wenn Sie Ihren Finger zu schnell von der Karte lösen, nachdem Sie diese vollständig nach innen gedrückt haben, kann es passieren, dass die...
- Page 90 EIN- UND AUSSCHALTEN DER KAMERA Einschalten: Drücken Sie den Hauptschalter. Das Objektiv wird ausgeschoben, und das Motiv erscheint auf dem LCD-Monitor. Die orange LED leuchtet. Die Kamera ist aufnahmebereit (Aufnahmemodus). Ausschalten: Drücken Sie den Hauptschalter. Die Kamera schaltet sich ab. (Der LCD-Monitor wird ebenfalls ausgeschaltet.) Die orange LED erlischt.
- Page 91 Umschalten zwischen Aufnahme- und Wiedergabemodus Aufnahmetaste ( Umschalten in den Aufnahmemodus (Aufnahmemodus) • Das Motiv wird auf dem LCD-Monitor angezeigt. • Die orange LED leuchtet. Wiedergabetaste ( Umschalten in den Wiedergabemodus (Wiedergabemodus) Drücken Sie Drücken Sie oder den Auslöser. • Das zuletzt aufgenommene Bild wird auf dem LCD- Monitor angezeigt.
-
Page 92: Einstellen Von Datum Und Zeit
AUSWÄHLEN EINER SPRACHE Drücken Sie den Hauptschalter. • Die Kamera wird im Aufnahmemodus eingeschaltet. • Das Objektiv wird ausgeschoben, und der LCD-Monitor schaltet sich ein. • Die orange LED leuchtet. Drücken Sie • Der Menü-Bildschirm wird angezeigt. Drücken Sie auf den Pfeiltasten •... - Page 93 Drücken Sie nachfolgenden Datumsformate: Y-M-D (Jahr/Monat/Tag), M-D-Y (Monat/Tag/Jahr), D-M-Y (Tag/Monat/Jahr). Drücken Sie anschließend • Wechseln Sie auf die Einstellung der Jahreszahl. • In diesem Anwendungsbeispiel wird das Datumsformat Y-M-D verwendet. Drücken Sie anschließend , um zur Einstellung des Monats zu gelangen.
-
Page 94: Menüfunktionen
MENÜFUNKTIONEN VERWENDEN DER MENÜS Wenn Sie die Kamera einschalten und LCD-Monitor angezeigt. Mithilfe dieses Menüs können Sie die verschiedenen Einstellungen der Kamera konfigurieren. Drücken Sie Menü-Taste ( Über den Menü-Bildschirm Weist darauf hin, daß eine weitere Seite folgt. Drücken Sie Funktion. -
Page 95: Aufnahmemodus
MENÜS Aufnahmemodus BACKUP [DATENSICHERUNG] SLEEP [RUHE MODUS] VIDEO OUT [VIDEOSIGNAL] MEMORY FORMAT FORMATIEREN] CARD FORMAT KARTE FORMATIEREN]) PIXEL MAPPING [PIXEL KORREKTUR] [ ]: Bei der Anzeige der deutschsprachigen Menüs. Diese Bedienhinweise sind ausschließlich als Kurzinformation zu verstehen. Weitere Einzelheiten zu den hier beschriebenen Funktionen finden Sie im “Referenzhandbuch”... - Page 96 Wiedergabemodus BACKUP [DATENSICHERUNG] MEMORY SETUP [SPEICHER FORM.] (CARD SETUP [KARTE EINR.]) SLEEP [RUHE MODUS] VIDEO OUT [VIDEOSIGNAL] [ ]: Bei der Anzeige der deutschsprachigen Menüs. 96 De Zeigt jedes gespeicherte Bild nacheinander an (Diashow). Wählen Sie mit [ ] eine einzelne Diashow aus oder mit [ ] eine fortlaufende Diashow.
- Page 97 NACHTAUFNAHME Dieser Modus eignet sich zum Erstellen von Bildern am Abend oder bei Nacht. Dabei verwendet die Kamera eine längere Verschlusszeit als sonst. Wenn Sie normalerweise eine Straße bei Nacht fotografieren, kann es sein, dass Sie aufgrund der fehlenden Helligkeit nur ein dunkles Bild mit ein paar hellen Flecken erzielen.
-
Page 98: Einzelbildmodus
EINZELBILDMODUS Sie können weiterhin Aufnahmen tätigen, indem Sie den Auslöser drücken, während Sie den LCD-Monitor betrachten. Die erstellte Aufnahme wird entweder auf der Karte (falls Sie diese eingelegt haben) oder in dem internen Speicher gespeichert. Drücken Sie den Hauptschalter. • Die Kamera wird im Aufnahmemodus eingeschaltet. •... -
Page 99: Wenn Die Richtige Bildschärfe Nicht Erzielt Werden Kann (Schärfespeicher)
WENN DIE RICHTIGE BILDSCHÄRFE NICHT ERZIELT WERDEN KANN (SCHÄRFESPEICHER) Wenn sich das scharfzustellende Motiv nicht in der AF-Markierung befindet (also nicht in der Mitte der Bildkomposition), können Sie durch die folgenden Schritte die korrekte Schärfe des Motivs erzielen. Diese Funktion wird als „Schärfespeicher“... -
Page 100: Movie-Aufnahme
MOVIE-AUFNAHME Mit dieser Kamera können Sie sowohl Einzelbilder als auch kurze Filmsequenzen aufzeichnen. Sie können aufgenommene Movies mit der Kamera wiedergeben. Ton kann nicht aufgenommen werden. Schärfe und Zoomposition werden beim Start der Aufnahme gespeichert. Wenn sich der Abstand zwischen Motiv und Kamera während der Aufnahme verändert, kann die Kamera das Motiv nicht erneut scharf stellen. -
Page 101: Einzoomen Eines Motivs
EINZOOMEN EINES MOTIVS Mit dem optischen Zoom sind Telezoom- und Weitwinkelzoom-Aufnahmen bei 3facher Vergrößerung möglich (entspricht 38 mm - 114 mm bei einer 35- mm-Kamera). Durch die Kombination des optischen mit dem digitalen Zoom können Sie eine Zoom-Vergrößerung erzielen, die maximal einer ungefähr 12 fachen Vergrößerung entspricht. -
Page 102: Blitzprogrammwahl
BLITZPROGRAMMWAHL Drücken Sie den Hauptschalter. • Die Kamera wird im Aufnahmemodus eingeschaltet. • Das Objektiv wird ausgeschoben, und der LCD-Monitor schaltet sich ein. • Die orange LED leuchtet. Drücken Sie die Blitzmodustaste ( • Der Blitzeinstellungs-Bildschirm wird angezeigt. Drücken Sie drücken Sie •... -
Page 103: Nahaufnahmen
NAHAUFNAHMEN Nahaufnahme ( Super-Nahaufnahme ( Drücken Sie den Hauptschalter. • Die Kamera wird im Aufnahmemodus eingeschaltet. • Das Objektiv wird ausgeschoben, und der LCD-Monitor schaltet sich ein. • Die orange LED leuchtet. Drücken Sie • Der Einstellungs-Bildschirm für die Nahaufnahme wird angezeigt. Drücken Sie auszuwählen, und drücken Sie •... -
Page 104: Den Selbstauslöser Verwenden
DEN SELBSTAUSLÖSER VERWENDEN Diese Funktion ist dann hilfreich, wenn Sie selbst auf einer Aufnahme erscheinen möchten. Befestigen Sie die Kamera im Selbstauslösermodus sicher auf einem Stativ, oder stellen Sie sie auf eine ebene Fläche. Drücken Sie den Hauptschalter. • Die Kamera wird im Aufnahmemodus eingeschaltet. •... -
Page 105: Regulieren Der Bildhelligkeit (Belichtungskorrektur)
REGULIEREN DER BILDHELLIGKEIT (BELICHTUNGSKORREKTUR) Mit dieser Funktion können Sie eine Feinkorrektur der von der Kamera ermittelten Belichtung vornehmen. Sie können die Belichtung im Bereich von ±2.0 in Schritten zu jeweils 1/3EV ändern. Nach dem Ändern der Einstellung können Sie das Ergebnis auf dem LCD-Monitor überprüfen. Drücken Sie den Hauptschalter. -
Page 106: Wiedergabe
WIEDERGABE WIEDERGABE VON EINZELBILDERN Wenn eine Karte eingelegt wird, werden die auf der Karte gespeicherten Bilder angezeigt. Um die im internen Speicher vohandenen Bilder anzuzeigen, entnehmen Sie die Karte. Drücken Sie den Hauptschalter, um die Kamera einzuschalten, und drücken Sie •... -
Page 107: Wiedergabe Mit Ausschnittsvergrößerung
WIEDERGABE MIT AUSSCHNITTSVERGRÖßERUNG Die auf dem LCD-Monitor dargestellten Bilder lassen sich in Einzelschritten bis auf das 4fache ihrer Orginalgröße vergrößern. Drücken Sie den Hauptschalter, um die Kamera einzuschalten, und drücken Sie • Der Wiedergabemodus ist eingestellt. • Die grüne LED an der Kamera leuchtet. Verwenden Sie die Pfeiltasten, um das Einzelbild auszuwählen, daß... -
Page 108: Movie-Wiedergabe
MOVIE-WIEDERGABE Drücken Sie den Hauptschalter, um die Kamera einzuschalten, und drücken Sie • Der Wiedergabemodus ist eingestellt. • Die grüne LED an der Kamera leuchtet. Verwenden Sie die Pfeiltasten und wählen Sie ein Bild mit Drücken Sie • Das Movie wird wiedergegeben. Wenn die Wiedergabe beendet wird, kehrt die Anzeige automatisch in den Wiedergabemodus zurück. -
Page 109: Bilder Löschen
BILDER LÖSCHEN Diese Funktion ermöglicht der Kamera, die aufgenommenen Bilder zu löschen. Die Funktion „Einzelbild löschen“ löscht nur das aktuell auf dem Bildschirm gezeigte Bild. Die Funktion „Alle Bilder löschen“ löscht sämtliche Bilder, die im internen Speicher oder auf der Karte gespeichert sind. •... -
Page 110: Druckvorauswahl/Direktes Ausdrucken
DRUCKVORAUSWAHL/DIREKTES AUSDRUCKEN MIT DRUCKVORAUSWAHL (DPOF) DPOF ist die Abkürzung für Digital Print Order Format. Das DPOF-Format wird dazu verwendet, die Druckinformationen von Kameras automatisch aufzuzeichnen. Nur die Bilder, die auf der Karte gespeichert sind, können zum Drucken vorausgewählt werden. Legen Sie die Karte in die Kamera ein, auf der die Aufnahmen enthalten sind, bevor Sie die Druckvorauswahl treffen. -
Page 111: Herunterladen Von Bildern Auf Ihren
Kamera aufgenommene Bilder, herunterzuladen. Was ist OLYMPUS Master? OLYMPUS Master ist eine Anwendungssoftware, mit der Sie Bilder auf einem Computer bearbeiten können, die Sie mit einer Digitalkamera erstellt haben. Durch die Installation auf Ihrem Personal Computer haben Sie die folgenden Möglichkeiten:... -
Page 112: Fehlermeldungen
FEHLERMELDUNGEN LCD-Monitor- Mögliche Ursache Anzeige [KEINE KARTE] Die Karte ist nicht eingelegt, NO CARD oder Sie kann nicht gelesen werden. [KARTENFEHLER] Es liegt ein Kartenfehler vor. CARD ERROR [SCHREIBSCHUTZ] Schreibgeschützte Karte. WRITE PROTECT [SPEICHER VOLL] Auf der internen Speicher ist kein MEMORY FULL Speicherplatz mehr verfügbar und es können somit keine weite-... -
Page 113: Technische Daten
Ca. 68 Bilder (SQ2 : 640 x 480) : 3.200.000 Pixel : 1/2,7 Zoll CCD-Chip, 3.340.000 Pixel (brutto) : Olympus-Objektiv, 5,8 mm bis 17,4 mm, Blenden f2,9 bis 5,0 (entspricht einem 38 mm - 114 mm Objektiv an einer 35-mm-Kamera) : Mittenbetonte Integralmessung : 1 Sek. - Page 114 Automatischer : 2004 bis zu 2099 Kalender Umgebungsbedingungen : 0°C bis 40 °C (Betrieb) Temperatur Luftfeuchtigkeit : 30% bis 90% (Betrieb) Spannungsversorgung : 2 AA (R6) Alkali-Batterien, NiMH-Batterien. Abmessungen : 87,5 mm (B) x 62,5 mm (H) x 38,5 mm (T) Gewicht : 140 g (ohne Batterien und karte) ÄNDERUNGEN DER TECHNISCHEN DATEN SIND OHNE...
- Page 115 CONTENIDOS PRIMEROS PASOS ......118 FUNCIONES DE LOS MENÚS ....132 FOTOGRAFÍA .
-
Page 116: Marcas Comerciales
Manual de consulta del CD-ROM. Para clientes de Norte y Sudamérica Para los clientes de Estados Unidos Declaración de Conformidad Número de modelo : D-535 ZOOM/C-370 ZOOM/X-450 Nombre comercial : OLYMPUS Entidad responsable : Dirección : Two Corporate Center Drive, PO Box 9058, Melville, New York 11747-9058 U.S.A. -
Page 117: Primeros Pasos
PRIMEROS PASOS NOMBRES DE LAS PARTES Botón obturador Objetivo Se extiende automáticamente cuando se presiona el botón de encendido. Tapa del compartimiento de las pilas/tarjeta Botón de bloqueo 118 Es Botón de encendido Flash LED del disparador automático Jack VIDEO OUT Tapa del conector Conector USB Rosca trípode... - Page 118 Botón del borrado Botón menú ( Botón del modo de flash ( Teclas de control Los botones y las teclas de control tienen funciones respectivas. También se utilizan como botones de dirección. se debe presionar. Botón del disparador automático Botón de reposición Monitor Botón de fotografía ( Lámpara naranja...
-
Page 119: Indicaciones Del Monitor
INDICACIONES DEL MONITOR Modo de fotografía Imagen fija Opciones 1 Verificación de las pilas 2 Lámpara verde 3 Flash en estado de reposo Aviso de movimiento de la cámara/ Carga del flash 4 Modo de fotografía 5 Modo macro 6 Modo de flash 7 Disparador automático 8 Compensación de la exposición 9 Modo de grabación... - Page 120 Modo de reproducción Imagen fija Opciones 1 Verificación de las pilas 2 Memoria actual* 3 Reserva de impresión, Número de impresiones 4 Número de archivo 5 Protección 6 Modo de grabación 7 Resolución 8 Compensación de la exposición 9 Fecha y hora 10 Número de cuadros Tiempo transcurrido/ Tiempo total de grabación (vídeo)
- Page 121 Verificación de las pilas Si la carga restante de las pilas es baja, la indicación de verificación de las pilas en el monitor cambiará de la manera indicada abajo mientras la cámara se encuentre encendida. Iluminado (verde) (El indicador se apaga después de unos momentos.) Nivel de carga restante: alto.
-
Page 122: Instalar Las Pilas
FIJACIÓN DE LA CORREA Haga pasar el extremo corto de la correa a través del enganche para correa. Haga pasar el extremo largo de la correa a través del lazo que ha pasado por el enganche para correa. Tire de la correa con fuerza para comprobar que ha quedado firmemente sujetada, sin riesgos de que se afloje. - Page 123 Presionando el botón de bloqueo, deslice la tapa del compartimiento de las pilas/ tarjeta en la dirección indicada , y luego levántela hacia • Deslice la tapa con la yema del dedo. No use la uña, ya que podría hacerse daño.
- Page 124 ACERCA DE LA MEMORIA INTERNA Y LA TARJETA Las imágenes tomadas se almacenan en la memoria interna. También puede utilizar una xD-Picture Card opcional (referida como “tarjeta” en este manual) para almacenar imágenes. La tarjeta posee más capacidad que la memoria interna y, por lo tanto, puede almacenar más imágenes. Esta tarjeta es conveniente, por ejemplo, cuando desea tomar muchas fotos durante un viaje.
- Page 125 INSERCIÓN DE LA TARJETA (OPCIONAL) Una tarjeta opcional (xD-Picture Card) se encuentra disponible para esta cámara. Asegúrese de que la cámara esté apagada. • El monitor esté apagado. • Las lámparas verde y naranja de la cámara estén apagadas. • El objetivo no esté extendido. Presionando el botón de bloqueo, deslice la tapa del compartimiento de las pilas/ tarjeta en la dirección...
- Page 126 Extracción de la tarjeta Empuje la tarjeta hasta el fondo para desengancharla, y luego déjela volver despacio. • La tarjeta sale un poco hacia afuera y luego se detiene. Nota Si retira el dedo rápidamente después de empujar a fondo la tarjeta, ésta podría salirse con fuerza de la ranura.
- Page 127 ENCENDIDO/APAGADO DE LA CÁMARA Encendido: Presione el botón de encendido. El objetivo se extiende y el sujeto aparece en el monitor. La lámpara naranja se ilumina. La cámara se encuentra lista para fotografiar (modo de fotografía). Apagado: Presione el botón de encendido. La cámara se apaga.
- Page 128 Cambio entre el modo de fotografía y el modo de reproducción Botón de fotografía ( Botón de reproducción ( Cambio al modo de fotografía (Modo de fotografía) • Se visualiza el objeto en el monitor. • La lámpara naranja se ilumina.
-
Page 129: Ajustar La Fecha Y La Hora
SELECCIÓN DE UN IDIOMA Presione el botón de encendido. • La cámara se enciende en el modo de fotografía. • El objetivo se extiende y el monitor se enciende. • La lámpara naranja se ilumina. Presione • Se visualiza la pantalla del menú. Presione •... - Page 130 Presione para seleccionar uno de los siguientes formatos de fecha: Y-M-D (Año/Mes/Día), M-D-Y (Mes/Día/ Año), D-M-Y (Día/Mes/Año). Luego, presione • Muévase hasta el ajuste de año. • Los pasos siguientes muestran el procedimiento a seguir cuando la fecha y la hora están ajustados a Y-M-D (Año/Mes/Día). Presione para ajustar el año, y luego presione para desplazarse al ajuste de mes.
-
Page 131: Funciones De Los Menús
FUNCIONES DE LOS MENÚS CÓMO USAR LOS MENÚS Al encender la cámara y presionar Desde este menú, puede ajustar varias configuraciones de la cámara. Presione Botón menú ( Acerca de la pantalla del menú Indica que hay una página siguiente. Presione presione Presione... - Page 132 MENÚS Modo de fotografía Ajusta la calidad y resolución. Copia las imágenes almacenadas en la memoria BACKUP interna de la tarjeta. Este ajuste no se encuentra disponible cuando la tarjeta no está insertada. Ajusta la fecha y la hora. Se puede seleccionar un idioma para la indicación en pantalla.
- Page 133 Modo de reproducción BACKUP MEMORY SETUP [CONF. MEM.] (CARD SETUP [CONFIG. TARJ.]) SLEEP [MODO INACTIV.] VIDEO OUT [ ]: Cuando se seleccione español. 134 Es Recorre todas las imágenes almacenadas una por una. Con [ ], selecciona una reproducción de diapositivas simple o, con [ reproducción de diapositivas continua.
-
Page 134: Fotografía
FOTOGRAFÍA MODO DE FOTOGRAFÍA Esta cámara le permite tomar imágenes fijas y grabar vídeos. Para tomar imágenes fijas, utilice el disco de modo para seleccionar uno de los modos de fotografía. Cada modo ya posee los ajustes óptimos para el propósito y las condiciones de su uso. - Page 135 ESCENA NOCTURNA Adecuada para realizar fotos por la tarde o de noche. La cámara se ajusta a una velocidad de obturador más lenta que en condiciones normales de fotografía. Si se fotografía una calle de noche en cualquier otro modo, el resultado será...
-
Page 136: Fotografía De Imágenes Fijas
FOTOGRAFÍA DE IMÁGENES FIJAS Puede tomar imágenes fijas simplemente presionando el botón obturador mientras observa el monitor. La imagen grabada quedará almacenada en la tarjeta si está insertada, o en la memoria interna, si no está insertada. Presione el botón de encendido. •... -
Page 137: Si No Se Puede Obtener Un Enfoque Correcto (Bloqueo De Enfoque)
SI NO SE PUEDE OBTENER UN ENFOQUE CORRECTO (BLOQUEO DE ENFOQUE) Cuando el sujeto que desea enfocar no está en la marca de objetivo de enfoque automático (AF) (no está ubicado en el centro de la composición), podrá seguir los siguientes pasos para obtener el enfoque correcto del sujeto. -
Page 138: Grabación De Vídeos
GRABACIÓN DE VÍDEOS Esta cámara le permite que grabe tanto vídeos como imágenes fijas. Con esta cámara, puede reproducir los vídeos grabados. No puede grabar sonido. El enfoque y el zoom quedan bloqueados. Si la distancia hasta el sujeto cambia, el enfoque puede verse alterado. Presione el botón de encendido. -
Page 139: Zoom De Acercamiento Sobre El Sujeto
ZOOM DE ACERCAMIENTO SOBRE EL SUJETO La fotografía telefoto y gran angular es posible con una amplificación de 3x (el límite del zoom óptico, equivalente a 38 mm - 114 mm en una cámara de 35 mm). Combinando el zoom óptico con el digital, podrá lograr un aumento máximo de aproximadamente 12x. -
Page 140: Usar El Flash
USAR EL FLASH Presione el botón de encendido. • La cámara se enciende en el modo de fotografía. • El objetivo se extiende y el monitor se enciende. • La lámpara naranja se ilumina. Presione el botón del modo de flash ( •... -
Page 141: Fotografía En El Modo Macro
FOTOGRAFÍA EN EL MODO MACRO Fotografía macro ( Fotografía supermacro ( Presione el botón de encendido. • La cámara se enciende en el modo de fotografía. • El objetivo se extiende y el monitor se enciende. • La lámpara naranja se ilumina. Presione •... -
Page 142: Fotografía Con Disparador Automático
FOTOGRAFÍA CON DISPARADOR AUTOMÁTICO Esta función resulta conveniente para realizar fotografías en las que desea aparecer usted mismo. Para fotografiar con disparador automático, coloque la cámara de forma segura sobre un trípode o una superficie nivelada. Presione el botón de encendido. •... -
Page 143: Variar El Brillo De La Imagen (Compensación De La Exposición)
VARIAR EL BRILLO DE LA IMAGEN (COMPENSACIÓN DE LA EXPOSICIÓN) Esta función le permite realizar cambios precisos en el ajuste de exposición automática. La exposición se puede ajustar en el margen de of ±2,0 en pasos de 1/3EV. Cuando se cambia el ajuste, es posible verificar el resultado en el monitor. Presione el botón de encendido. -
Page 144: Reproducción
REPRODUCCIÓN VISUALIZACIÓN DE IMÁGENES FIJAS Cuando se inserta la tarjeta, se visualizan las imágenes almacenadas en la tarjeta. Para visualizar las imágenes almacenadas en la memoria interna, extraiga la tarjeta. Presione el botón de encendido para encender la cámara, y presione •... -
Page 145: Visualización De Índice
REPRODUCCIÓN DE PRIMEROS PLANOS Las imágenes visualizadas en el monitor se pueden ampliar en pasos hasta un máximo de 4 veces su tamaño original. Presione el botón de encendido para encender la cámara, y presione • Se ajusta el modo de reproducción. •... -
Page 146: Reproduce Vídeo
REPRODUCE VÍDEO Presione el botón de encendido para encender la cámara, y presione • Se ajusta el modo de reproducción. • La lámpara verde de la cámara se ilumina. Utilice las teclas de control para visualizar la imagen con Presione •... -
Page 147: Borrado De Fotografías
BORRADO DE FOTOGRAFÍAS Esta función hace que la cámara borre las fotografías grabadas. La función de “borrado de un solo cuadro” borra sólo el cuadro actual visualizado en la pantalla. La función “borrado de todos los cuadros” borra todos los cuadros almacenados en la memoria interna o en la tarjeta. -
Page 148: Reserva De Impresión/Impresión Directa
RESERVA DE IMPRESIÓN/IMPRESIÓN DIRECTA CON RESERVA DE IMPRESIÓN (DPOF) DPOF son las siglas de Digital Print Order Format. DPOF es el formato utilizado para registrar información sobre impresión automática desde las cámaras digitales. Sólo las imágenes almacenadas en la tarjeta pueden reservarse para imprimir. -
Page 149: Descargar Fotografías A Un Ordenador
Para editar y administrar archivos de imagen con un ordenador, instale el software OLYMPUS Master, que se encuentra en el CD-ROM suministrado con la cámara. Después de instalar el software OLYMPUS Master, conecte la cámara al ordenador con el cable USB para descargar las imágenes tomadas. -
Page 150: Códigos De Error
CÓDIGOS DE ERROR Indicaciones del Causas posibles monitor [SIN TARJETA] La tarjeta no está colocada NO CARD o no puede ser reconocida. [ERR. TARJ.] Hay un problema con la CARD ERROR tarjeta. [PROTEC. ESCRT.] Está prohibido escribir en WRITE PROTECT esta tarjeta. -
Page 151: Especificaciones
: Elemento captador de imágenes CCD de estado sólido, de 1/2,7", 3.340.000 píxeles (en total) : Objectivo Olympus 5,8 mm a 17,4 mm, f2,9 a 5,0 (equivalente a un objetivo de 38 mm a 114 mm en una cámara de 35 mm) : Sistema de medición centrada... - Page 152 Entorno de funcionamiento Temperatura : 0°C a 40°C (funcionamiento) Humedad : 30% a 90% (funcionamiento) Fuente de : 2 pilas alcalinas AA (R6), o 2 pilas NiMH. alimentación Dimensiones : 87,5 mm (An.) x 62,5 mm (Alt.) x 38,5 mm (P.) Peso : 140 g (sin pilas ni tarjeta) LAS ESPECIFICACIONES SE ENCUENTRAN SUJETAS A CAMBIOS SIN...
- Page 153 MEMO...
- Page 154 MEMO...
- Page 155 Our phone customer support is available from 8 am to 10 pm (Monday to Friday) ET E-Mail: distec@olympus.com Olympus software updates can be obtained at: http:// www.olympus.com/digital Premises: Wendenstrasse 14-18, 20097 Hamburg, Germany Goods delivery: Bredowstrasse 20, 22113 Hamburg, Germany...
Need help?
Do you have a question about the Camedia C-370 ZOOM and is the answer not in the manual?
Questions and answers