AeroClave RDS 3110 Quick Reference Manual
Hide thumbs
Also See for RDS 3110:
- Troubleshooting manual (4 pages) ,
- Operator's manual (28 pages) ,
- Operator's manual (35 pages)
Advertisement
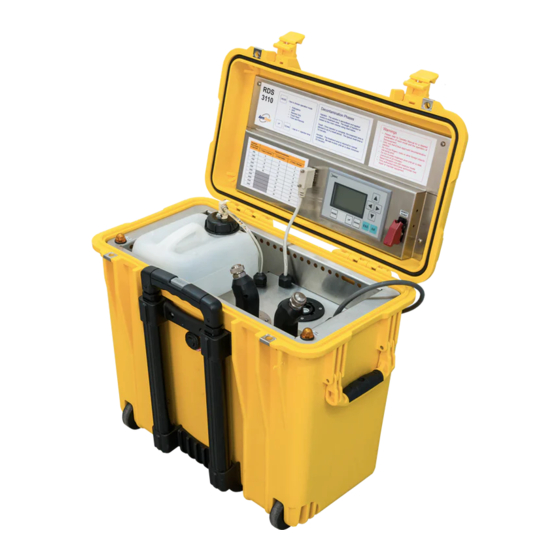
Time chart shows
how long to fog,
using the cubic
footage (ft
) of the
3
space. Ambulance
fog time is 6
minutes.
Connect ADP
ambulance port
hose for fogging
here (Ambulance
mode). APA hand
sprayer connects
here also (APA
mode).
Make sure solution
tank is filled and
connector is
secure.
If there is no ADP
port, use this fixed
head to fog. When
fogging an
ambulance use 1
Fixed mode.
RDS 3110 Quick Reference Guide
Use Control Panel to change modes and times.
Arming switch must be flipped up prior to
fogging.
Advertisement
Table of Contents

Related Manuals for AeroClave RDS 3110


Summary of Contents for AeroClave RDS 3110
- Page 1 RDS 3110 Quick Reference Guide Time chart shows Use Control Panel to change modes and times. how long to fog, Arming switch must be flipped up prior to using the cubic fogging. footage (ft ) of the space. Ambulance fog time is 6 minutes.
- Page 2 RDS 3110 Quick Reference Guide Ambulances with an ADP-PT Connect the 8’ ADP-PT connector hose to the RDS 3110 unit Time chart shows how long to fog, using the cubic footage (ft ) of the space. Ambulance fog time is 6 minutes.
- Page 3 RDS 3110 Quick Reference Guide Ambulances with an ADP-EX Connect one end of the 8’ ADP-AS connector hose to the RDS 3110 unit and then connect the other end to the ADP-EX port. Time chart shows how long to fog,...
- Page 4 NOTE: When operating in Ambulance mode. The screen shown in (Figure 1) will be present on the screen upon powering up the RDS 3110 system. Upon turning on the red arming switch, the screen shown in (Figure 2) will appear. To clear the error, as shown in (Figure 3), connect the ADP connector hose to the RDS 3110 system.
- Page 5 For ambulances either an ADP-PT or ADP- EX port NOTE: When operating in 1 Fixed mode (Figure 4). Place the RDS 3110 in the rear of the patient compartment. Point the right-facing spray nozzle towards the center of the patient compartment (Figure 5).
Need help?
Do you have a question about the RDS 3110 and is the answer not in the manual?
Questions and answers