Advertisement
Quick Links
INSTALLATION INSTRUCTIONS
NI TB-2641
8 × 64 1-Wire Matrix Terminal Block for the NI PXI-2532
Introduction
Note
Refer to the
assemblies.
Connecting Ribbon Cables
The NI TB-2641 terminal block configures the NI PXI-2532 as an 8 × 64
1-wire matrix. The NI TB-2641 has ribbon cable headers to connect signals
to the switch, and it provides optional isolation resistors to protect the reed
relay from capacitive loads.
Refer to the NI Switches Getting Started Guide to determine when to install
the terminal block.
Make sure you have the following:
•
NI TB-2641 terminal block
•
1/8 in. flathead and #1 Phillips screwdrivers
•
Eight 2 mm jumpers
•
Two 34 conductor, 28 AWG, .050 in. pitch ribbon cable assemblies
(not included)One 16 conductor, 28 AWG, .050 in. pitch ribbon cable
assembly (not included)
Accessories
section for information about ordering the appropriate cable
To connect ribbon cables to the terminal block, refer to Figures 1 and 2
while completing the following steps:
1.
Remove the top cover screw.
2.
Gently remove the top cover from the terminal block.
Advertisement

Related Manuals for National Instruments NI TB-2641


Summary of Contents for National Instruments NI TB-2641
- Page 1 8 × 64 1-Wire Matrix Terminal Block for the NI PXI-2532 Introduction The NI TB-2641 terminal block configures the NI PXI-2532 as an 8 × 64 1-wire matrix. The NI TB-2641 has ribbon cable headers to connect signals to the switch, and it provides optional isolation resistors to protect the reed relay from capacitive loads.
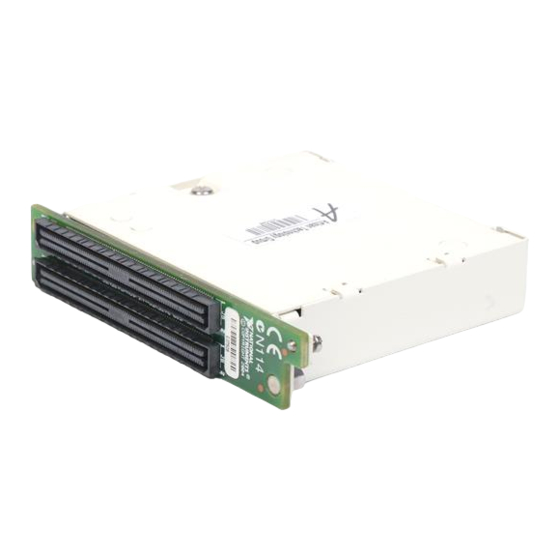
- Page 2 6 Column Connection Board 2 Top Cover 7 Module Interface Board 3 Strain-relief Screws 8 Column Headers 4 Strain-relief Bar 9 Row Headers 5 Column Connection Board Screws 10 Housing Figure 1. NI TB-2641 Terminal Block NI TB-2641 Installation Instructions ni.com...
- Page 3 PROTECTION BYPASS 0 (Pin 0) 0 (Pin 0) 0 (Pin 0) COLUMN CONNECTION BOARD COLUMNS Figure 2. NI TB-2641 Terminal Block Signal Connections Accessories Table 1. Accessories for the NI TB-2641 Accessory Manufacturer Part Number NI SCB-264X screw terminal block...
-
Page 4: Specifications
100 kHz ........<–60 dB 1 MHz........<–40 dB National Instruments, NI, ni.com, and LabVIEW are trademarks of National Instruments Corporation. Refer to the Terms of Use section on ni.com/legal for more information about National Instruments trademarks. Other product and company names mentioned herein are trademarks or trade names of their respective companies. - Page 5 取り付け手順 NI TB-2641 NI PXI-2532 用 単線式マトリクス端子台 × はじめに NI TB-2641 NI PXI-2532 × 端子台は、 を 単線式マトリクスとして構成 NI TB-2641 します。 には信号をスイッチに接続するリボンケーブルヘッダ が装備されており、リードリレーを容量性負荷から保護するオプションの 絶縁抵抗を提供します。 NI TB-2641 を取り付ける順番については、 『 スイッチ スタートアップ ガイド』を参照してください。 下記の部品があることを確認します。 • NI TB-2641 端子台 • 1/8 in. マイナスドライバーおよび プラスドライバー...
- Page 6 列接続ボードから 本のネジを取り外し、プラスチックのスペーサ はそのままにしておきます。 列接続ボードを端子台ケースの前方へスライドさせてモジュールイン タフェースから外します。 各リボンケーブルを列接続ボードおよびモジュールインタフェース ボードの対応するヘッダに接続します。 端子台を再度組み立てます。 メモ 保護抵抗およびマトリクス拡張についての詳細は、 『 スイッチ ヘルプ』を参 照してください。 上部カバーのネジ 列接続ボード 上部カバー モジュールインタフェースボード ストレインリリーフネジ 列ヘッダ ストレインリリーフバー 行ヘッダ 列接続ボードネジ ケース 1 NI TB-2641 図 端子台 NI TB-2641 ni.com/jp 取り付け手順...
- Page 7 HEADERS PROTECTION BYPASS 0 (Pin 0) 0 (Pin 0) 0 (Pin 0) COLUMN CONNECTION BOARD COLUMNS 2 NI TB-2641 図 端子台の信号接続 アクセサリ 1 NI TB-2641 表 対応のアクセサリ アクセサリ 製造元 製品番号 National Instruments 779341-01 NI SCB-264 ネジ留め式端子台 National Instruments 779346-01 NI SCB-264 端子台用行...
- Page 8 National Instruments Corporation 、 、 、および は National Instruments (米国ナショナルインスツルメンツ社)の商標です。 の商標の詳細については、 Terms of Use ni.com/legal の「 」セクションを参照してください。本文書中に記載されたその他の National Instruments 製品名および企業名は、それぞれの企業の商標または商号です。 の製品を保護 する特許については、ソフトウェアに含まれている特許情報(ヘルプ→特許情報) 、 に含まれている patents.txt ファイル、または ni.com/patents のうち、該当するリソースから参照してください。 373959C-01 2007 年 月 © 2004–2007 National Instruments Corporation. All rights reserved...
Need help?
Do you have a question about the NI TB-2641 and is the answer not in the manual?
Questions and answers