Table of Contents
Advertisement
Available languages
Available languages
Quick Links
Advertisement
Table of Contents

Subscribe to Our Youtube Channel
Related Manuals for Jinbei TR-Q7II


Summary of Contents for Jinbei TR-Q7II
- Page 1 TR-Q7II Universal-Funkauslöser ANLEITUNG AUF DEUTSCH MANUAL IN ENGLISH...
-
Page 2: Table Of Contents
Technische Daten . . . . . . . . . . . . . . . . . . . . . . . . . . . . . . . . . . . . . . . . . . . . . . . . . . . . . . 20 TR-Q7II... - Page 3 Content General Information . . . . . . . . . . . . . . . . . . . . . . . . . . . . . . . . . . . . . . . . . . . . . . . . . . . 22 Explanation of Symbols .
-
Page 4: Allgemeine Informationen
Allgemeine Informationen Sehr geehrte Kundin, sehr geehrter Kunde, wir freuen uns, dass Sie sich für eine Jinbei TR-Q7II Funkfernbedienung entschieden haben. Mit der Jinbei TR-Q7II haben Sie eine Funkfernbe- dienung für kompatible Jinbei Blitzgeräte und Canon/ Fujifilm /Nikon/ Sony (mit zusätzlichem Adapter)/ Panasonic und Olympus Kameras erworben. -
Page 5: Zeichenerklärung
Allgemeine Informationen Eine Jinbei Produktübersicht finden Sie auf www.jinbei-deutschland.de In unserem Newsletter informieren wir Sie über Neuheiten, Aktionen und Firmware-Updates. Zeichenerklärung Die folgenden Symbole werden in dieser Bedienungsanleitung, auf dem Sender oder auf der Verpackung verwendet. Mit diesem Symbol gekennzeichnete Produkte erfüllen alle maßgeblichen Gemeinschaftsvorschriften des Europäischen... -
Page 6: Entsorgung
Entsorgung Entsorgen Sie die Verpackung sortenrein . Nutzen Sie dafür die örtlichen Möglichkeiten zum Sammeln von Papier, Pappe und leichten Verpackungen. (Anwendbar in der Europäi- schen Union und anderen europäischen Staaten mit Syste- men zur getrennten Sammlung von Wertstoffen) Geräte, die mit diesem Symbol gekennzeichnet sind, dürfen nicht mit dem Hausmüll entsorgt werden! Sie sind gesetz- lich dazu verpflichtet, Altgeräte getrennt vom Hausmüll zu entsorgen. -
Page 7: Konformität
Konformität Hiermit erklärt die RCP Handels-GmbH & Co. KG, dass der Funkanlagen typ „Jinbei TR-Q7II” der Richtlinie 2014/53/EU entspricht. Der vollständige Text der EU-Konformitäts- erklärung ist unter folgender Internetadresse: https://www.jinbei-deutschland.de/egk/tr-q7ii RCP Handels-GmbH & Co. KG In de Tarpen 42, 22848 Norderstedt... -
Page 8: Warn- Und Sicherheitshinweise
Warn- und Sicherheitshinweise Allgemeine Sicherheitshinweise Um Schäden an Ihrer Kamera und Verletzungen bei Ihnen oder anderen zu vermeiden, lesen Sie die folgenden Sicherheitshinweise sorgfältig durch, bevor Sie dieses Gerät verwenden! – Nehmen Sie das Produkt nicht in Betrieb, wenn das Produkt oder Zubehör sichtbare Schäden aufweist oder defekt ist. - Page 9 Im Falle eines Fehlers lösen Sie das Gerät direkt von der Kamera. Wird festgestellt, dass das Produkt raucht oder riecht, wenden Sie sich an das JINBEI Service Center. Wenn Sie es in dieser Situation weiter- verwenden, kann es zu Verletzungen kommen.
- Page 10 Warn- und Sicherheitshinweise Vorsichtsmaßnahmen 1. Laden Sie den Akku vollständig auf und entfernen Sie anschließend das USB-Kabel. 2. Wurde das Produkt für einen längeren Zeitraum nicht mehr genutzt, laden Sie den Akku vor der erneuten Nutzung. 3. Um die Akkulaufzeit zu verlängern, sollten Sie den Akku mindestens alle drei Monate laden.
-
Page 11: Beschreibung
Beschreibung Signalanzeiger Navigationstaste Rechts / Gruppenauswahltasten Einstelllicht- / Zoom-Einstel- USB-C-Anschluss lung-Taste Kanal- / Tastensperre-Taste Auswahl- / Bestätigungstaste Testauslöser-Taste Navigationstaste Runter Navigationstaste Links / Auslö- Batteriefachdeckel seton- / Sammelauswahl-Taste 1.500 mAh Lithium-Ionen-Akku Blitzschuh-Verriegelung Navigationstaste Hoch Sync / C.Fn / Menü-Taste 2,5 mm Sync-Buchse Ein- / Ausschaltknopf... -
Page 12: Installation
Beschreibung Hinweise – Drücken Sie Kanal-/ Tastensperre-Taste [4] für ca. zwei Sekunden, um die Tastensperre zu aktivieren. – Drücken Sie die Sync / C.Fn / Menü-Taste [9] für ca. zwei Sekunden, um in das Optionsmenü zu kommen. Installation 1 . Akku laden: Um den Funkauslöser zu laden, verbinden Sie einen USB-Adapter (nicht enthalten) mit dem Ladeanschluss. -
Page 13: Funktionen
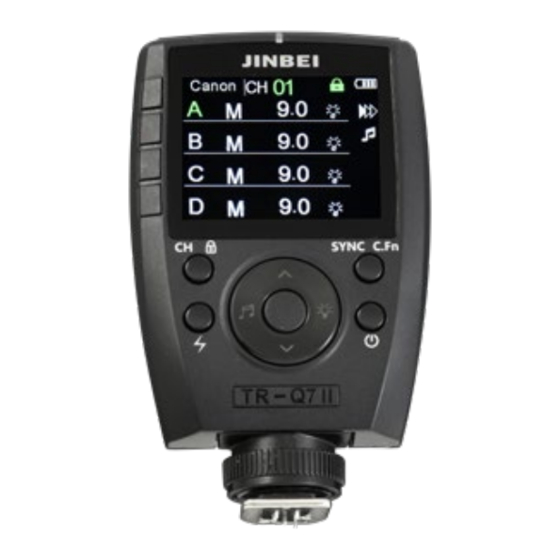
Funktionen Anzeigebereich für drahtlose Einstellungen Anzeigebereich für Gruppeneinstellungen Bildschirmsperre-Symbol Strom-Symbol Funktionssymbol Anzeigebereich 1 . Blitzleistung: M: Im manuellen Modus kann die Blitzleistung von 1,0 bis 9,0 ein- gestellt werden. Die minimale Ausgabeleistung beträgt 1.0 und die maximale 9.0. Drücken Sie kurz die Auswahltaste, bis die Blitzleis- tung markiert ist. - Page 14 Funktionen Leistungseinstellung für alle Gruppen im Manuellen Modus: Drücken Sie für 3 Sekunden auf die Navigationstaste Links / Auslö- seton- / Sammelauswahl-Taste [6] und es werden alle Grup pen mar- kiert. Zum Anpassen der Leistung aller Gruppen auf einmal drücken Sie kurz die Auswahltaste und navigieren Sie mit den Navigations- tasten Hoch und Runter für die gewünschte Einstellung.
- Page 15 Funktionen Anmerkung: Aufgrund der internen Kameraparameter werden u.U. nicht alle Funktionen am Display des Senders jeder Kamera an- gezeigt. Bitte rufen Sie in diesem Fall das Kameramenü auf, um die gewünschte Funktion zu wählen. 5 . Kanal: Der Sender kann für bis zu 32 Funkkanälen ab der Nummer 00 ~ 31 eingestellt werden.
- Page 16 Bluetooth® -Symbol am Display. Wenn Bluetooth® aktiviert ist, können Sie den Sender über die JINBEI App „JINBEI Studio” und „Studio“ mit Ihrem Smartphone ver- binden. Diese App ist für iOS und Android verfüg bar und kann im App Store oder Amazon App Store für Android herunter geladen...
- Page 17 Navigationstasten Hoch und Runter. Bestätigen Sie die Einstellung durch kurzes Drücken der Auswahltaste. Hinweis: Unsere JINBEI Blitze lassen sich sowohl über die Einstellung „NOR“ als auch über die Einstellung „BOOST“ bedienen. Die Ein- stellung ist abhängig von der verwendeten Firmware bzw. muss am Blitz angepasst werden.
-
Page 18: Bedienung
Bedienung 1. Drücken Sie die Einschalttaste und halten Sie sie etwa 2 Sekunden lang gedrückt, um den Sender zu starten. 2. Stellen Sie den Funkmodus auf Ihrem Sender entsprechend der benutzten Kamera ein: Canon / Nikon Sony / Fuji / Olympus / Lu- . - Page 19 Bedienung 7. Drücken Sie den Navigationstaste Rechts / Einstelllicht-/ Zoom- Einstellung-Taste [12], um das Einstelllicht des Blitzes zu aktivieren oder zu deaktivieren. 8. Drücken Sie die Navigationstaste Links / Auslöseton-/ Sammel- auswahl-Taste [6], um den Signalton des Blitzes ein- oder auszu- schalten.
-
Page 20: Technische Daten
1. / 2. Verschlussvorhang, Freeze (via App) Weitere Ausstattung Bluetooth® (effektiver Arbeitsabstand < 100 m), Einstelllicht (ein / aus über App oder TR-Q7II), Testblitzauslöser, 2“-LC-Display, einstellbare Display-Helligkeit, Sleep-Modus (5 / 15 / 30 Min) Bluetooth® App-Steuerung Funktion Bluetooth®... - Page 21 TR-Q7II, wiederaufladbarer Lithium-Ionen- Akku, USB-C-Kabel 1) Die Bluetooth®-Wortmarke und Logos sind eingetragene Warenzeichen der Bluetooth SIG, Inc. und die Verwendung dieser Marken durch Jinbei erfolgt unter Lizenz. Andere Warenzeichen und Handelsnamen sind Eigentum ihrer jeweiligen Inhaber. *Canon und Nikon sind eingetragene Warenzeichen, Canon- bzw. Nikon-Pro- dukte sind Warenzeichen oder eingetragene Warenzeichen von Canon bzw.
-
Page 22: General Information
General Information Dear Customer, we are pleased that you have decided to purchase a Jinbei TR-Q7II ra- dio remote control. With the Jinbei TR-Q7II you have purchased a radio remote control for compatible Jinbei flash units and Canon/ Fujifilm / Nikon/ Sony (with additional adapter)/ Panasonic and Olympus came- ras. -
Page 23: Explanation Of Symbols
General Information You can find a Jinbei product overview at www.jinbei-deutschland.de In our newsletter we inform you about news, promotions and firmware updates. Explanation of Symbols The following symbols are used in this instruction manual, on the transmitter or on the packaging. -
Page 24: Disposal
Disposal Dispose of the packaging according to its type . Use the local possibilities for collecting paper, cardboard and other materials (applicable in the European Union and other European countries with systems for the separate collection of recyclable materials). Devices that are marked with this symbol must not be disposed of with household waste! You are legally obliged to dispose of old devices separately from to dispose of house- hold waste. -
Page 25: Conformity
Conformity Hereby the RCP Handels-GmbH & Co.KG declares, that the radio equipment type ”Jinbei TR-Q7II“ complies with Directive 2014/53/EU. The full text of the EU declaration of conformity is available at the following internet address: https://www.jinbei-deutschland.de/egk/tr-q7ii RCP Handels-GmbH & Co. KG... -
Page 26: Warning And Safety Instructions
Warning and Safety Instructions General safety instructions To prevent damage to your camera and injury to yourself or others, read the following safety instructions carefully before using this product! – Do not operate the product if the product or accessories have visible damage or are defective. - Page 27 In the event of a fault, disconnect the product directly from the camera. If the product is found to be smoking or smelly, contact the JINBEI Service Centre. If you continue to use it in this situation, injury may result.
- Page 28 Warning and Safety Instructions Precautions 1. Fully charge the battery and then remove the USB cable. 2. If the product has not been used for a long period of time, charge the battery before using it again. 3. To prolong battery life, charge the battery at least every three months.
-
Page 29: Description
Description Signal indicator Navigation button Right / Group selection buttons Modeling light / Zoom adjust- USB-C port ment button Channel / key lock button Select / Confirm button Test trigger button Navigation button Down Navigation button left / shutter Battery cover sound / group selection button 1,500 mAh lithium-ion battery Hot shoe lock... -
Page 30: Installation
Description Notes – Press the Channel / Key Lock key [4] for approx. two seconds to activate the key lock. – Press the Sync / C.Fn / Menu key [9] for approx. two seconds to enter the options menu. Installation 1 . -
Page 31: Functions
Functions Display area for wireless settings Display area for group settings Screen lock icon Power icon Function icon Display area 1 . Flash output: M: In manual mode, the flash output can be set from 1.0 to 9.0. The minimum output power is 1.0 and the maximum is 9.0. Briefly press the select button until the flash output is highlighted. - Page 32 Functions Power setting for all groups in Manual mode: Press the Left navigation key / Trigger tone / Collective selection key [6] for 3 seconds and all groups will be highlighted. To adjust the power of all groups at once, briefly press the Select button and navigate with the Up and Down navigation buttons for the desired setting.
- Page 33 Functions Note: Due to the internal camera parameters, not all functions may be shown on the transmitter display of each camera. In this case, please access the camera menu to select the desired function. 5 . Channel: The transmitter can be set for up to 32 radio channels starting from number 00 ~ 31.
- Page 34 If Bluetooth® activated, you can connect the transmitter to your smartphone via the JINBEI App ”JINBEI Studio“ and „Studio“. This app is available for iOS and Android and can be downloaded from the App Store or Amazon App Store for Android.
- Page 35 Up and Down. Confirm the setting by briefly pressing the selection button. Note: Our JINBEI flashes can be operated using both the „NOR“ and „BOOST“ settings. The setting depends on the firmware used or has to be adjusted on the flash.
-
Page 36: Operation
Operation 1. Press and hold the power button for about 2 seconds to start the trans- mitter. 2. Set the radio mode on your transmit- ter according to the camera you are using: Canon / Nikon Sony / Fuji / Olympus Lumix . - Page 37 Operation 7. Press the navigation button Right / modeling light/ zoom adjust- ment button [12] to activate or deactivate the modeling light of the flash. 8. Press the Navigation button Left / Shutter sound/ collective selec- tion button [6] to switch the flash signal sound on or off. Wireless zoom control for clip-on flashes Press the Right Navigation button / Modeling Light / Zoom Setting button [12] for 3 seconds and the transmitter will change to the zoom...
-
Page 38: Technical Data
Freeze (via App) Other features Bluetooth® (effective working distance < 100 m), modeling light (on / off via App or TR-Q7II), test flash trigger, 2" LCD display, adjustable display brightness, sleep mode (5 / 15 / 30 min) Bluetooth® App control function Bluetooth®... - Page 39 USB-C cable 1) The Bluetooth® word mark and logos are registered trademarks of Bluetooth SIG, Inc. and any use of such marks by Jinbei is under license. Other trade- marks and trade names are the property of their respective owners.
- Page 40 RCP Handels-GmbH & Co. KG In de Tarpen 42, D-22848 Norderstedt Germany Service Hotline: +49 40 270750400 www.jinbei-deutschland.de Prod. No.: 1092...
Need help?
Do you have a question about the TR-Q7II and is the answer not in the manual?
Questions and answers