
Related Manuals for Sonnen sonnenProtect-Plus


Summary of Contents for Sonnen sonnenProtect-Plus
- Page 1 Installation Guide Installation Guide | for authorised electricians sonnenProtect-Plus Backup option for sonnenBatterie Hybrid 9.53 info@sonnen.com.au info@sonnen.com.au Page 1 of 26 fdsfsf info@sonnen.com.au...
- Page 2 Installation Guide IMPORTANT Read this document carefully before installation/ operation. Retain this document for reference purposes. Publisher sonnen Australia Lower Ground Floor, 61 Dunning Ave, Rosebery NSW 2018, Australia Service number 137 666 Email info@sonnen.com.au Document Document number 10052021 Version...
-
Page 3: Table Of Contents
6.1.2 Implementing the emergency circuit(s) ................15 Wiring procedure for the electrical installation ..............15 Commissioning ......................22 Switching on the sonnenProtect-Plus and the storage system ..........22 Setting up the sonnenProtect-Plus ..................22 Changing the backup buffer using the Web Interface of the storage system ......23 sonnenBatterie Protect-Plus Configurations ............. -
Page 4: Information About This Document
Installation Guide 1 Information about this document This document describes the installation of the sonnenProtect-Plus in connection with the sonnenBatterie Hybrid 9.53 storage system. Read this document in its entirety. Keep this document in the vicinity of the sonnenProtect-Plus. 1.1 Target group of this document This document is intended for authorised electricians. -
Page 5: Safety
5 kWh (2 battery modules). • The sonnenProtect-Plus must be installed by an authorised licensed electrician. • The sonnenProtect-Plus must only be connected to the storage system as described here. • Intended use includes observing the diagrams and schematics contained within this document as well as all accompanying product documentation of sonnenBatterie Hybrid 9.53, and not modifying any of the pre-wired/ installed connections and/ or... -
Page 6: Voltage Inside The Sonnenprotect-Plus
Installation Guide • The sonnenProtect-Plus must only be used in its original state without any user modifications and only when in perfect working order. • Safety devices must never be overridden, blocked, or tampered with. • The interfaces of the sonnenProtect-Plus and the storage system must be wired in accordance with the product documentation. -
Page 7: Product Description
Installation Guide 3 Product Description 3.1 Technical Data We reserve the right to update or modify any information. All values, information, images and illustrations in this data sheet, brochures and all other publications are exemplary and are subject to on-going changes and updates. Unless expressly designated as binding all this information is provided with no assurances. -
Page 8: System Components Of The Sonnenprotect-Plus
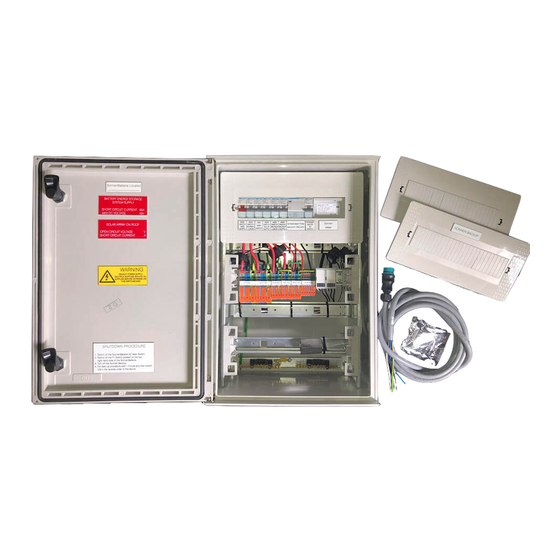
Miniature circuit breakers Power Meter Switches Cover Cover notches Figure 1: System components of sonnenProtect-Plus with covers Transformer interfaces Current transformers Snap connectors RJ-45 coupling for Modbus line Figure 2: System components of sonnenProtect-plus with covers removed. Page 8 of 26... -
Page 9: Operation
4 Operation 4.1 Function The sonnenProtect-Plus is simple and universal in its design. The product comes completely pre-wired and requires the installer to connect the grid supply, normal loads, essential loads and optionally an AC-coupled PV system. Another benefit is also the sonnen Power Meter that is already an integral part of the sonnenProtect-Plus. - Page 10 Automatic stop and resumption of the emergency operation The storage system with sonnenProtect-Plus generates power until a minimum state of charge of the battery is reached. Thereafter, no further discharge is allowed.
-
Page 11: Mounting
The pre-wired sonnenProtect-Plus has simplified the installation of the sonnenBatterie Hybrid 9.53 with backup functionality and integrability with an optional AC-coupled PV system. It comes with all the AC MCBs, RCBO and sonnen Power Meter with CTs enclosed within an IP66 outdoor enclosure. The sonnenProtect-Plus includes full pre-installed labelling as prescribed within the application AS/NZS Standards. -
Page 12: Mounting The Sonnenprotect-Plus
Then, place the enclosure on the wall and fix it as required. Figure 7: Mounting bracket Figure 6: Mounting brackets facing out at 45 degrees at the ear of the enclosure. Figure 8: sonnenProtect-Plus mounted on the wall. Page 12 of 26... -
Page 13: Electrical Installation
The pre-wired sonnenProtect-Plus has simplified the installation of the sonnenBatterie Hybrid 9.53 with backup functionality and integrability with an optional AC-coupled PV system. It comes with all the AC MCBs, RCBO and sonnen Power Meter with CTs enclosed within an IP66 outdoor enclosure. The sonnenProtect-Plus includes full pre-installed labelling as prescribed within the application AS/NZS Standards. - Page 14 Installation Guide consumers which may be important during a grid outage are specified in the sample calculation presented below. • How much capacity of the storage system should be reserved as backup buffer? The following example, in which a utility room and other important functions within a single-family home are to be supplied with power, can be used to determine this.
-
Page 15: Implementing The Emergency Circuit(S)
Note that the essential loads which were previously part of the normal loads, must now be isolated as a sub-circuit. This sub-circuit as the essential loads are wired in a way so they will be specifically powered from the sonnenProtect-Plus during emergency operation. - Page 16 Use the lever provided in the accessories kit to open the enclosure door. Insert a small screwdriver into the notches to unclick and remove the covers. Before starting the wiring process of the sonnenProtect-Plus, switch off all the circuits to the property.
- Page 17 Figure 9: Snap connectors in the sonnenProtect-Plus 5- Connect the AC-coupled PV system (if any) into the “Solar Supply” labelled snap connectors in the sonnenProtect-Plus. These connectors can take up to 10 mm CSA cables. 6- Connect the sonnenBatterie main unit to the sonnenProtect-Plus using the provided AC mains cable of the main unit.
- Page 18 These connectors can take up to 10 mm CSA cables. 3- Connect the 24VDC supply to the “Contactors” labelled snap connectors on the bottom DIN rail of the sonnenProtect-Plus enclosure, as illustrated in Figure 11. Figure 11: Connecting the Backup Supply and the 24VDC for contactors.
- Page 19 4- Plug in the cable which is connected to the “Backup Supply” in the sonnenProtect- Plus to the XSO4 port on Hybrid 9.53, as illustrated in Figure 12. Figure 12: Connecting the sonnenProtect-Plus Backup supply cable to the Backup port of Hybrid 9.53 Page 19 of 26...
- Page 20 Figure 13: RJ-45 coupling of the Modbus line for connecting the sonnen power Meter. 1- As the sonnen Power Meter is pre-wired, plug a suitable data cable such as shielded Cat 6 into the RJ-45 coupling socket in the sonnenProtect-Plus.
- Page 21 Once the above wiring process in the sonnenProtect-Plus is completed, replace the covers back on, close the door to the sonnenProtect-Plus and lock it using the lever provided. Ensure the key to the sonnenProtect-Plus is located in a convenient location.
-
Page 22: Commissioning
Figure 15. Select the Protect version as “2500”. Enter the Serial number of the sonnenProtect-Plus. This can be found on the name plate label provided at the scope of delivery. Set the Min. state of charge. This is a percentage value of the total capacity of the storage system to be reserved as backup buffer for the sonnenProtect-Plus in the event of a grid outage. -
Page 23: Changing The Backup Buffer Using The Web Interface Of The Storage System
The storage system is connected to the router of the home network. Your laptop or PC also accesses the home network. The sonnenProtect-Plus was set up by the installer using the Commissioning Assistant 2.0. On the web interface of the storage system, navigate to the Settings page. -
Page 24: Sonnenbatterie Protect-Plus Configurations
Installation Guide 8 sonnenBatterie Protect-Plus Configurations The following are the basic installation configurations. Figure 17: Retrofit installation with an existing AC-coupled PV system. Figure 18: New installation with a directly connected PV system. Page 24 of 26... - Page 25 Installation Guide Figure 19: AC-coupled storage solution only. Page 25 of 26...
- Page 26 Installation Guide sonnen Australia Lower Ground Floor, 61 Dunning Ave. Roseberry, NSW 2018, Australia Page 26 of 26...