Table of Contents
Advertisement
Quick Links
USE OF ELECTRIC SCOOTERS
LEGAL WARNING:
• United Kingdom law – This e-scooter is not to be used on public roads, cycle paths or
pavements.
• Only to be used on private land and with the landowner's permission.
IMPORTANT!
Read these instructions carefully and keep for future reference
Do not use the e-scooter when under the influence of medication or alcohol.
The user should check the limits of use in accordance with the local regulations (e.g. use in
pedestrian areas, on-road).
Watch for pedestrians and others in your vicinity when riding.
Always wear a helmet and suitable footwear when riding this e-scooter.
Ensure your battery is fully charged before use.
This product is not a toy, and is intended for riders aged 16+ years.
PLEV Class 2 - Designed to carry a single rider.
Do not use this e-scooter in rain, snow or icy conditions.
Read this manual and all warning labels on the product before using this product.
WASP
Advertisement
Table of Contents

Related Manuals for busbi WASP

Summary of Contents for busbi WASP
- Page 1 WASP USE OF ELECTRIC SCOOTERS LEGAL WARNING: • United Kingdom law – This e-scooter is not to be used on public roads, cycle paths or pavements. • Only to be used on private land and with the landowner’s permission. IMPORTANT! Read these instructions carefully and keep for future reference Do not use the e-scooter when under the influence of medication or alcohol.
- Page 2 Additional Information For more guidance and support videos to help you get started, please visit: busbistore.com/videos or, simply open the camera app on your mobile phone, and point the camera at the QR code below: Warnings The following symbols and words are used in this user manual to signal and warn against personal injury or damage to property.
-
Page 3: Table Of Contents
6.5. Changing the Brake pads. 3.1 Assembly. 7. Cleaning and Storage. 3.2 Brake Cables – Fitment. 8. Further Guidance for safe use. 3.3 Folding and Unfolding the Busbi Wasp. 10,11 8.1. Weight limits. 3.4 Charging. 8.2. Maximum travel distance. 3.4.1 Connect the Charger. -
Page 4: General Information
1. General Information: This instruction manual will provide you with the information you need to use and maintain your Busbi Wasp e-scooter . Please read and retain these instructions for future use. This manual contains important instructions for safety and care. - Page 5 • Wear appropriate footwear when using this e-scooter. • Your Busbi Wasp has a waterproof rating of IPX4, this means your Busbi Wasp is protected against splashes of water. • This e-scooter must be properly maintained according to these instructions.
-
Page 6: Getting Started
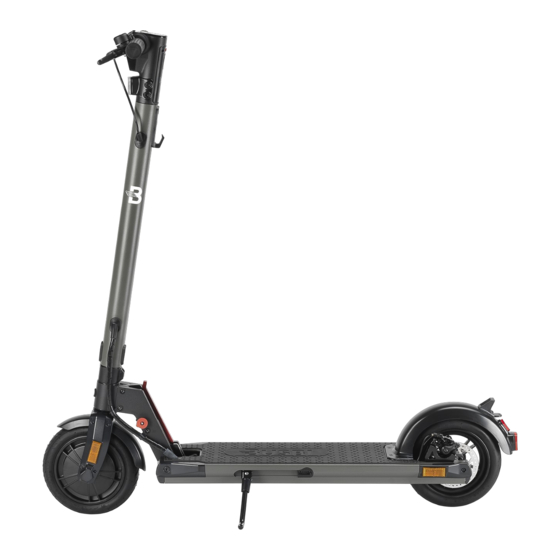
Attention: Please fully charge your Busbi Wasp before first use. Your Busbi Wasp e-scooter is a two wheeled electric scooter, powered by a Lithium-ion battery located inside the frame of the foot deck, and a hub motor incorporated in the front wheel. - Page 7 Display Rear Brake Handle RH Handle Bar Grip (with bell) LH Handle Bar Grip Throttle Charging Port Locking Hook (Used when folded) Power Rubber foot deck. Button Charging Brake Caliper Port Handlebar Stem Locking Hook (Used when folded) Rear light Disc Brake plate Locking...
-
Page 8: Preparing For First Use
3. Preparing for first use: Open the box and carefully take out all the parts, confirming the contents. Please retain the packaging, this will allow return of the product in the event of any problems. 3.1 Assembly. Place the e-scooter on the floor. Push straight down on the rear mud guard and hold, so as to release the locking hook from the buckle. - Page 9 Please note, the following operation would benefit from the assistance of a second person holding the handlebars. Identify the three cable connectors attached to the handlebar assembly, and the corresponding connectors in the handlebar stem. • Battery • Rear Light •...
-
Page 10: Brake Cables - Fitment
Please take time to view our helpful video by scanning the QR code found in the introduction or by visiting: busbistore.com/videos The Busbi Wasp is fitted with a unique locking mechanism, providing added safety. The method of unfolding is as follows: Unfolding the Busbi Wasp •... -
Page 11: Charging
Note: If the safety pin is not pulled fully out, the locking lever will not move and you will be unable to fold the handlebars; this is a safety feature. • Ensure the Busbi Wasp is powered off. • Hold the handlebar stem. •... -
Page 12: Riding Your Busbi Wasp
Cruise control is disengaged by pulling the brake lever. Disabling Cruise Control. To disable the cruise control function: With the Busbi Wasp powered on, press the power button 7 times in quick succession; cruise control will be disabled. To re-enable Cruise Control, repeat the above operation. - Page 13 Keep your body balanced when turning to avoid falling over due to high speeds or a shifting centre of gravity. Step 6: Once you have finished riding your Busbi Wasp, press and hold the On/Off button for 3 seconds to turn the scooter off.
-
Page 14: Braking
4.1 Braking • To slow down, simply release the throttle. • To brake, do not pull the brake lever abruptly. • The brake lever activates the rear disk brake and initiates proportional hub motor braking. • Gradually apply increasing pressure to the brake lever. WARNING Braking efficiency reduced due to wet or slippery conditions. -
Page 15: Display Console
4.2 Display Console The display console, located on the handlebars, displays the status of the scooter, providing the rider with the following information. 1. Light Status (On/Off) 2. Speedometer / Speed Mode 3. Battery Level 4. Pedestrian Mode activated. 4.3 Lights - Operation: Press and release the Power Button swiftly once;... -
Page 16: Battery Charging
Do not short-circuit the charger pins using a metal object. • Disconnect the charger from the mains power source before connecting and disconnecting from the Busbi Wasp e-scooter. • The external flexible cable of this product cannot be replaced; If the cord is... -
Page 17: Charging Procedure
Allow the battery to cool for 30 minutes after riding your Busbi Wasp. • If your Busbi Wasp stops working due to overheating, place it in a cool, dry place and wait for the battery and hub motor to cool before using it again. -
Page 18: Battery Service Life
NOTE Do not use the Busbi Wasp when the battery is low or the system requires a safe shutdown. Battery service life will be shortened if you continue to use the Busbi Wasp while the battery voltage is low. -
Page 19: General Maintenance
Repeat this procedure on the opposite side. 6.2. Brake Adjustment and Maintenance: Wear and tear of the braking system is normal after frequent use of the Busbi Wasp. Some adjustment of the braking system will be required to maintain effective braking. -
Page 20: Brake Discs
Do not wash your Busbi Wasp with alcohol, petroleum, acetone, or other corrosive solvents. These substances may damage the appearance and internal structure of your Busbi Wasp. Do not wash your Busbi Wasp with a power washer or hose. WARNING Ensure your Busbi Wasp is powered OFF and the charging cable is unplugged before cleaning;... -
Page 21: Further Guidance For Safe Use
Do not modify your Busbi Wasp, this will invalidate any warranty and may reduce performance, cause damage and potentially cause serious injury. • Do not fit accessories or additional items to Busbi Wasp that are not approved by the manufacturer. •... -
Page 22: Weight Limits
• Exceeding the maximum weight or not meeting the minimum load weight of 20kg may cause the user to fall or be injured and may damage the Busbi Wasp. • Failure to comply with the recommendations may result in the Busbi Wasp losing its ability to safely decelerate or stop while going downhill. -
Page 23: Safety Features
The bell is a safety feature of your e-scooter allowing you to alert others of your presence, it must be installed on your handlebars. Cable Lock. For security and to prevent unauthorised use of your Busbi Wasp, a handy cable lock is included for your convenience. NOTE Theft or use by unauthorised person. -
Page 24: Busbi - Reducing Waste
10. Busbi - Reducing Waste: Here at Busbi we do everything we can to use little or no plastic in the packaging of our products. The packaging that your Busbi Wasp has been protected by, and delivered in, has been designed to be minimalistic and plastic free. In addition, there are no coloured inks or varnishes used on the cardboard packaging, allowing ease of recycling. -
Page 25: Annex A
Annex A Before each and every use, carry out the inspection schedule described below: Table 1 - Inspection Schedule Check and confirm all screws and fasteners are tightened All parts. correctly. • Ensure folding system is free from debris and obstructions. •... - Page 26 Table 2 – Wasp Specifications Battery 36 V 7.8AH Hub Motor 300W Average 350W Maximum. Range Up to 28 km Charging Charge port Splash Resistant IP X4 (Can withstand splashing of water) Lights Front LED, automatic rear LED Braking Electronic and Hand Operated Disc.
- Page 27 Table 5 - Battery specifications Type Lithium-ion Nominal Voltage Capacity 7.8 Ah Number of cycles (≥70% capacity) 500 cycles Maximum input 42V DC 2 Amp...
- Page 28 A copy of the Technical File for this equipment is available from the address above. DESCRIPTION OF EQUIPMENT: Model: TT-EL-H1858 Marketed as: Busbi Wasp. Designated as a Personal Light Electric Vehicle. (PLEV) Class 2. An adult electric kick scooter, designed for recreational use. Serial Number: BW/858/XX/202X/XXXX EAN: 5051868188497...
- Page 29 Rating Plate: found on the underside of the foot deck of your Busbi Wasp: Brand: Busbi BW/858/03/2022/XXXX Designation: PLEV (Class 2) EN 17128 Model: Wasp (TT-EL-858) WARNING: DOM: March 2022 Read the instruction manual and all warning labels Max Speed: 15.5mph (25km/h)
- Page 30 For more guidance and support including videos to help you get started, please visit: busbistore.com/scooters/ or, simply open the camera app on your mobile phone, and point the camera at the QR code below: WASP...
Need help?
Do you have a question about the WASP and is the answer not in the manual?
Questions and answers
Busby wasp tyre size