Table of Contents
Advertisement
Quick Links
Advertisement
Table of Contents

Related Manuals for Rose electronics RA180


Summary of Contents for Rose electronics RA180
- Page 1 IntegratedAmplifierRA180 - WithGalliumNitrideAmplifierbuiltin - 1 -...
- Page 2 - 2 - - 3 -...
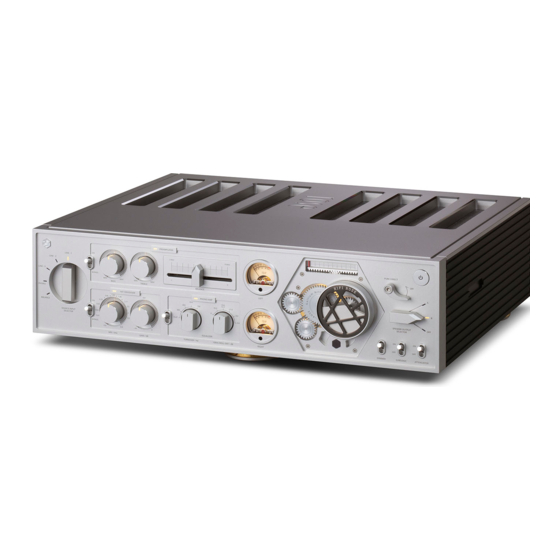
- Page 3 HiFi ROSE Products HiFi ROSE Products Integrated Amplifier - With Gallium Nitride Amplifier built in RA180 Complete HiFi Network Streamer RS250 ▪ClassADAmplifierwithnextgenerationGaNFET ▪ReferenceGradeAll-in-OneNetworkStreamer ▪MultiOutputComponent ▪NetworkStreamer+DAC ▪DesignedtoplayuptotheSuperTwitterRealm ▪High-ResolutionMusicPlaybackavailable(DSD512,PCM32bit/768kHz) ▪BalancedPowerSupply ▪AFemtoClockprovidesUltraPrecision ▪PHONOAmplifierwithVariableEQ ▪TheSpecialLinearPowerSupplyConfigurationminimizeselectricalnoise Design430*350*110mm/16.7kg/HighPurityAluminum/Color:Silver Connectivity Bluetooth,DLNA,Airplay,SpotifyConnect,RoonReady Design278*202*76mm/3.2kg/8.8”Wideviewingangletouchscreen/Color:Silver Analog In Line1, Line2, Line3(Bypass), Balanced, Phono(MM/MC)
- Page 4 HiFi ROSE Products HiFi ROSE OSSystem Innovative ROSE OS System HiFi Media Player RS301 ▪High-endAll-in-OneSpeaker ▪NetworkStreamer+DAC+AMP+SPEAKER Hi-Res Audio Spotify Connect Roon Ready ▪3-Wayfull-rangespeakerconfiguration ▪High-ResolutionMusicPlaybackavailable(DSD256,PCM32bit/384kHz) HiFiROSEdevicesarecertified SpotifyConnectallowsyoutoplay ROSEOSisfullycompatiblewithRoon ▪Powerfulsoundplaybackwithdualpassivewooferenginedesign(Patentedtechnology) witha‘High-ResolutionAudio’ andwirelesslycontrolSpotifymusic Core,withRoonReadycertificationin ▪Awardedtheworld’sthreemajordesignawards(Reddot,PIN-UP,iF) licensefromtheJAS(Japan onyourROSEOSoveranetwork.With compliancewithallrequirementsofRoon AudioSociety). theSpotifyConnectfunction,you Labs.YoucanenjoyHiFisoundquality Connectivity Ethernet,Wi-Fi,Bluetooth,DLNA,Airplay canenjoyavarietyofmusicwithHiFi...
- Page 5 Control Playlist YoucanfreelyandconvenientlycontrolvariousHiFiROSE Youcancreateyourownplaylist.MakeaplaylistonMusicandROSE functionswirelessly. TubeandcheckitoutatHome-MyMusic. Control Youcancontrolavarietyoffunctionsremotelyincluding OWNER’S MANUAL Music,ROSETube,TIDAL,Qobuz,Bugs,Radio,Podcasts, Share with Friends andCDRipping. Remote ROSEConnectincludestheremotecontrolfunction. Youcanshareyourplaylistswithyourfriendsorlistentomusic Search Youcanconvenientlysearchforavarietyofmusicinthe recommendedbythem.Communicatewithyourfriendsthrough MediaLibrary. music. RA180 Product Owner’s Manual Streaming Media Library Youcansimplyandeasilyplaymusicstoredonyourphoneonyour Scanthemusicinyourlocalmemorytoorganizeitintovarious ROSEdevice.Enjoyalossless,high-qualitystreamingservice. categories. - 8 - - 9 -...
-
Page 6: Table Of Contents
Table of Contents Safety Precautions 4. Mobile Wi-Fi Settings 4-1. Main Home Screen 1. Warnings 4-2. How to Register a Device 2. Precautions 4-3. Device Search 5. Bypass·Power Amplifier Mode Components List 5-1. How to Use Bypass·Power Amplifier Mode Location / Function of Buttons and Ports Product Specifications 1. -
Page 7: Safety Precautions
Safety Precautions • To completely disconnect the product from the AC main power source, unplug the power supply cord from the AC outlet. • Do not use the product near water. Do not expose the product to a dripping or splashing environment and do not place objects containing liquids, such as vases, on the device. -
Page 8: Components List
Components List Location / Function of Buttons and Ports 1. Front Side of the Product Main Device ❹ ❷ ❸ Power Volume Speaker Bypass·Power Button/ ❶ Level Amplifier Status Tone Control Function(Preamplifier) Source Level Meter Indicator Selector Mode Switch Display LED Remote Control (including battery) Power Cable... - Page 9 • TREBLE: Controls the frequency characteristics of the high frequency range. When the knob is set to the center position, a flat frequency characteristic is obtained. Turning it clockwise enhances the high-frequency range, and turning it counterclockwise This unit is equipped with a phono amplifier compatible with MM/MC cartridges, enabling high-level analog record playback by attenuates the high-frequency range.
-
Page 10: Rear Side Of The Product
Turntable Grounding When connecting the turntable, connect the ground line to reduce noise. 2. Rear Side of the Product Balanced Input This is a port that receives a balanced input (XLR) from an external source device, and the input sensitivity is 2 Vrms. BTL Mode Speaker By combining four mono amplifiers into two amplifier blocks, a 400 W (8 Ω) output per channel is possible. -
Page 11: Remote Control
3. Remote Control Memo Power Button Used to power the set on or off. ❶ ❷ Mute Button Used to mute music. ❸ ❹ LINE 1 Move to the Line 1 input source position. ❺ ❻ LINE 2 Move to the Line 2 input source position. ❼... -
Page 12: Product Installation
1. Product Design Method and Recommended Installation Location • This product includes a removable power cord. Please connect the power cord after connecting all the audio cables. RA180 • This product is designed to be used on a table or shelf. -
Page 13: How To Properly Connect The Rear Ports And Cables
3-1. Connecting the Analog Input Port to the Power Amplifier RA180 • As shown in the figure below, you can connect the analog output port of the source device to the analog audio input (Balanced/Line 1 - 3) of this product. -
Page 14: Connecting The Phono Mm Compatible Input Port To An Audio Device
• You can connect the analog output of the turntable to the phono analog audio input (PHONO IN) of this unit, as shown in the following figure. • When using the phono audio input as the source, you need to switch the input source to “PHONO” in the input settings. Input settings can be RA180 changed by remote control or manually. -
Page 15: Connecting The Phono Mc Compatible Input Port To An Audio Device
• When using the phono audio input as the source, you need to switch the input source to “PHONO” in the input settings. Input settings can be changed by remote control or manually. RA180 • When using a phono product in MC mode, you need to change the rear phono mode switch ( ) to MC. -
Page 16: Subwoofer Output
• If you want to output to speaker A, set the speaker output selector switch on the front to A. • If you want to output to speaker B, set the speaker output selector switch on the front to B. RA180 FRONT... - Page 17 A or B speaker, you can change the speaker output selection switch on the front and listen to it with the desired speaker.) • Speakers A and B are not output at the same time. RA180 Super Tweeter-B Right...
-
Page 18: Connecting The Speaker A/B Output When The Btl Mode Switch Is Set To Bi-Amp A / Btl B
(For speaker configuration, two full range speakers (400 W or higher) are required. If you set the speaker output selection switch on the front to B, you can output the speaker in BTL Mode.) • Speakers A and B are not output at the same time. RA180 Speaker-B BTL Right Speaker-B BTL Left... -
Page 19: Connecting The Speaker A/B Output When Btl Mode Switch Is Set To Btl A / Btl B
(For speaker configuration, two full-range speakers (400 W or higher) are required. When you want to output to A or B speaker, you can change the speaker output selection switch on the front and listen with the desired speaker.) • Speakers A and B are not output at the same time. RA180 Speaker-B BTL Right Speaker-B BTL Left... -
Page 20: How To Connect Connectors And Cables
4. Mobile Wi-Fi Settings 3-9. How to Connect Connectors and Cables 3-9-1. Trigger Input Terminal and Pinout 4-1. Main Home Screen • The trigger function can control the power by linking the product and the source device. • This is the screen that appears when you run AMP Connect for the first time. You can connect the amplifier to the network by selecting A. You can also select B to search for amplifiers with network connections. -
Page 21: How To Register A Device
4-2. How to Register a Device 4-2-1. 4-2-2. 4-2-3. 4-2-4. 4-2-5. 4-2-6. This is the first screen to register the This is the screen to check the network Check that the device and the amplifier are This screen lists the amplifiers connected to the If you press and release the power button of the amplifier to Next is the screen to connect the network of the network of the amplifier. -
Page 22: Device Search
4-3. Device Search 4-3-1. 4-3-2. Device Connection Screen and Function Description 4-3-3. Amplifier Settings 4-3-4. Detailed Firmware Version Information This is the screen for connecting by directly If you select FW Details, the firmware inputting the IP address of the amplifier details of the amplifier are displayed. - Page 23 4-3-5. Detailed IP Information 4-3-6. Wi-Fi ON/OFF Mode Setting 4-3-7. Auto Power Off (APO) Settings 4-3-8. Input Source Selection Function Setting 4-3-9. Amplifier Status Display If you select IP Details, the IP details of the This shows the current Wi-Fi activation mode. You can set the mode. You can set on/off and time for automatic You can change the output source of the This shows the current status values of the...
-
Page 24: Bypass·power Amplifier Mode
5. Bypass·Power Amplifier Mode 5-1. How to Use Bypass·Power Amplifier Mode • To use the power amp mode by turning on Bypass·Power Amplifier Mode, activate the function in the following order. When the Bypass·Power Amplifier Mode switch on the front is turned on, the input source of Line 3 is connected to the power amplifier without ※... -
Page 25: Product Specifications
Product Specifications 1. Specifications 1W x 2ch X-Over * Maximum output per stereo channel HPF(-3dB) 600Hz ~ 6kHz with On/Off Switch (H/F Speaker Output) Item Condition Specifications Measurement Standard Flat 4Ω 200W x 4ch (800W) 300Hz (+7.7dB@100Hz) 200W x 4ch (800W) Amplifier Output 8Ω... -
Page 26: Appendix
Appendix RMS Level 1. Bass Control Function of the Preamplifier • If you turn on the tone control on the front of the product and turn the bass knob to the left or right, the bass range is increased or attenuated (in 100 ㎐... -
Page 27: Treble Control Function Of The Preamplifier
2. Treble Control Function of the Preamplifier RMS Level • If you turn on the tone control on the front of the product and turn the treble knob to the left or right, the treble range is increased or attenuated (in 10 ㎑... -
Page 28: Hpf Control Function Of The H/F Crossover
3. HPF Control Function of the H/F Crossover RMS Level • When using the bi-amping function, the frequency range sent to the treble area is changed so that the treble can be reproduced more faithfully. • Speakers with a two-way or more structure have built-in networks inside. If you set the frequency range below the built-in network crossover value, the network does not send low-range frequencies, so the speaker reproduces treble notes more faithfully. -
Page 29: Gain Control Function Of The H/F Crossover
4. Gain Control Function of the H/F Crossover RMS Level • This function can attenuate signals in the input treble area when using the bi-amping function by up to -42 ㏈u. H/F CROSSOVER - HPF H/F CROSSOVER - GAIN 50 60 80 100 400 500 600 800 1k... -
Page 30: Subsonic On/Off Function
5. Subsonic ON/OFF Function 6. Phono Equalizer Curve • When the front subsonic switch is turned on or off, the subsonic is cut based on 50 ㎐. • In the case of phono records, since each record label has a different recording method for tape recorders, the low and high frequency characteristics for each record are different, so you need to set the frequency phono equalizer curve value according to the record. -
Page 31: Warranty
• Name of the Company that Received the Conformity Assessment: CI TECH Co., Ltd. • Manufacturer/Country of Manufacture: CI TECH Co., Ltd. / Republic of Korea • Identification Code of the Certified Company: SYH • Certification No.: R-R-SYH-RA180 * HiFi ROSE is a registered trademark. - 60 -... - Page 32 Memo Memo - 62 - - 63 -...
- Page 33 Memo - 64 -...
Need help?
Do you have a question about the RA180 and is the answer not in the manual?
Questions and answers