
Related Manuals for CashDro CD3

Summary of Contents for CashDro CD3
- Page 1 Code: ENCD3MIU501 CD3 – Installation and User Manual Version: Date: 5.01 2021/10/07 Installation and User Manual...
- Page 2 Copyright This publication, including all photographs, pictures and software is protected by international copyright laws, with all rights reserved. No part of this manual or materials contained in this document can be reproduced without the written consent of the author. Clarification The information in this document is restrained to changes without notice Registered trade mark...
- Page 3 Date: 5.01 2021/10/07 Change tracking Version Changes 4.01 - Includes the connection with CashDro Controller. This new functionality affects to following chapters of the manual: • Chapter 2. Initial installation wizard • Chapters 4.1 and 11.1. Users management • Chapter 3.2. Manual update •...
-
Page 4: Table Of Contents
7.3 Day closing at the end of the working day..........21 8. Sale Process......................22 8.1 Directly in CashDro3 (stand-alone mode)..........22 8.2 Point of sale software integrated through web service......23 9. CashDro Menu....................24 9.1 Menu options according to user type............24 10. Operations.......................25 10.1 Deposit Calculation................25 10.2 Charge....................26... - Page 5 10.7 Income....................29 10.8 Income by amount.................30 10.9 Payment....................30 10.10 Transfer to cassette................30 10.11 Withdraw bills cassette................31 10.12 Withdraw coins cassette..............31 10.13 POS Closing..................32 10.14 Initialize levels..................34 11. Consults......................35 11.1 Cash breakdown..................35 11.2 Movements summary................36 11.3 Movements list..................36 11.4 Not available change................38 11.5 Diagnostics....................38 11.5.1 Operations in progress..............40 11.5.2 Reset machine................40...
- Page 6 12.7.4 Configure remote support.............60 12.7.5 Configure time zone..............60 12.7.6 Factory restore................60 12.7.7 Restore network configuration (SSD moved to another PC)..61 12.7.8 Date/Time..................61 12.7.9 Update CashDro................61 13. Centralization....................62 14. Internal view and Devices................63 14.1 Coins validator..................63 14.2 Coins dispenser..................64 14.3 Coins Cassette / Stacker...............64 14.4 Bill device....................65...
-
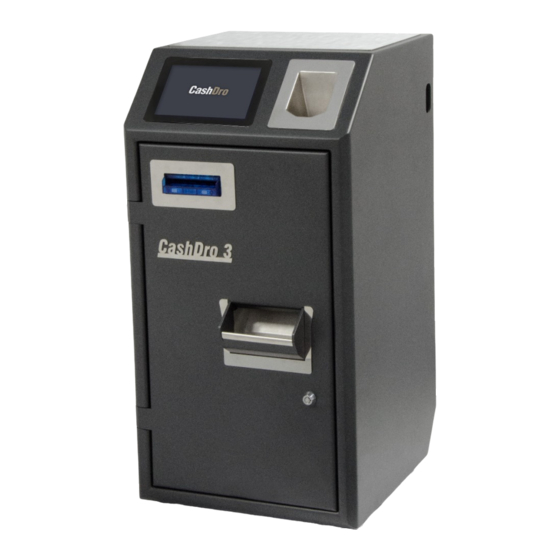
Page 7: External View
1. External view Front view Turn on and turn off switch Hopper for fast coins accepting and loading 7'' LCD Touchscreen Insertion, validation and bills dispensation Coins dispensing Security lock External view | 1... -
Page 8: Manual Structure
◦ 6. Start up ◦ 7. Daily Cash Management ◦ 8 . Sale Proces s • The full list of CashDro functionalities lists and details the menu options and covers the chapters: ◦ 9 . CashDro Menu . ◦ 10. Opera tions . -
Page 9: Initial Device Registering
3. Initial Device Registering CashDro3 has two external cables: • Power supply cable • Ethernet cable Verify that both cables are connected to the power supply and to the internet network respectively. CashDro3 must have internet connection in order to carry out following functions: •... - Page 10 When these steps are performed, CashDro3 makes necessary adjustments, tests that all the devices are functioning correctly and shows this screen. After pressing “Continue” on the following screen it will be required the password for the user “support”, who manages the technical support, configuration of the device and the management of the technical users.
- Page 11 It is recommended that this password is entered by the technical personnel who manages these functions. On the next screen the Administrator’s password will be asked (user: “admin”). This user will be used by the client and has the function of managing the device non-technical users. Therefore: •...
- Page 12 Enter the verification code received by email. After the verification code is introduced, CashDro3 will initialize the devices and internal CPU and the following screen will appear in touchscreen indicating the end of the CashDro configuration. CashDro3 is ready to work. When pressing “Finalize” the service will restart and CashDro will request the authorized technical service credentials.
- Page 13 Once validated the credentials, the selection of users screen will appear. To access to technical users, press on the top-right corner icon. Pressing again in the same icon, the system comes back to the first screen of non-technical users. To access the menu select a user and enter his password. Initial Device Registering | 7...
- Page 14 CashDro3 comes by default with three general users (non-technical users) and one technical user. • General Users: ◦ User “admin”: the password of this user is the one indicated during the initial assistant explained before. By default it has access to all the operations, except the device configuration.
-
Page 15: Software Update
4. Software update Every time we turn on CashDro3, it checks if a software update is available and if so, the update process is activated. There are two update modes: manual or automatic. The update mode is defined by the manufacturer, according to the estimated update time. When it is anticipated that the update time will be long, the update is defined in manual mode, for the user execute it when he wants to. - Page 16 To run the update access to section “Configuration” of the main menu and then press “Actions”. Once inside press the option “Update CashDro”. Note: This option is only shown when there is an enabled update. When you press on this option the following screen is displayed to enter the Official ATS credentials.
- Page 17 Finally, press the button “Update CashDro” to run the update process. During the process is displayed the following screen where is shown in all moment the updating progress. During downloading process, appears in the upper right corner of the screen an icon to access to Emergency system, who allows reset machine and reset service in case of the uploading has been stopped.
-
Page 18: Device Customization
If we want to modify this set up, we must go to the menu section “Configuration- Currencies”, detailed in section 12.5 Currencies Important: In order to recycle bills of another denomination the corresponding pieces of the recycler must be changed. Consult manual CD3 – Manual Bills recycler denominations changing. Device Customization | 12... -
Page 19: Screen Orientation
5.4 Screen orientation We must define if the device will face the client or the seller. In order to configure this parameter access the section from “Configuration-General Parameters”. In case the device is configured to face the client, we can define also if we want allow Cancel o Finalize an operation from 7”... -
Page 20: Start Up
6. Start Up Before starting to work with CashDro3 it is essential to carry out three final tasks. 6.1 Defining deposit Before staring to work with CashDro3 it's necessary to define a deposit level (also known as cash-float or initial change). For this, go to the menu section Operations-Deposit Calculation and configure the Deposit of your choice manually. -
Page 21: Change Payment Settings
In the column “Missing” the number of bills or coins needed to reach the defined Deposit level is shown. We can print a missing detail pressing the “Print missing” button on top of the screen. This list includes a QR code with the missing details that can be used for facilitate the integration with a POS. -
Page 22: Maximum Number Of Pieces To Return
6.3.3 Maximum number of pieces to return We can define by each bills and coins denomination the following parameters: • Maximum number of pieces to return on changes and payments. • Maximum number of pieces to return when cancel an operation. This parameter only acts in collection of sales. -
Page 23: Rounding In Amounts
If the number of pieces to return of a denomination is higher than the configured, CashDro3 dispenses using the inferior denomination. If the existing configuration does not allow to dispense the exact amount, CashDro3 acts as follows, depending of have or not activated the canceling and change controls: •... -
Page 24: Use Of 0,01 € Coins (Only Euro)
In case we are working with rounding due to lack of coins, we have to define how we want to apply the rounding in changes and payments: We can define one of the three options following: • Always pay the original amount •... -
Page 25: Daily Cash Management
7. Daily Cash Management In order to have the correct cash management, we just need to follow the instructions from levels warnings during the working day and in the end of the working day to do the POS Closing and leave CashDro3 at the Deposit level for the next day. 7.1 Levels management during the working day During the working day CashDro3 will inform you about the need to load or withdraw cash through the warnings bars at top of the touch screen integrated to the device. - Page 26 • Bill recycler Action when Situation Alert message displayed press on the alert bar Some recyclable Coins/Bills level under minimum. Please touch on denomination less than the Levels adjustment this bar to adjust levels minimum established level Some recyclable bill Bills level unbalanced.
-
Page 27: Levels Adjustment
7.2 Levels adjustment The levels adjustment does sequentially the following operations: 1. If level in the coins cassette >= 900, withdraw coins cassette 2. If level in the bills cassette >= 700, withdraw bills cassette 3. Transfer to cassette of coins and bills until deposit level 4. -
Page 28: Sale Process
8. Sale Process CashDro3 can collect money from sales: 8.1 Directly in CashDro3 (stand-alone mode) CashDro3 can realize charges without being linked to any selling software. In order to make a sale, access the section “Operations-Sale” Introduce the amount of sale and the following screen will appear, the user will be guided during the payment process and during the change giving process. -
Page 29: Point Of Sale Software Integrated Through Web Service
As soon as the amount entered in CashDro3 exceeds or equals the sale amount, the team will automatically complete the operation and pay the change if applicable. 8.2 Point of sale software integrated through web service It is possible to use the CashDro3 collection screen in an integration process with a POS. This integration must be done through the use of webservices and the integrator will be able to load on the POS screen the same payment screen shown on the CashDro3 touch screen. -
Page 30: Cashdro Menu
Non-technical users will access a menu of options directed towards the execution and consultation of operations and will have restricted access to some configuration options. All the options on these menus are detailed in the following chapters. CashDro Menu | 24... -
Page 31: Operations
10. Operations The "Operations" menu option provides access to 14 different operations: Depending on the permissions assigned to a user, they may see all or only some of the available operations. By default the user "admin" has access to all operations. 10.1 Deposit Calculation In this section you can modify the deposit levels. -
Page 32: Charge
• Any denomination of bills with deposit above the recycler capacity. • In manual mode, any deposit level not between minimum and maximum. If maximum and minimum calculation is configured in manual mode, in this screen we can also define maximum and minimum levels. CashDro3 can calculate the real need of deposit according the own historic of movements pressing “Calculate deposit”... -
Page 33: Withdraw
We can print a missing detail pressing the “Print missing” button on top of the screen. This list includes a QR code with details of the missing items, which can be used to facilitate integration with a POS. 10.3 Withdraw This operation is used to withdraw partially or totally the coins and / or bills from the system. -
Page 34: Change
10.5 Change It is used to change bills to coins or to change coins or small denomination bills to bills of bigger denominations using the optimal change condition (the smallest amount of units possible). This option can also be used in order to restore the number of the bills that are below minimum or to replace excessive denominations without changing the total value of the money inside CashDro3. -
Page 35: Sale
Once the values to withdraw are defined, push the button “Accept” for CashDro3 to dispense change. 10.6 Sale Sale operation without need to be linked with a sales software. To be displayed this option in the menu, configure function mode Stand-alone. With this mode, every time that a sale is finished CashDro3 remains in menu, without exit to Login screen while the user does not want. -
Page 36: Income By Amount
10.8 Income by amount It is used to collect money with CashDro3 for operations that are not related with sales that made in POS. This option first lets to indicate the amount to collect by CashDro3. If the inserted amount exceeds the indicated amount, CashDro3 gives necessary change. If amount of cash inserted is smaller than indicated amount, it is possible to finalize the operation with the amount that was really inserted. -
Page 37: Withdraw Bills Cassette
10.11 Withdraw bills cassette When access to this operation, we can to withdraw the cassette or click on “Cancel” button if we want to make it in another moment. Once the cassette is removed, CashDro3 displays a message reminding we have to reintroduce the cassette. -
Page 38: Pos Closing
Note: the stacker withdrawal operations puts the counting to 0 and it is assumed that all the coins deposited inside the stacker were taken out manually. 10.13 POS Closing This operation allows to make the closing at the end of the day or shift removing the collection obtained and leaving the deposit level to next day or shift: This option makes sequentially the following operations: 1. - Page 39 3. Withdraw coins cassette. After withdraw bills cassette is activated the withdraw coins cassette. We can press “Accept” and do it or “Cancel” if we want to realize the withdraw in other moment. Note: the stacker withdrawal operation puts the counting to 0 and it is assumed that all the bills/coins deposited inside the stacker were taken out manually.
-
Page 40: Initialize Levels
• Missing levels detail 10.14 Initialize levels This operation empty the levels of coin dispenser and / or bill device. It is usually used to restore the levels of CashDro if the pieces have had extracted manually. Operations | 34... -
Page 41: Consults
11. Consults This menu section contains the options to make consults. Technical users only have access to the consults "Movements list", "Not available change", "Diagnostic" and "Simulate deposit". 11.1 Cash breakdown In this informational screen you can find the information about the cash levels that exist at the moment in CashDro3. -
Page 42: Movements Summary
This consult is very useful in order to reconcile the information of point of sale cash closing with the information of CashDro3, especially in installations where the money is collected in different POS terminals and/or by different CashDro and there is a need to match information from both. - Page 43 dispensed amount, the income (difference between introduced and dispensed amount) and the user that made the operation. By using the button “Filter” we can select the operations to be shown. We can filter by operation type (in multi-selection), by user, by terminal, and by seller. The button “Print”...
-
Page 44: Not Available Change
In this part we can see the synoptic schema that informs us about the device status. If the device doesn't have any problem, the scheme will look as it is shown below: This this screen we can see the version of CashDro software, device serial number and the IP address. - Page 45 If some incident exists, the scheme will indicate us in which part of the device the problem was detected. See the example below: If we push on “x” near coins dispenser, a description of the technical issue will appear: Consults | 39...
-
Page 46: Operations In Progress
When in the message appears the sign of information “i”, the screen with the steps how to solve the incident will appear after pushing on this “i”. These instructions always will consist of steps that the user can make without the help of a certified technician. -
Page 47: Disconnect Support
11.6 Deposit status This consult allows to visualize the configured deposit levels and the missing levels without leaving CashDro disabled for sales collecting. We also can pint a missing list clicking on ‘Print’ button on top of screen. Consults | 41... -
Page 48: Simulate Deposit
11.7 Simulate Deposit This consult allows to simulate a deposit configuration without applying any modification to the software. Its use is destined to test the configuration without applying changes on the system by a technician. Consults | 42... -
Page 49: Configuration Menu
12. Configuration menu Although some of them have already been seen in previous chapters of this manual, all sections of the configuration menu are detailed bellow. Access to the "Configuration" menu by non-technical users implies entering a password: Note: This access password is for the exclusive use of the installer and should not be provided to the end customer. - Page 50 The technical user (user: “support”) can only view, create, modify and delete technical users. In order to delete a user, push the recycle bin icon in the user list screen. The administrator (user “admin”) and the technical user (“support”) can not be eliminated. In order to create new users push on “+ New user”.
-
Page 51: Company Data
Once the company data has been entered, it is possible to obtain and save the geographical coordinates corresponding to that address. Saving this information will allow showing the CashDro in Controller through a graphic map. By clicking on the button "Geographical coordinates", the equipment will try to obtain the coordinates of the address, or failing that, a list of addresses that are as close to the address entered. -
Page 52: Printing
“Empty” button. At the top of this section, the "print bar code" option is also available. When selected, all CashDro proofs will incorporate a barcode with the CashDro serial number in code 128 format. Configuration menu | 46... -
Page 53: Receipts Configuration
12.3.2 Receipts configuration We can configure which proofs we want CashDro3 prints and which information we want be shown in them. By each proof type we can configure the following parameters: • Print: If We want this proof type be printed by CashDro3. •... - Page 54 “CD3-Recycler denomination change manual” in private area of website www.cashdro.com In this screen we can visualize the columns “Minimum level”, “Deposit” and “Maximum level”. These columns are only for visualize and they are not editable. For modify these values we have to access to section of menu Operations-Deposit calculation. If we are working in automatic mode for maximum and minimum calculation, the maximum and minim levels are never editable because they are calculated automatically by CashDro3.
-
Page 55: Bills Accepted Cassette
If the number of pieces to return of a denomination is higher than the configured, CashDro3 dispenses using the inferior denomination. If the existing configuration does not allow to dispense the exact amount, CashDro3 acts as follows, depending of have or not activated the canceling and change controls: •... -
Page 56: Coins Accepted
12.5.3 Coins accepted All coins are always recycled, so it is not necessary to define the denominations to recycle. We can define if the client wants that any denomination is not accepted by CashDro3. For it simply uncheck the parameter “Accept”. In this section we can visualize the columns “Minimum level”, “Deposit”... - Page 57 By default, CashDro3 has configured these values to 10. If the number of pieces to return of a denomination is higher than the configured, CashDro3 dispenses using the inferior denomination. If the existing configuration does not allow to dispense the exact amount, CashDro3 acts as follows, depending of have or not activated the canceling and change controls: •...
-
Page 58: General Parameters
You can identify the equipment with a name. This field is important in cases where the user can send sales to different CashDro from the same POS or mobile solution. By default CashDro3 fill this field with the serial number of the equipment. -
Page 59: Screen Orientation
12.6.1.2 Screen orientation We can configure if CashDro3 is oriented to client or to seller. Depending of the option chosen, we can define also if we want that options “Cancel” and “Finalize” are visible at touch screen of CashDro3. The option “Cancel” returns all introduced amount until this moment. The option “Finalize”... -
Page 60: Function Mode
• “Show list of users”: Shows the screen of users created in order to choose one of them by pushing on it. The list is always ordered by names. By pushing on it a numeric keyboard appears in order to enter the Password. •... -
Page 61: Web Integration
The following two options, “Enable HTTP” and “Self-signed CashDro Certificate” (SSL certificate), are options specifically aimed at developers who integrate their software with CashDro. For more information on these options, consult the "CashDro Integration by Web Service". 12.6.1.6 Change not available If we mark this option the information about the not available payment appears in the screen and the user have to validate its visualization pressing “Accept”... -
Page 62: Sequential Payment
12.6.2.3 Sequential payment If we activate this option when CashDro3 returns change, in the sells operations, will give the coins first and then the bills. 12.6.2.4 Maximum and minimum calculation CashDro3 can work with two different ways of maximum and minimum calculation: •... -
Page 63: Rounding On Amounts
If is introduced a bill with destiny to cassette (unrecyclable denomination) and with this the introduced amount exceeds the available amount in recyclers (bills and coins) the bill is rejected to avoid the introduced amount can’t be returned in case of cancellation. If is introduced a recyclable bill or a coin, it always is accepted because its destiny is the recycler, therefore it always can be returned. -
Page 64: Use Of 0,01 € Coins (Only Euro)
• Pieces difference for rounding payments: ◦ Always pay the original amount (without rounding) ◦ Always pay the rounded amount ◦ Pay the rounded amount when the original number of pieces exceeds the number of pieces of rounded amount in ___ pieces. This third option is which is marked by default and with a value of 5. -
Page 65: Actions
12.7 Actions In this section are included different actions that can be performed by the user. 12.7.1 Configure network In this screen we can manually define the configuration of network. By default it comes configured with DHCP mode, so is to say, when connecting CashDro3 to a router or switch the IP is assigned automatically. -
Page 66: Configure Language
Allows to choose the language. For this you must click on the desired language. In the login screen you always can choose between three languages: the language configured, English and the language “CashDro” that shows the labels of each text and is used to make translations. -
Page 67: Restore Network Configuration (Ssd Moved To Another Pc)
12.7.8 Date/Time It allows to modify the date and time of the equipment. 12.7.9 Update CashDro This action allows to update CashDro3 when has been launched from factory an update in manual mode. This action is only displayed when there is an update available to be executed. -
Page 68: Centralization
Once the CashDro is centralized, all existing users will be replaced by the ones established in the CashDro Controller. Note: It is important to review the CashDro Controller manual to know all the aspects of this configuration. Centralization | 62... -
Page 69: Internal View And Devices
The common signs of lack of cleaning are blockages in the coins validator during the operation and excessive rejection of coins. The removal of the coins validator, as well the cleaning, must be carried out by the Certified Technician of CashDro. Internal view and Devices | 63... -
Page 70: Coins Dispenser
14.2 Coins dispenser The coins dispenser performs coins storage and dispensation functions. Frontal view 1. Coins entry 2. Coins exit 3. Leds of status 4. Security locker (optional) 5. Unblocking 14.3 Coins Cassette / Stacker The coin cassette is the final deposit of the coins where they are kept until they are withdrawn. -
Page 71: Bill Device
Includes two recyclers, each for one denomination, with the capacity until 100 bills in each recycler. Includes the security key for opening. Consult the manual CD3-Manual change of bills recycler denominations in order to change the denominations in any of the recyclers. -
Page 72: In Case Of Jam
14.4.4 In case of jam The actions for removing and opening the bill validator are indicated below in the event of a jam. Push down the latch located in the bottom Take out of CashDro3 Open the top by lifting the Take out the stuck bill Close the top and put the blue latch... -
Page 73: Maintenance
15. Maintenance 15.1 Maintenance of bill device The bills validator bases its functioning mainly in optic recognition of the bills and uses the mechanics for the transportation. The optical system is based on sensors, lenses and crystals that get dirty because of the dust and dirtiness accumulated on bills, as well as the dirtiness of the environment. -
Page 74: Maintenance Of Coins Validator
The common signs of lack of maintenance are validator blocks during the operation and excessive rejection of coins. The maintenance of this device must be done by the Certified CashDro Technician. Contact your usual supplier. 15.3 Maintenance of coins dispenser Before starting the maintenance of the coins dispenser it is necessary to empty the dispenser. - Page 75 Remove the dirtiness existing In order to remove the coins After carrying out of before in the dispenser. Remove the that are in the transporting mentioned steps, introduce rests of metal, dirtiness and belt and to verify that it the dispenser accumulated objects rotates correctly, start turning the disc manually counter-...
-
Page 76: Accessories And Consumables
16. Accessories and Consumables 16.1 Accessories CD-ELO-CD CD3-ELO-RS CD3-CB Block for removal of coins Block for removal of recyclers CashDro3 Base dispenser module and of stacker 16.2 Consumables CD-CLB CD3-STA1000 CD-CDEP Cleaning tapes for 1000 bills Stacker Coins cassette maintenance... -
Page 77: Declaration Of Approval
C. de la Tramuntana 25123 Torrefarrera Lleida (Spain) Declares that the product: Name of the product: CashDro3 Reference of model: CD3-150101 Comply with the following product specifications: Low Voltage Directive: 2006/95/EC EN 60950-1:2006 EN 60950-1:2006/A11:2009 EN 60950-1:2006/A1:2010 EN 60950-1:2006/A12:2011 (not apply) - Page 78 Code: ENCD3MIU501 CD3 – Installation and User Manual Version: Date: 5.01 2021/10/07 For more information about CashDro3, access the web page: www.cashdro.com...
Need help?
Do you have a question about the CD3 and is the answer not in the manual?
Questions and answers
A5 alarm on bill cassette what is the meaning? we clean it uo and replace the door(cashdro 5)