Advertisement
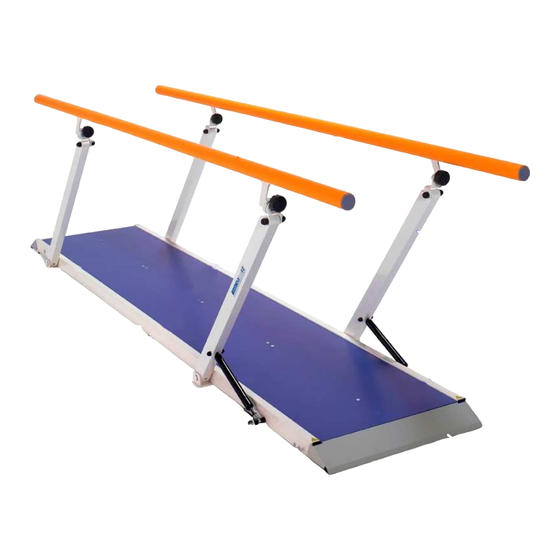
REMEDIAL PARALLEL BARS "PLUS"
Magnetic
STRIKES
Handrail
width
adjustment
KNOB
01380
Parallel Bar Glider
08586
Rolls and bags
REV. 001
USER AND MAINTENANCE MANUAL
Art. 01325
PARALLEL BARS PLUS 2M
Art. 01326
PARALLEL BARS PLUS 3M
PARALLEL BARS PLUS 3M TILT
Art. 01327
CHILDREN'S PARALLEL BARS PLUS 2M
Art. 01391
Handrail height
control
PEDAL
ACCESSORIES
01335 – Cart for Portable Paths
01379 – Set of Therapy Paths
08587
08589
Sensory Modules
Hemispheres
www.chiroform.com
HANDRAIL
01330
Obstacle -divider
08591
Concave - convex
UPRIGHT
PLATFORM
RAMP
08585
Sensory Bags
02510
Set of Bags
1/5
Advertisement
Table of Contents

Related Manuals for Chiroform StandGOSystem PARALLEL BARS PLUS 2M


Summary of Contents for Chiroform StandGOSystem PARALLEL BARS PLUS 2M
- Page 1 01335 – Cart for Portable Paths 01330 08585 Parallel Bar Glider 01379 – Set of Therapy Paths Obstacle -divider Sensory Bags 08586 08587 08589 08591 02510 Rolls and bags Sensory Modules Hemispheres Concave - convex Set of Bags www.chiroform.com REV. 001...
-
Page 2: General Information
4. Install the gas springs on the uprights from both sides: tighten the self-locking nut, leaving the spacers free to rotate (Fig. 2). 5. Place the platform in position for use. 6. Install the handrails with the hardware provided: tighten the self-locking nut thus allowing smooth height adjustment (Fig.3). Chiroform Ltd Mariendalsvej 22 8800 Viborg •... - Page 3 3. Tighten this knob and then screw back and tighten the other one. 4. The handrails, when tightened to the central hole, allow using the glider, code 01380 TIGHT KNOB LOOSE KNOB www.chiroform.com REV. 001...
-
Page 4: Maintenance And Cleaning
ACCESSORIES: 01380 – PARALLEL BAR GLIDER The 01380 parallel bar glider offers effective support in the rehabilitation of insecure patients or patients who need to limit load on the lower limbs. Mounting and adjustments: 1. Insert the handrail ends into the four safety stops and lock with the locking pin provided. 2. -
Page 5: Main Dimensions
The orders must be in writing and specify the customer, the item and the shipping method as well as the precise fiscal data of the customer. The order processing time can vary depending on the availability of the material. The return of spare parts will not be accepted. Payment shall be cash on delivery, unless other agreements are made. www.chiroform.com REV. 001...
Need help?
Do you have a question about the StandGOSystem PARALLEL BARS PLUS 2M and is the answer not in the manual?
Questions and answers